Sunday, December 27, 2009

Daring Bakers December - Gingerbread House

The December 2009 Daring Bakers’ challenge was brought to you by Anna of Very Small Anna and Y of Lemonpi. They chose to challenge Daring Bakers’ everywhere to bake and assemble a gingerbread house from scratch. They chose recipes from Good Housekeeping and from The Great Scandinavian Baking Book as the challenge recipes.

Wow, what a great challenge for December! I chose Y's recipe and it was an absolute breeze to put together. I will let my photos do most of the talking for this post :)

My house plan - found of recipelink.com Click above for all the details

In progress

My little helper guarding the pieces

Welcome to my home!

Step on down the tic tac path to be greeted by the gingerbread zombie

Do you like what I've done with the place? These chuppa chup shrubs are all the rage!

A little snow dusting the freckle covered roof and wonky chimney

Thanks for stopping by!

And thanks to Anna and Y for a fabulous festive challenge for December! You can find the recipes and instructions on each of their blogs.

I had a lot of fun doing this and it didn't take nearly as long as I thought it might. If you haven't made a gingerbread house before I challenge you to have a go!

Wednesday, December 23, 2009

Spiced Sugared Nuts

With all the Christmassey fare I've made over the years, I can't believe I've never made nuts. Until now, that is! I saw the recipe for these spiced sugared nuts in the December/January edition of Super Food Ideas magazine and knew they would be perfect as a gift.

They have a crisp, crackly coating of sugar and spices and the chilli adds just enough heat to cut through the sweetness. These nuts are definitely moreish!

Spiced Sugared Nuts

3/4 cup icing sugar
1 teaspoon ground cardamom
1 teaspoon ground cinnamon
1 teaspoon chilli powder
1/2 teaspoon salt
400g assorted, unsalted mixed nuts
1 eggwhite, lightly whisked

Preheat oven to 180 degrees C (350F). Combine the dry ingredients in a bowl. Place the nuts and eggwhite in a large bowl. Stir to combine. Add the spice mixture to the nut mixture and mix well.

Line a large baking tray with baking paper. Spread over the nut mixture in a single layer and bake for 10 minutes or until golden. Remove from oven and cool completely on the tray. Break up any large clusters. Serve immediately or wrap in a cellophane bag tied with ribbon for a lovely Christmas gift.

Makes 4 cups.

Tuesday, December 22, 2009

Tuesdays with Dorie: My Favourite Pecan Pie

I have to admit I wasn't that excited about making pecan pie this week. I've been in Christmas baking mode for weeks now and have been snacking on lots of goodies. Pecan pie is SO sweet that just the thought of it made me want to eat a truckload of veges.

BUT this pecan pie is a little bit different. First of all there is way less sugar/corn syrup than in some versions plus it has a few extras like chocolate and coffee powder. To boost the chocolate factor I decided to do a chocolate crust as well (using Dorie's Chocolate Shortbread Tart Dough from p 476 of Baking).

The taste test ...

Oooh boy, this is one hell of a pecan pie! While it's definitely rich it's not too sweet, with the coffee and chocolate notes providing the perfect balance. The chocolate crust was fantastic! It got a little browner than I planned (but not at all burnt even though it appears that way in the top photo). We served it with a big scoop of Cappucino Indulgence icecream. Yummmmmm.

Coming after one of the best Sunday dinners I think I've ever made (chargrilled Angus beef with avocado bearnaise sauce and mashed potato), it was a wonderful end to a great weekend!

Thanks to Beth of Someone's in the Kitchen with Brina for this week's pick! You can find the recipe on her blog under today's date.

Monday, December 21, 2009

Individual Rum Christmas Cakes

I have to confess, I am one of those people. Those people who actually like fruitcake! There is a lot of anti-fruitcake sentiment out there, particularly at this time of year, but around here we are in fruitcake heaven.

In addition to making the full size cakes I make every year, I decided to try a new recipe and make some smaller cakes to go in our gift hampers. These little beauties are rich and moist and fragrant. And oh yeah, they are also packed with rum!

Individual Rum* Christmas Cakes
Recipe source TBA

840g mixed dried fruit (apricots, cherries, figs, raisins, currants, cranberries, sultanas or whatever takes your fancy)
3/4 cup rum
250g unsalted butter, chopped
1 cup dark brown sugar
1/2 cup treacle
4 eggs
1 1/2 cups pecans, chopped
1 1/2 cups plain flour
1 1/2 cups self-raising flour
2 ts ground nutmeg
2 ts ground ginger
2 ts ground cinnamon
12 tbs rum, extra

Chop all the dried fruit into small pieces. Place in a large bowl with the rum and mix well. Cover and leave overnight (I left mine for a week), stirring occasionally.

Preheat the oven to slow (150 degrees C). Lightly grease 12 x 1 cup muffin holes and line the bases with a circle of baking paper.

Beat the butter, sugar and treacle in a large bowl until just combined. Add the eggs, one at a time, beating well after each addition. Stir in the soaked fruit mixture, pecans and then the sifted flours and spices and mix well.

Spoon the mixture evenly into the tins, smoothing the surface of each with wet fingers. Bake for 1 - 1 1/4 hours, or until a skewer inserted into the middle comes out clean. Cover the tops of the cakes with foil if over-browning. Once cooked and still hot, brush the tops the cakes with half the extra rum, cover with baking paper, then seal firmly with foil and cool completely in the tins.

Once cool, remove from the tins, brush with remaining rum and wrap firmly with cling film and leave for 2 weeks before decorating.

Decorating Options

1. Soft Icing - Roll out 100g of soft, ready made white icing the the size of each cake. Brush the cakes with warmed apricot jam, then lay the icing over the top and smooth down. Decorate with ribbon.

2. Royal Icing - Beat 1 egg white with a wooden spoon, gradually adding 2 cups of pure icing sugar, beating until smooth. Drizzle in 2-3 ts lemon juice until the icing becomes a little runny. Spread a tablespoon of the icing over each cake, allowing it to run down the sides a little. Top with holly and berries before the icing sets hard.

* The original recipe called for bourbon. We're not big bourbon drinkers in this house so we used good old Bundy Rum instead!

Tuesday, December 15, 2009

Daring Cooks December - Beef Wellington

Well this will be short and sweet because my Beef Wellington was an epic fail. I can't even show the photo I took because it looks like road kill. In spite of using our super-duper meat thermometer it was massively overcooked and dry as sawdust. Picture a shriveled piece of beef surrounded by brown stuff and pastry crumbs. We couldn't even eat it :(

I imagine if cooked well it would be absolutely sensational!

The official line: The 2009 Daring Cooks challenge was hosted by Simone of Junglefrog Cooking. Simone chose Salmon en Croute (or alternative recipes for Beef Wellington or Vegetable en Croute) from Good Food Online.

For some examples of how Beef Wellington or Salmon en Croute SHOULD be done, visit the other Daring Cooks here.

The Kitchen Reader Cookie Exchange - Rum Balls

Ok so I know these aren't technically cookies, but they are cookie-ish! Instead of a book review, this month Jennifer of Cooking for Comfort suggested a Christmas Cookie Exchange for the Kitchen Reader members. So while these aren't cookies they are definitely Christmassey and perfect for sharing.

I'm not sure where Rum Balls originate but there are as many different recipes as there are days in the year (I may be exaggerating slightly!). Basically if there is rum, chocolate and some sort of carb (either cake crumbs, biscuit crumbs or even weetbix) you have yourself a rum ball.

These make the perfect gift at Christmas time and are great to get the kids into as there is no baking involved. Perhaps just leave out the rum!! (cranberry juice would be a great alternative and you would end up with a choc-cranberry truffle).

Susan's Rum Balls

500g cake (a madeira or pound cake is perfect)
1/2 cup cocoa
1 cup dessicated coconut
1/2 dried cranberries
1 tin (approx 400g) condensed milk
2 tbs rum plus extra
1-2 cups dessicated coconut, extra

Roughly chop the cranberries and add to a small saucepan with the 2tbs rum and 1 tbs water. Bring to the boil then simmer until all the liquid is absorbed and the fruit is plump. Remove from the heat and allow to cool.

Tear the cake into rough chunks and add to the food processor with the cocoa. Blitz until the cake is in crumbs and the cocoa is evenly distributed.

Turn out the cake crumbs into a large bowl and add the coconut, cooled cranberries and the condensed milk. Mix thouroughly, adding extra rum if you find you need more liquid (an extra tablespoon or so will be plenty).

Roll into walnut sized balls, roll in the extra dessicated coconut then set on a tray. Refrigerate until required. These are best to make the day before you need them to allow the flavours to meld. Makes approx 30.

Tuesdays with Dorie: Cafe Volcano Cookies

A really interesting pick this week for TWD. MacDuff of The Lonely Sidecar chose Dorie's Cafe Volcano Cookies and without a photo, I had no idea what I was actually making! I had to laugh though when I read the storing instructions, essentially 'Humidity will make these go soggy.' Living in Brisbane in December, high humidity is pretty much a given!

So what are volcano cookies? Very similar to a coconut macaroon but with nuts instead of coconut, these cookies aren't exactly photogenic. Probably why there's no picture in the book! I used cocoa instead of espresso powder so my cookies are a rich chocolately colour.

I made a half batch and kept a close eye on them while baking. Just 16 minutes and they were done.

The taste test ...

Totally unexpected but absolutely delicious! I ate 3 before I could stop myself! Very light, the meringue disolves on your tongue leaving crisp toasty nuts and a hint of chocolate. I knew these would be really sweet so I'm glad I added just a pinch of salt. These were a real winner.

Thanks for a great pick, MacDuff! You can find the recipe at The Lonely Sidecar under today's date.

Wednesday, December 9, 2009

White Chocolate Gingerbread

I've been thinking a lot about traditions lately. Lots of my Christmas memories involve food so with each new recipe that I try, particularly as we get closer to Christmas, I wonder whether it will be something that Oscar remembers from his childhood.

I found the recipe for this White Chocolate Gingerbread in a free Christmas magazine from Coles (one of our major supermarkets). While there were lots of yummy things this one leapt off the page. White chocolate. Gingerbread. Need I say more?

White Chocolate & Gingerbread Slice
Recipe from Coles Christmas 2009 Magazine, p37

100g unsalted butter
3/4 cup golden syrup
3/4 cup brown sugar
2 tsp ground ginger
1 tsp cinnamon
2 eggs, lightly beaten
1/3 cup milk
2 cups plain flour
180g white chocolate, chopped
icing sugar for dusting

Preheat oven to 180 degrees C (350F). Grease and line a 19cm x 29cm slice pan with non-stick baking powder.

Place butter, golden syrup, sugar, ginger and cinnamon in a small saucepan. Stir on medium heat for 2-3 minutes, until butter has melted and mixture is smooth.. Remove from heat and allow to cool slightly. Add the eggs and milk and mix well.

Sift flour into a large bowl. Add the chocolate. Fold through the egg mixture and mix until combined.

Fill prepared pan. Bake for 30-35 minutes, until firm. Cool completely in pan. Dust with icing sugar and cut into fingers to serve. Makes 18 pieces.

The verdict?

While very tasty I found it a little solid. Next time I would add 1 teaspoon of baking powder to lighten it up a little, and maybe also some crystallised ginger for some extra spice. Otherwise this is a lovely morning or afternoon tea slice, perfect for this time of year!

Saturday, December 5, 2009

Tuesdays with Dorie: Lemon Sables

We're well and truly into the Christmas spirit at chez food.baby this week and thanks to Barbara of Bungalow Barbara I have found another item to add to my Christmas gift baskets ... Lemon Sables!

These are simple slice and bake cookies, basically a buttery shortbread, that can be flavoured with virtually anything. I love citrus so went with lemon and let me tell you, the smell of that lemon zest scented sugar was divine.

I found the cooking time to be way off the mark. I happened to check on these at the 12 minute mark (the recipe said 17 to 20) and they were already pretty dark around the edges.

The taste test ...

Yum, yum yum! So simple to make, no fancy ingredients but absolutely delicious. I really loved the crackly, sugar-encrusted edges. Next time though I would increase the amount of zest and maybe do a lemon-orange combo. Really though, the possibilities are endless!

Thanks Barbara, we loved these! You can find the recipe on her blog.

Tuesday, December 1, 2009

Tuesdays with Dorie: Rosy Poached Pear and Pistachio Tart

Lauren of I'll Eat You chose Dorie's Rosy Poached Pear and Pistachio Tart this week, and wow, what a stunner! Absolutely perfect for the 1st of December because this beauty just screams Christmas.

I think I was lucky to find some ok pears from the very limited selection available as it's not pear season here. Once poached they were perfect, just a little on the small side.

The pastry cream was fabulous, such a full flavour, however it never got as firm as it was supposed to. You can see from the photos that my pears were already sinking into the pastry cream and once cut, it oozed everywhere. Didn't affect the taste though!

The taste test ...

This is definitely a special occasion recipe. Crisp, buttery pastry, rich pastry cream and tart pears. And that pistachio praline? An absolute revelation! It was a shame it was so messy to serve.

Thanks for a wonderful pick, Lauren. You can find the recipe on her blog.

Friday, November 27, 2009

Daring Bakers November - Cannoli

It's Daring Bakers time again, and again we are venturing into new territory. There was no baking this month but there was ... deep frying!

The November 2009 Daring Bakers Challenge was chosen and hosted by Lisa Michele of Parsley, Sage, Desserts and Line Drives. She chose the Italian Pastry, Cannolo (Cannoli is plural), using the cookbooks Lidia’s Italian-American Kitchen by Lidia Matticchio Bastianich and The Sopranos Family Cookbook by Allen Rucker; recipes by Michelle Scicolone, as ingredient/direction guides. She added her own modifications/changes, so the recipe is not 100% verbatim from either book.

I've never deep fried anything before - the thought of all that hot oil just waiting to tip over or catch alight scares me just a little bit. Ok a LOT. But this is the daring bakers after all so I was up for the challenge.

I didn't want to purchase cannoli forms just for this one challenge so I decided to cut out some shapes instead. I rolled the dough using my pasta machine (so easy) and then chose some cookie cutters in interesting shapes. Problem was, they didn't cut through the dough easily and when I tried to lift them out they tore and stretched out of shape. I did get one decent heart though ...

Oooh pretty!

I made the chocolate recipe exactly as stated and also used the traditional filling. However because I am a citrus nut I doubled the amount of orange peel and added in the zest of an orange as well.

The recipe is ridiculously long so I won't post it all here. You can find the recipe on Lisa's blog here. Link
The taste test ...

Never having had cannoli before I really wasn't sure what to expect, but these were really tasty! My first batch was a little oily as I don't think the oil was quite hot enough in spite of what my thermometer said. The shells were crunchy and definitely moreish. I could snack on those all day. The filling was what really made it for me though, it was a like a choc-orange flavoured Sicilian cheesecake. Yum!

I think I've conquered my fear of deep drying (I made beer battered fish last night for dinner) but it's still not something I will do regularly.

Thanks for a great challenge!

Wednesday, November 25, 2009

Healthy Bread in 5 Minutes a Day

So everyone has heard about the fabulous Artisan Bread in 5 Minutes a Day that has been doing the rounds in the blogosphere. But have you heard about Healthy Bread in 5 Minutes a Day? From the same authors, Zoe Francois and Mark Luinenberg, the focus of this new book is on breads with whole grains, fruits, vegetables and even gluten free options. Yay!

Amazon delivered my copy in amazingly good time last week and I have already made my first batch. I decided to go with the master recipe for a plain whole wheat boule to begin with. It was very simple to mix up and I love that the authors have included metric conversions. Makes my life much easier!

Dough mixed

After a 2 hour rest on the bench

Shaped and ready to bake - definitely need to practice slicing the top

Baked and smelling fabulous!

Well cooked, nice crumb but very slightly sticky/gummy in the middle - will try a little less water in the mix next time

Continuing with our plan to use our new bbq every week we decided to do pizzas. Let me tell you, pizza on the grill is out-of-this-world good! One batch of the master recipe was enough for the boule plus 3 large pizzas. No further resting is required for the bases, so after shaping each one just throw on your toppings and get it straight on the grill.

My favourite - ham and pineapple. Yum!

Bread making is definitely an art and I have a lot to learn but I'm really encouraged by the results so far. Making your own bread is not only healthier but kinder on your wallet as well. I would estimate each loaf/pizza base cost less than $1 to make. Beat that, supermarket!

Michelle of Big Black Dog has started a baking group for HBin5. There is still time to join as their first bread isn't posted until January. Click below for all the details ...

I'm on the fence about joining as I have my hands pretty full with TWD, Daring Bakers and Daring Cooks. But I do plan on posting everything I bake so stay tuned!

Tuesday, November 24, 2009

Tuesdays with Dorie: All-in-One Holiday Muffins

This week Britin of The Nitty Britty chose Dorie's All-in-One Holiday Bundt Cake, an awesome looking cake packed with festive flavours. But sometimes a whole cake can be a bit intimidating. People get scared to take the first piece. So when I needed to bring something to a get-together I decided to make it as muffins - much friendlier!
Yet again there were no cranberries to be had so I used cherries and almonds but kept the rest of the flavours the same. I got 18 full size muffins from this recipe.
The taste test ...
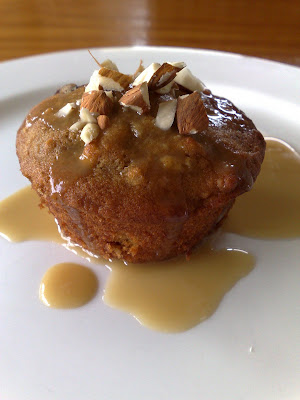
Delicious! Really, really moist and full of flavours I love - ginger, cinnamon, cherries. Couldn't really taste the pumpkin here but it added a lovely colour. I served mine with a maple syrup glaze and a scattering of chopped almonds and it made a perfect afternoon tea. I will definitely be making this again as a bundt cake.
Thanks Britin, great pick!
All-in-One Holiday Bundt Cake From Baking from My Home To Yours
2 cups plain flour
2 tsp baking powder
1/2 tsp baking soda
2 tsp ground cinnamon
1/4 tsp freshly grated nutmeg
 Pinch of salt
1 1/2 tsp grated fresh ginger (or 1 tsp ground ginger)
150 grams unsalted butter, at room temperature
1 cup white sugar
1/2 cup (packed) light brown sugar
2 large eggs, at room temperature
1 tsp pure vanilla extract
1 1/4 cups pumpkin puree
1 large apple, peeled, cored and finely chopped
1 cup cranberries, halved or coarsely chopped
1 cup pecans, coarsely chopped
Icing sugar, for dusting or maple syrup icing (see note)
Centre a rack in the oven and preheat the oven to 180 degrees C / 160 degrees C fan-forced. Butter a 9- to 10- inch (12 cup) Bundt pan.
Whisk together the flour, baking powder, baking soda, cinnamon, nutmeg, salt and ground ginger.
Working with a stand mixer or with a hand mixer in a large bowl, beat the butter and both sugars together at medium speed until light and fluffy. Add the eggs one at a time, and beat for 1 minute after each addition. Beat in the vanilla. Reduce the mixer speed to low and add the pumpkin, chopped apple and grated ginger, if you’re using it-don’t be concerned if the mixture looks curdled. Still on low speed, add the dry ingredients, mixing only until they are incorporated. With a rubber spatula, stir in the cranberries and pecans. Scrape the batter into the pan and smooth the top with the rubber spatula.
Bake for 60 to 70 minutes, or until a skewer comes out clean. Transfer the cake to a rack and cool for 10 minutes before turning out onto the rack to cool to room temperature.
Just before serving, dust the cake with icing sugar or drizzle it with maple syrup icing.
To make the Maple Syrup Icing - Sift 6 tablespoons icing sugar into a bowl and stir in 2 tablespoons maple syrup. Add up to another ½ tablespoon of maple syrup little by little, until you have an icing that runs nicely off the tip of the spoon. Place the cooled cake on a sheet of baking paper and drizzle the icing over the top. Let the icing set for a few minutes before serving.

Tuesday, November 17, 2009

Tuesdays with Dorie: Sugar-Topped Molasses Spice Cookies

Pamela of Cookies with Boys chose Dorie's Sugar-Topped Molasses Spice Cookies this week, and this is the one recipe of the month that I am posting on the actual date!

After last weeks mammoth effort for the chestnut cake I was really happy with this pick. Only thing was I discovered after I started to make them that I was completely out of cinnamon. (Totally not my fault though as hubby threw away the pack because it wasn't sealed properly and then didn't replace it. Love you sweetie!).

Rather than wait and make them another day I compensated by upping the ginger by 1/2ts and adding in 1/4 ts ground cardamon and a very generous pinch of pepper. I also used treacle rather than molasses as I already had some.

The taste test ...

Crispy on the outside, chewy in the middle and packing a real punch of flavour. They'd be perfect for icecream sandwiches or even just dunked in a glass of ice cold milk. And I don't even like milk! These are definitely going on the list for my Christmas baking.

Thanks for an awesome pick Pamela! You can find the recipe on Pamela's blog.

Monday, November 16, 2009

Meatless Monday - Ratatouille with Corn Cakes

Today marks what will hopefully become a regular thing - a week's worth of meals already planned and shopped for! In the interest of our waistlines and budget we have decided to make 2 or 3 of those meals vegetarian. Tonight's dinner was this Ratatouille with Corn Cakes. So fresh and packed with flavour, I thought it was delicious! Hubby thought it needed beef. Oh well!

Ratatouille with Corn Cakes
p102 'Almost Vegetarian' by The Australian Woman's Weekly Cookbooks, 1993

2 tbs olive oil
1 medium brown onion, finely sliced
1 clove garlic, crushed (I used 3 cloves - can't have too much garlic!)
3 baby eggplants (180g) sliced thinly
2 medium zucchini, sliced thinly
1 red capsicum, chopped finely
1 green capsicum, chopped finely
150g button mushrooms, halved
2 x 410g tins chopped tomatoes
2 medium tomatoes, chopped finely
1/3 cup fresh basil leaves
1/4 cup parmasan cheese flakes

Heat oil in a large saucepan; cook onions and garlic, stirring, until onion is soft.
Add all other vegetables and cook until tender.
Add both tins of tomatoes and the fresh tomato. Bring to the boil. Reduce the heat and simmer, incovered, for about 20 minutes or until the vegetables are soft and the sauce is thickened slightly. Season to taste with salt and pepper (and sugar, 1-2 ts depending on the acidity of your tomatoes).
Serve ratatouille with corncakes, topped with basil and cheese.

Corncakes:
2/3 cup wholemeal plain flour
1/2 cup white plain flour
130g tin corn kernels, drained
2 x 130g tins creamed corn
2 eggs
3/4 cup (180ml) milk

Sift flours into medium bowl; add combined corn, creamed corn, eggs and milk. Whisk until comined; stand 30 minutes.
Pour 1/4 cup mixture into heated, greased frying pan. Cook until bubbles appear on surface and underneath is browned. Turn; brown other side. Repeat with remaining mixture.

Do you have a favourite vegetarian meal? I'm looking for inspiration so would love to hear your ideas!

Saturday, November 14, 2009

Daring Cooks November - Sushi

The November 2009 Daring Cooks challenge was brought to you by Audax of Audax Artifex and Rose of The Bite Me Kitchen. They chose sushi as the challenge.

Yay, sushi! While I'm not exactly a sushi connoisseur (I'm not a raw fish fan - it's a textural thing) I have made it a number of times at home. This meant I already had the rice, mats, vinegar etc and was ready to get started.

Our challenge this month had 4 elements - first the sushi rice itself, which we then made into 3 different end products. I followed the recipe to the letter and have to say my rice turned out better than it ever has before.

First up - Dragon Roll ...

My dragon roll filled with delicious terriyaki chicken and topped with sliced avocado.

And turned into a dragon. Grrrr!

Yes, I am aware my dragon looks like it was made by a 3 year old. Let's pretend it was!

Next, Spiral Sushi Roll ...

I think I rolled these the wrong way because they look like the regular sushi rolls I buy all the time. Very tasty though, filled with terriyaki chicken, avocado, cucumber, carrot, omelette and sesame seeds.

And last, bite sized Ngiri ...


I made two varieties of these, one with smoked salmon and the other with omelette and nori. Yum!

I won't post the recipes here as they are really long, but you can find a printable PDF version here.

Thanks for a wonderful challenge Audax and Rose!

Tuesday, November 10, 2009

Tuesdays with Dorie: Chocolate-Caramel Chestnut Cake

Today is my dad's 60th birthday and to celebrate we had a big family bbq on Sunday. You can't have a birthday party without birthday cake and this week's TWD pick was perfect!

Chestnuts aren't at all common in Australia. My only experience with them prior to this was in Paris as a 17 year old, and what an eye opener that trip was for a budding foodie! One freezing cold day while wandering through the streets we came across a street vendor selling roasted chestnuts in paper bags. I still remember the rustle of the bag, the warmth and delicious taste of those chestnuts.

Here I had to make do with tins of chestnuts and unsweetened chestnut puree (which I sweetened by blitzing it with 3 ts vanilla extract and 3 tbs of sugar) sourced from a local deli.

This cake is definitely not for the faint of heart, with 1/2kg butter, 1/2 litre of cream and almost 3 blocks of chocolate. It didn't rise as much as I expected so I only sliced it into 2 layers instead of 3. Still managed to use all of that delicious ganache though!

The taste test ...

One word - RICH. Dorie said it serves 16 but I think you could double that easily. There aren't too many times where just 1 piece of cake is enough but this was it. The flavour of the cake itself was absolutely sensational and I will definitely make it again, just without all the chocolatey excess.

It was the perfect finish to a fabulous lunch of roast pork loin cooked on the bbq, lots of salad, breads, cheese and drinks. We just didn't eat much else for the rest of the day.

Thanks for a great pick Katya! You can find the recipe on her blog here.

Tuesday, November 3, 2009

Tuesdays with Dorie: Cran-Apple Crisps

Well, first thing you'll notice is there are no cranberries in my crisps. I've bought frozen cranberries many times and although we are only 52(!) days away from Christmas, there were none to be found.

By the way, a big thank you to Laurie for being flexible with this month's posting days. I am saving the Chocolate Caramel Chestnut cake for my dad's birthday next week!

Em of The Repressed Pastry Chef chose Dorie's Cran-Apple Crisps this week and without the cranberries I don't know if I'm a good judge of these or not. Basically it was just an apple crumble. Tasty, but usually our fallback dessert if we haven't planned ahead.

The taste test ...

Like I said, your standard apple crumble. I'm sure the cranberries would elevate this to something more special and give a great contrast with the sweet crumble topping. Oh well, we did enjoy it with a big scoop of vanilla icecream. An easy Saturday night dessert! I'll stock up on cranberries next time I find them just to pop into something like this.

Thanks Em! You can find the recipe (and no doubt some gorgeous photos) on her blog.

Sunday, November 1, 2009

Sunday Crepes

Breakfast has always been my favourite meal of the day, particularly on weekends, but lately I can wander around the kitchen for ages before I find something that takes my fancy. It can't take too long to prepare, be too sweet or too heavy. The answer? Crepes!

Lots of crepe recipes are filled with unnecessary ingredients. One recipe I came across had 1/2 cup sugar and 80g butter. Ridiculous!

The recipe I use is from The Original Woman's Weekly Cookbook (circa 1970s) and it is one that has stood the test of time. This weekend we filled our crepes with fresh sliced bananas and topped with a raspberry and lime sauce. Delicious.

Crepes

1/3 cup plain flour
2 eggs
3/4 cup milk
pinch of salt

Combine all ingredients using a food processor or hand whizz. Let stand for 15 minutes.

Meanwhile to make the sauce, in a small saucepan add 1 cup of frozen raspberries, 1 tbs sugar and the juice of 1 lime. Warm through on low-medium heat, stirring gently to keep some of the raspberries intact.

Heat a non-stick frying pan (or crepe pan if you have one) over medium-high heat. You shouldn't need to use any oil at all. Holding the pan in one hand, pour in 1/4 cup mixture while tilting the pan in a circular motion to swirl the mixture evenly over the base. Cook for about 1 minute or until the the top of the crepe is dry and the edges are starting to curl. Flip the crepe over and cook for another 30 seconds or until lightly golden. Remove crepe and repeat process.

Saturday, October 31, 2009

The Kitchen Reader

Last month I stumbled across (I say stumbled but it was on Cakelaw's blog which I visit frequently) The Kitchen Readers, an online group reading their way through foodie related books. As it combines two of my great loves ie. food and books, I decided to join at once!

Unfortunately I don't have a book to review this month. Literally. Neither of the next few month's selections are available in our library system or indeed any b0okshop in the country (or so it seems) so I resorted to buying online and they haven't arrived yet.

My apologies to Jennifer and the other members!

Thursday, October 29, 2009

Triple Treat Chocolate Chip Cookies

After the hot weather we've had lately, it was a relief that yesterday was grey, misty and cool. The kind of day that is perfect for curling up with a good book, a hot drink and something sweet to nibble on.

Which brings me to these.

There is much debate on what consitutes the 'perfect' chocolate chip cookie but I say, to each their own. If your preference is for thin, crunchy or chewy these are not for you. Or they may just convert you!

Triple Treat Chocolate Chip Cookies
Adapted from 'Chocolate Chip Cookies' on p16 of Modern Classics Number 2 by Donna Hay

125g butter, at room temperature
1/2 cup white sugar
1/2 cup brown sugar
1ts vanilla extract
2 eggs, at room temperature
2 cups plain flour
1 ts baking powder
100g dark chocolate, roughly chopped
100g white chocolate, roughly chopped
2/3 cup roasted salted peanuts

Preheat oven to 180 degrees C. Line 2 baking trays with baking paper.

Beat together the butter, sugar and vanilla until thick and smooth. Add the eggs and beat to combine. Using a spatula, fold through the flour and baking powder until just barely combined. Add the chocolate and nuts and fold through.

Roll dessertspoonfuls of mixture into balls and place on prepared trays allowing room for each cookie to spread.

Bake at 180 degrees for 10 to 12 minutes, or until puffed and lightly golden. They will still be very soft. Remove from oven and allow to rest for a few minutes before transferring to wire racks to cool completely.

Tuesday, October 27, 2009

Tuesdays with Dorie: Cherry-Fudge Brownie Torte

This week's TWD selection was another decadent delight!

April of Short & Rose chose Dorie's Cherry-Fudge Brownie Torte and really the name says it all don't you think? Cherry, fudge, brownie, torte. I'm there!

I made only minor changes to the recipe, using dried cranberries instead of cherries, black cherry jam instead of cherry preserves and leaving out the kirsch (I just used all water instead and this really allowed the flavour of the fruits to shine through).

My topping was not even remotely pourable - it somehow managed to achieve to achieve the consistency of a baked New York cheesecake. Fluffy and delicious but not at all mousse-like!

I was all set to do the chevron pattern on the top so I still piped the jam on top.

The taste test ...


I think this would have to be in my top 5 TWD recipes so far! Exactly like a black forest cake but in brownie form and with (an unintentional) cheesecake topping. And of course a lot easier to make. Absolutely delicious.

The tartness of the fruit cut through the richness but I was happy to be able to give most of it away. My MIL was having a working bee on Sunday to give her backyard a makeover. N and I couldn't make it so I sent the torte down to feed the hungry horde. It apparently went down really well and there was none left over, that's always a good sign!

I will definitely be making this again, perhaps for Christmas. Thanks April! You can find the recipe on her blog.

Daring Bakers October - Macarons

The 2009 October Daring Bakers’ challenge was brought to us by Ami S. She chose macarons from Claudia Fleming’s The Last Course: The Desserts of Gramercy Tavern as the challenge recipe.

Oooh boy, this month's DB challenge was a doozey! For the first time since I joined the Daring Bakers over a year ago I don't really have a finished product to blog about.

So many bloggers seem to have a macaron obsession that I was really keen to try them myself. After all, I'm not a complete novice now. How hard could they be?

Attempt #1 - I followed the DB recipe for a plain macaron. I weighed and measured everything carefully, aged the egg whites and ended up with these ...

Now I know they're not terrible but they're also not macarons. I didn't bother filling them since I had to scrape them off the baking paper (they were stuck like superglue) and I naievly assumed my next lot would be better. Ha!

Attempt #2 - I tried a different recipe (chocolate flavour) which called for them to be rested on the bench for an hour before baking. This time I didn't even make it to the baking part. Once I folded in the dry ingredients my mix turned almost solid. I could have rolled the dough into balls it was so stiff and dry. It just seemed like the ratio of eggwhites to dry ingredients was completely off. It all went straight in the bin.


Attempt #3
- Same recipe as attempt #2 but this time I added only half the amount of dry ingredients (I stopped as soon as the consistency seemed right).


Dry ingredients weighed, blitzed in the food processor and seived


Aged eggwhites at room temperature whipped with sugar until thick and glossy


Piped onto trays and hoping the peaks will soften


After 1 hour - nope, they look exactly the same

After 15 minutes at 150 deg C

Definitely not right

The best 2, sandwiched together with rosella jam

I am completely in awe of everyone else who made these successfully. Some of the results were absolutely stunning! But for me it was stressful, frustrating and a waste of time as I don't feel any closer to mastering them. I can't even learn from my mistakes because I have no idea what I did wrong.

As much as it pains me to say it, the macarons won. Final score Macarons 3: Susan 0.

Bring on November!
Related Posts Plugin for WordPress, Blogger...