Showing posts with label Baking. Show all posts

Tuesday, September 11, 2018

Gluten-free Banana Muffins with Cinnamon and Ginger

gluten free dairy free banana muffins with doTERRA cinnamon and ginger essential oils from www.mywholefoodfamily.com

Anyone for afternoon tea? 


We love bananas at our place and always buy in bulk when we can.

Last week my hubby grabbed a 10kg box and of course, they all got ripe at once!

So I've been baking over the past few days and the rest are peeled and stashed in the freezer ready for smoothies or homemade ice cream.

And just FYI the same essential oils in this recipe whizzed up with frozen bananas and some coconut cream makes the most DIVINE ice cream!

GLUTEN FREE BANANA MUFFINS
with Cinnamon and Ginger essential oils

4 very ripe bananas (mine weighed 320g peeled)
2 large eggs
3 tbs liquid coconut oil
2 tbs coconut sugar
1 ts vanilla extract
1 cup gluten-free self-raising flour
1 drop Cinnamon Bark essential oil
2 drops Ginger essential oil

Preheat the oven to 160 degrees fan-forced.

Line a 12 cup muffin tray with paper liners or lay out some silicone muffin cases on a baking tray.

In a blender or Thermomix beat together the bananas, eggs, coconut sugar, coconut oil, vanilla and essential oils until smooth.

Fold through the flour until just combined.

Spoon mixture into prepared tin and bake for 15-18 minutes or until cooked through (the top will spring back when pressed lightly with your finger).

Cool on a wire rack. Makes 12-15. Great frozen for lunchboxes.

There are an incredible 37 doTERRA essential oils that can be used to flavour your food. I've used Cinnamon and Ginger here but the only limit is your imagination!


*I only use and recommend doTERRA essential oils. Click here for a quick guide to essential oils, doTERRA and how you can get your own (no matter where you are in the world!)


Monday, December 28, 2015

My pre-Christmas Bake-a-thon and the Best Ever Gingerbread

Merry Christmas everyone! Hope you all had a fabulous day. We enjoyed a lovely relaxing Christmas at home which was perfect as there is no way the boys would have wanted to leave their brand new trampoline behind.

Did anyone else have a Christmas Eve bake-a-thon? I spent most of the day in the kitchen and then crashed in the afternoon before heading out for the evening. Don't get me wrong I really enjoy the baking and cooking (I wouldn't be here otherwise!) it's just the cleanup that gets me down. I am so grateful to have a dishwasher, we couldn't get by without it.

I was trying not to leave everything to the last minute but some things can really only be made the day before, and other things I sort of forgot about so ended up doing those too!

I know you are probably all totally over Christmas food but I wanted to post at least this one recipe so I can keep track and make it again next year (and probably before that too) because it was totally amazing.  

I didn't have much cooking to do this year but I did lots of sweet things.

On Christmas Eve I made 2 types of custard to take to my mother in laws house (the pudding was already prepped thank goodness). Then for our trifle I made a lemon and orange curd, a spelt genoise sponge, more custard and a mango and coconut jelly. Yum! I also made a double batch of this pumpkin gingerbread for our Christmas breakfast, a batch of my dairy-free rum balls and a batch of gingerbread men so the boys would have something yummy to leave for Santa. Whew!!

For me this gingerbread was the absolute highlight of my Christmas baking. It was everything you want in a gingerbread - packed with warm spicy flavour, incredibly moist and tasted even better the next day when you can't be bothered cooking anything. We had it Christmas morning with some homemade peach and chia jam.

While I think it would be more suited for our Christmas in July celebrations rather than a hot summertime Christmas, I would happily eat this any day and am glad to have half a loaf still stashed in the freezer.

Apologies for the less than stellar photo - cake for breakfast waits for no man! Had to snap one quickly and then get it on plates for the hungry horde. 


Best Ever Pumpkin Gingerbread 
Adapted from Simply Recipes

400g white spelt flour
1 1/2 ts bicarb soda
1 tbs ginger
1 tbs cinnamon
1/2 ts nutmeg
1 1/2 ts salt
2 cups pumpkin puree
225g melted butter
2/3 cup coconut sugar
1/2 cup rice malt syrup
1/2 cup molasses
4 eggs, beaten
1/3 cup water

Preheat oven to 180 degrees C / 160 degrees C fan forced. Grease and line 2 loaf pans (mine were pyrex) and set aside.

In a large bowl whisk together the flour, bicarb, salt and spices.

In a separate large bowl or jug, whisk together the remaining ingredients until smooth.

Pour the wet ingredients into the dry ingredients and fold through until just combined.

Pour the mixture evenly into the prepared pans and bake for 45-60 minutes (mine was done at 45 minutes so start checking then). It is done when a skewer inserted into the middle comes out clean.

Leave in the pan for 5 minutes before turning out onto a wire rack.

Delicious served warm with butter but it's even more amazing the next day if you can wait that long.

Sunday, December 13, 2015

My Fruit Mince Tarts


The first day of the school holidays was unexpectedly cool and rainy so what better way to spend it than to with some Christmas baking! My husband has been dropping not so subtle hints for fruit mince tarts over the past few weeks so that was first on my list.

Before I got into my wholefoods groove I used to make fruit mince tarts with packet pastry and a jar of pre-made fruit mince. Not any more. I love making pastry and after a few years of practice I feel like I understand it a little more and can prevent some disasters. And honestly how amazing is homemade pastry?  If you don't feel up to making your own, the Careme brand pastry in Australia is really good and they even have a gluten free version.

I used my go-to spelt pastry recipe and developed my own fruit mince recipe which was SO delicious I couldn't help taking lots of sneaky spoonfuls for 'just to check if it was ready.' Ha!


The kids were hanging around by the oven waiting for them to bake because they smelt so amazing and then each had 3 for afternoon tea. So that's a big tick of approval.

The pastry recipe makes enough for one batch of 12 tarts and I rolled the scraps out into some little biscuits which we snacked while waiting for the tarts to cool enough to eat.


The fruit mince recipe makes enough for 2 batches of 12 tarts and is stashed in the fridge to make some more next weekend. As I was making these for kids I cooked the brandy in with the fruit to get the flavour but cook off most of the alcohol. You can add the brandy at the end once the fruit is cooked for a bit more of a kick.


My Fruit Mince Tarts

Fruit mince:

500g organic mixed dried fruit
5 granny smith apples (peeled, cored and diced)
1 cup fresh orange juice, pulp and all
1/2 cup rice malt syrup
1/4 cup brandy
zest of 1 orange
1 ts cinnamon
1/4 ts nutmeg
1/4 ts clove
1/4 ts allspice

Place all ingredients into a pot over medium heat. Bring to the boil then reduce the heat and simmer until the apple has completely softened and the mixture is thick and sticky. This will take around 20 minutes or so. Remove from the heat and leave to cool completely.

Pastry:

250g white spelt flour
20g coconut sugar
125g cold salted butter
1 egg yolk
2-3 tbs iced water, as needed

Place flour and sugar into the thermomix or food processor and mix just to combine and break up any lumps. Add the butter and process for a few seconds at a time, until the mixture resembles rough sand. Add the egg yolk and 1 tbs iced water and process again for a few seconds at a time until the dough starts to clump together. Add extra water 1 tbs at a time only if needed.

Turn the dough out onto a piece of plastic wrap and press into a disc. Wrap well and place into the fridge to rest for at least 20 minutes before rolling.

To assemble the tarts:

Preheat the oven to 180 degrees C / 160 degrees fan-forced. Grease a 12 cup tart or muffin tray and set aside.

Roll out about 2/3 of the dough (leave the rest in the fridge) about 3mm thick. Using a round cutter (mine was 7cm), cut out 12 circles for the bases of your tarts. Choose a cutter that is just a little wider than the diameter of each hole in your tray and they will fit perfectly. Press each circle over the base of your prepared tray and set the scraps of dough aside.

Place a teaspooful of fruit mince mixture into each tart base, being careful not to overfil or the edges won't seal. Using your finger, dab some water around the edge of pastry of each tart.

Roll out the remainder of the dough from the fridge in the same way, but use a slightly smaller cutter (mine was 6cm) to cut 12 circles for the tops of your tarts. Place a piece on top of each tart and then use a fork to crimp and seal the edges. Use the fork to pierce the top of each tart to allow steam to escape.

Bake for 15-20 minutes until the tarts are golden brown and smell amazing. Cool in the tray for 5 minutes before turning out onto a rack. Delicious warm or cold.

Buttery pastry surrounding sweet and spicy fruit, there's a reason these are a classic!

Wednesday, July 8, 2015

'Apple' Crumble Slice


This may be the most amazingly sneaky recipe I've ever made. I mean I've done lots of hidden veggies recipes before but this really takes the cake. I called it an apple crumble slice and my kids went nuts for it. But let me tell you a secret ... there isn't any apple in it.

So do you want to take a guess as to exactly what is cooking in this pan?


It's zucchini!!!

Seriously.

I found this recipe for Zucchini Pie Bars on Crazy for Crust and I was immediately intrigued but quite dubious. How on earth would zucchinis taste like apples? Especially as I wouldn't be smothering it in ice cream and caramel sauce like the original recipe. But I'm always up for a challenge so I gave it a go.


The slice consists of a pastry base which you bake until golden brown. Then the filling is diced zucchini sauteed in butter, cinnamon and sugar until just soft and then drained. Next there is a buttery crumble topping.

There was absolutely no discernible taste of zucchini. For all intents and purposes it was an apple slice, although perhaps a little less sweet than normal. The crust and crumble were crisp and buttery and the filling was soft and lightly spiced with cinnamon and lemon. My boys absolutely devoured it, asking for seconds and thirds.

So do I feel a little guilty about the deception? Not even a little bit. It is totally delicious and my extremely fussy 4 year old actually ate a serve of vegetables. Win!

'Apple' Crumble Slice
Adapted from Crazy for Crust

For the Crust:
125g softened butter
1 1/2 cups white spelt flour
1/4 cup coconut sugar
1/4 ts salt

For the Filling:
3 large zucchini, peeled and diced
2 tbs butter
2 tbs coconut sugar
1 ts cinnamon
zest 1/2 lemon

For the Topping:
125 softened butter
1/2 cup coconut sugar
1 cup white spelt flour
1/2 ts cinnamon
1/2 cup rolled oats
1/4 ts salt

Line a 20x30cm slice pan with baking paper. Preheat oven to 170 degrees Celsius.

To prepare the crust, place all ingredients into a food processor and pulse until the mixture is crumbly. It may look dry but if it sticks together when you squeeze a handful it is ready. Press the mixture into the prepared tin and bake for 13 minutes.

To make the filling, melt the butter and sugar together in a frying pan over low-medium heat. Add the zucchini, cinnamon and lemon zest and cook, stirring often, for approximately 5 minutes or until the zucchini is just starting to soften. Remove from the heat and drain until ready to use.

While the zucchini is cooking prepare the topping. Place all ingredients into the food processor and pulse until crumbly.

Remove the hot crust from the oven and scatter the cooked zucchini carefully over the top before sprinkling the topping evenly over the top. Bake for around 25 minutes or until golden brown.

Cool completely in the pan before slicing into bars and serving. Can be stored in the fridge for 3 days in an airtight container or up to 1 month in the freezer.

Thursday, July 2, 2015

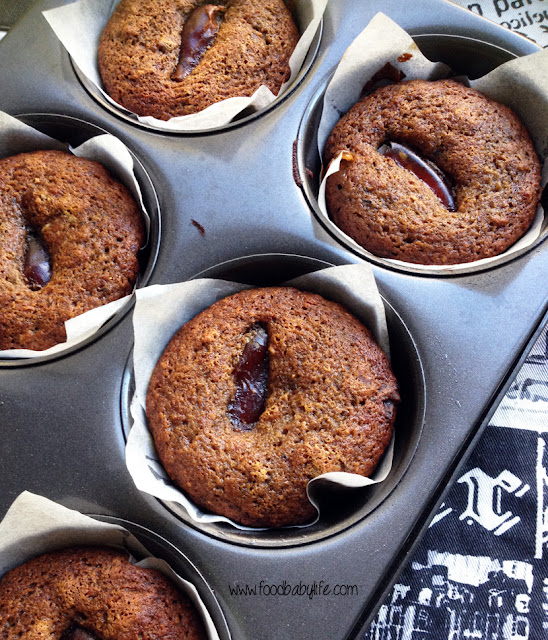
Sticky Date Muffins for my mum

Sticky date muffins © www.foodbabylife.com

So today would have been my mum's 64th birthday and it also marks 7 years to the day since her funeral. With each anniversary I think maybe it will get a little easier ... but it never does. I had some fun with my boys today but I was also snappy and exhausted and tears were always just under the surface.

Mum and I didn't always see eye to eye, especially when I was a teenager but she was always my confidante, the one person in the world I could guarantee would be on my side. She would literally drop everything if I needed her. That's what mums are for right?

I have loved baking since I was little and mum and I spent many hours in the kitchen together. I think she was relieved though when I got older and wanted to take over more of the cooking duties as I don't she really enjoyed it all that much. She loved tasting everything I baked and she would have loved these sticky date muffins which I made today in her memory. They are pure comfort food, like a big warm hug, and I was comforted enjoying them with my boys this afternoon.

"Life has to end" she said. "Love doesn't."
-Mitch Albom

Sticky Date Muffins 

250g dried pitted dates
400mls water
2 tbs brandy
1 tbs bicarb soda
100g butter
1/2 cup rice malt syrup
1 ts vanilla extract
zest of 1 orange
2 ts cinnamon
2 ts dried ginger
3 eggs
250g white spelt flour, sifted with 3 ts baking powder
6 extra dates, split in half

Line a 12 cup muffin tray and set aside.

In a medium saucepan over medium heat, place the dates, water and brandy. Bring to the simmer for 5 minutes then add the bicarb and stir well. It will foam and froth up. Add the orange zest and vanilla then remove from the heat and allow to cool completely.

Preheat the oven to 180 degrees C.

In a stand mixer or a large bowl with electric beaters, cream the butter and add the syrup a splodge at a time, until well incorporated.

Next add the eggs one at a time, beating well after each addition.

Fold through half the flour together with the cinnamon and ginger, then half the cooled date mixture and repeat with the remainder.

Spoon the mixture into the prepared muffin tray and top each with half a dried date.

Bake for 15-20 minutes or until golden brown and springing back in the middle (mine were done at 18 mins but it depends on your oven so check once they start to smell amazing). Allow to cool for 5 minutes in the tray before turning out. Enjoy warm for dessert with ice-cream (if you're not dairy free) or at room temperature with a cup of tea or coffee for afternoon tea.

Makes 12. Suitable to freeze.

Monday, June 22, 2015

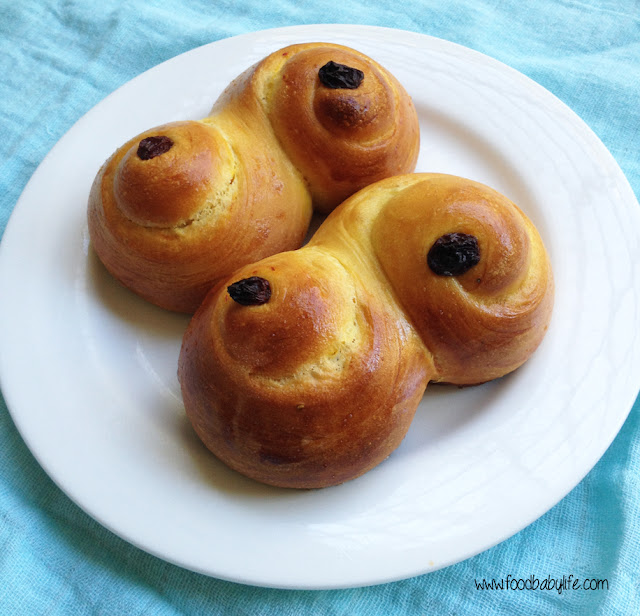
Saffron and Cardamom Sweet Buns (SRC)

St Lucia Saffron and Cardamom Buns © www.foodbabylife.com

It's Secret Recipe Club time! We are now officially halfway through the year, can you believe it??

This month for SRC I was assigned the fabulous Lavender and Lovage by Karen. Karen is truly living the dream, dividing her time between the UK and the South West of France where she runs her own cookery school! I've long had a love-affair with France, learning the language in high school and enjoying a 3 month homestay with a family in Brittany when I was 17. So as you can imagine I had a great time on Karen's blog this month, reveling in some truly delicious food and stunning photography.

Being the middle of Winter here I was drawn to some hearty and traditional dishes like her Provence Beef Casserole and Chicken, Sausage and Vegetable Hotpot, and I have bookmarked her Victorian Epiphany Tart with 9 different types of jams and preserves to make at Christmas time. I was also really tempted by her Cauliflower Pizza Crust as it is the nicest looking version that I've seen.

In the end though I simply couldn't go past her Saffron and Cardamom sweet buns, which are baked in Sweden (and Scandinavia) to celebrate St Lucy's day and the Winter Solstice on the 13th December. Now before you wonder why I would choose to make this recipe when it is nowhere near December, it actually makes perfect sense: here in Australia our Winter Solstice is in June and this year it coincidentally falls today on reveal day (at 2.39am to be exact!).

Clearly it was meant to be!

I baked these just yesterday and it was a perfect Winter weekend baking project as they take a few hours to make. If you've made any sort of bread you would have no problems making these. And just look at that gorgeous sunny colour! The saffron was a real splurge - my tiny 1 gram container cost $11!! but I didn't use all of it and now need to think of something suitably special to make with what's left.

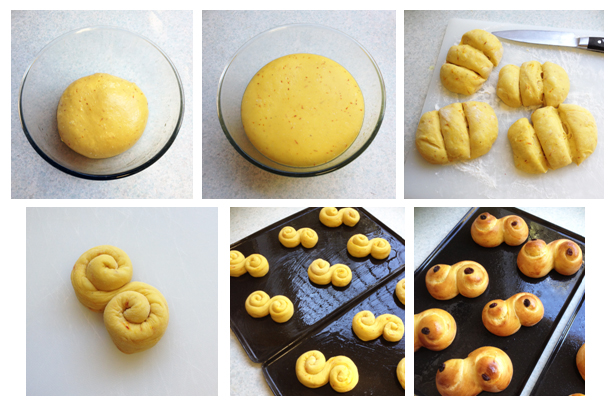
shaping Saffron and Cardamom Buns © www.foodbabylife.com

And the verdict? We LOVED these! So delicious, not too sweet and with that beautiful fragrance from the saffron and cardamom. My 6yo declared that I was 'a chef and should work in a bakery.' High praise indeed. In all seriousness these were sensational and I will definitely be baking them again, although perhaps saving them for the festive season as they are a bit of a luxury.

St Lucia Saffron and Cardamom Buns © www.foodbabylife.com

Lussakatter - St Lucia Saffron and Cardamom Sweet Buns
Recipe from Lavender and Lovage

300mls milk (I used rice milk)
1 ts saffron threads
500g strong white bread flour
7g sachet dried yeast
1/2 teaspoon salt
100g golden caster sugar
10 cardamom pods (seeds removed and crushed in a mortar and pestle)
75g butter, melted
1 large free-range egg
1 small free-range egg (extra, for the glaze)
24 raisins

Grease 2 large baking sheets and set aside. Place the saffron threads and the milk in a small pot and warm gently over low heat. Remove from the heat and cool to tepid.

In a large bowl, combine the flour, yeast, sugar, salt and cardamom seeds. Make a well in the middle and add the saffron milk, beaten egg and melted butter.

Stir together before turning it out onto a floured surface and kneading for 10 to 15 minutes, until the dough is smooth and elastic.

Grease the bowl you already used before returning the dough, covering it with a clean tea towel and leaving it to prove in a warm place for about an hour, or until doubled in size.

Knock the dough back and turn out onto a floured surface and divide into 12 equal pieces. Take each piece in turn and roll it out into a long sausage shape before twisting it tightly into an ‘S’ shape.

Place the shaped dough onto the prepared trays, cover with a tea towel and leave them to prove in a warm place for approximately 45 minutes. Preheat the oven to 200 degrees C / 400 degrees F during this time.

Once risen, brush the tops with the extra beaten egg and then push a raisin into the middle of the scroll on each end – 2 raisins per bun (see photos).

Bake for 15 to 20 minutes until dark golden brown and sound hollow when tapped from underneath.

Cool on a wire rack before serving. Best eaten the same day.

Makes 12 buns.

Thank you Karen for a truly special recipe and a wonderful month!
 

Thursday, February 7, 2013

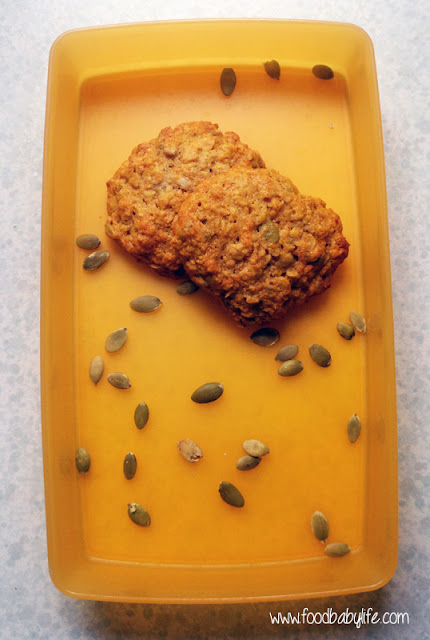
Carrot Cake Cookies

Carrot and Seed Cookies © www.foodbabylife.com

I've had a hankering for carrot cake this week but really couldn't be bothered making a whole cake. Plus I've been meaning to make a big batch of something to stash in the freezer for after-kindy snacks and a cake doesn't really work.

I spotted some Sunflower Seed Cookies on Planning with Kids a while back and have had them bookmarked to try.

As always when I find a recipe I like I very rarely make it as written. Here I've switched around quite a few of the ingredients using wholemeal flour, carrot and pumpkin seeds which weren't in the original. I've also used dextrose instead of sugar to make them lower in sugar/fructose and added extra baking powder so they are more cakey. Think a not-too-sweet carrot cake but in cookie form.

My boys went nuts for these! They had 2 each with a glass of milk for afternoon tea desperately wanted more but mean mummy said no.

This recipe makes a huge batch so they will last for more than 5 minutes. Most of the batch is in the freezer and I'm looking forward to bringing them out for after-kindy afternoon teas. As they are nut-free they would also be suitable to pack in Oscar's lunchbox for kindy.

Carrot Cake Cookies
Inspired by Sunflower Seed Cookies on Planning with Kids
Makes 4 dozen

225 grams butter, softened
1 ½ cups dextrose (or white sugar)
2 eggs
1 teaspoon vanilla
1 cup plain flour
1 cup wholemeal plain flour
1 teaspoon baking soda
1 teaspoon ginger
1 teaspoon cinnamon
1 teaspoon baking powder
1/4 teaspoon salt
2 cups rolled oats
½ cup sunflower seeds
½ cup pumpkin seeds
1 cup grated carrot (about 3 carrots peeled then finely grated)

Preheat oven to 180 degrees celsius /160 degrees fan-forced. Line 4 baking trays with non-stick paper and set aside.

Place the butter and dextrose a large bowl and beat with an electric beater until light and fluffy. Add the eggs one at a time followed by the vanilla, beating well after each addition.

In another bowl add all the dry ingredients and stir to combine then pour over the butter mixture. When roughly combined add the grated carrot and enough milk to make a thick and slightly sticky batter.

Roll heaped tablespoons of dough into balls and place them onto the trays (12 per tray), leaving plenty of room for spreading.

Bake for approx 12 minutes, rotating the trays halfway through, until lightly golden brown. Leave the cookies to cool for 5 minutes then transfer them to a wire rack to cool completely. Cookies will be soft but will firm up when cooled.

Makes approx 48. Suitable to freeze.

Sunday, November 11, 2012

Christmas Baking with Lucky Nuts

Recently I received a lovely gift bag of nuts from Lucky courtesy of Product Talk by Nuffnang. Just look at that haul! As a baker it made me very, very happy especially in the lead-up to Christmas which is the time of year when I cook with nuts.

I grew up watching my mum use Lucky nuts in her Christmas baking and they are what I turn to for special occasion baking too. I didn't actually realise it but Lucky almonds are all grown in Australia and in fact Lucky is the leading cooking nut brand in Australia, so they are definitely doing something right!

In case you can't see well enough I received a bag each of blanched, slivered and flaked almonds, walnuts, pine nuts, almond and hazelnut meals and 2 new products which I was very excited about.

Firstly was a bag of Easy Chef Oven Roasted Almond Meal, which as the packet says it basically a cheesecake base in a bag. So of course I had to make a cheesecake!

Secondly was a bag of Easy Chef Almond Crumble which is a mix of almond meal, flaked and slivered almonds with oats and again as the packet says, is a crumble topping in a bag. Perfect.

The walnuts didn't make it into my baking but I enjoyed them as a tasty mid-morning snack during the week. The pine nuts are set aside for pesto and the almond meal will be used in a gluten free almond shortbread recipe I am working on for Christmas. The blanched almonds will of course be decorating the tops of my Christmas cakes which aren't ready to bake yet.

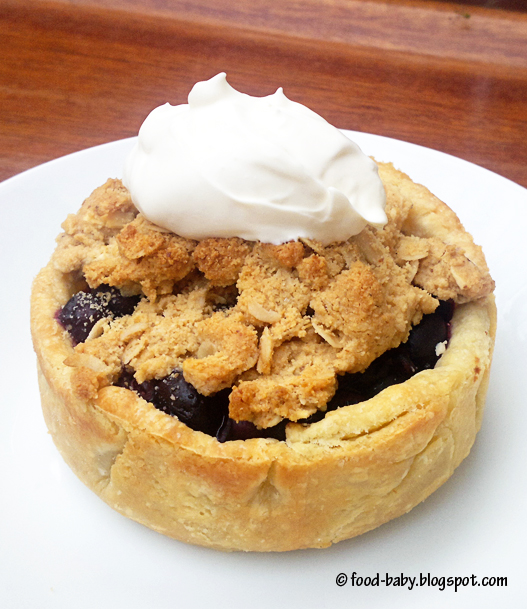
I ended up making 4 desserts, perfect for Christmas for anytime really - some moist Choc Hazelnut Cakes, a Panforte Ice Cream, Almond Cheesecake and Blueberry Crumble Pie.I'm trying to cut back on sugar so some of my recipes use Natvia.

I hope you enjoy these recipes and if you would like to try any Lucky products for yourself, the full range is available in Coles with a smaller range available in Woolies and independent grocery stores.

Almond Cheesecake


Adapted from Lucky

For the crust
125g unsalted butter, melted
250g packet Lucky Oven Roasted Almond Meal
1 tbs Natvia for Baking (or 2tbs brown sugar)

For the filling
500g cream cheese
3 eggs
3/4 cup Natvia for Baking (or 3/4 cup caster sugar)
2 ts vanilla extract
1/2 cup pure cream
1/2 cup Lucky Flaked Almonds, toasted*

Lightly grease and line the base of a 23cm springform pan.

Mix together the Lucky Oven Roasted Almond Meal with the melted butter and Natvia. Spoon into the prepared tin and press over the base and up the sides. Place in the freezer to chill for 30 minutes.

Preheat oven to 180 degrees celsius (160 degrees fan-forced).

In a food processor or electric mixer, beat together the cream cheese and Natvia until smooth. Add the eggs, vanilla and cream and beat for 3 minutes. Pour the mixture into the prepared base and bake for 35-40 minutes or until cheesecake is lightly golden and just set in the middle.

Remove and allow to cool to room temperature before chilling in the fridge for at least 2 hours. Decorate with toasted almonds. Serves 8-10.

Panforte Ice Cream

Panforte Ice Cream © food-baby.blogspot.com All rights reserved
Adapted from The Perfect Scoop by David Lebovitz, p68

1 cup full cream milk
1/3 cup Natvia for Baking (or white sugar)
1/2 ts cinnamon
1/4 ts ground cloves
1/4 ts ground nutmeg
Zest of 1 orange
2 cups pure cream
4 large egg yolks
1 x 110g pack Lucky Slivered Almonds, toasted*

Warm the milk, Natvia/sugar, spices and orange zest in a medium saucepan. Remove the pan from the heat, cover and leave to steep for 30 minutes. Add the cream and rewarm the mixture.

In another large bowl whisk the egg yolks.

Pour the warm milk/cream over the yolks, whisking constantly, then pour the mixture back into the saucepan. Cook the custard over medium heat, stirring with a heatproof spatula, until it thickens and coats the spatula. Pour the custard through the strainer into the cream. Mix thoroughly.

Place the bowl into an ice bath and stir the custard until it is cool.

Chill the mixture thoroughly in the fridge before churning in an ice cream maker according to the manufacturer's instructions. Add the toasted almonds in the last few minutes of churning.

* To toast almonds place them on a large ungreased oven tray and bake at 170 degrees celsius for 10-12 minutes, stirring several times. Leave to cool    

Makes approx 1 litre.


Moist Choc Hazelnut Cakes

Moist Choc Hazelnut Cakes © food-baby.blogspot.com All rights reserved
Adapted from Curtis Stone

90g Lucky hazelnut meal
125g dark chocolate (minimum 70% cocoa)
125g butter
pinch of salt
2 whole eggs
2 egg yolks
65g caster sugar
Plain flour for dusting (can use gluten free flour)
Butter for greasing
Raspberries for serve

Place a baking tray in the oven and preheat to 180 degrees celsius fan forced. Grease the inside of 6 metal dariole molds with butter and dust with flour. Set aside.

Melt the chocolate in a small bowl over a pan of simmering water, making sure the water does not touch the bottom of the bowl. Stir in the butter and remove from the heat.

Place the whole eggs, egg yolks and sugar in a large bowl and beat with an electric mixer for 5-7 minutes or until light, pale and foamy. Fold the melted chocolate into the eggs and then the hazelnut meal, mixing gently until well combined.

Spoon evenly into the prepared molds, place on the baking tray and bake for 8 minutes. Remove from oven and allow to rest for 1-2 minutes, before turning out onto serving plates. Dust each one with icing sugar and serve with fresh raspberries. Makes 6.


Blueberry Crumble Pie

Blueberry Crumble Pie © food-baby.blogspot.com All rights reserved
Adapted from Dorie Greenspan's Double Crusted Blueberry Pie in Baking from My Home to Yours, p361

Crust
1 1/2 cups all purpose flour
1 tbs sugar
280g salted butter, very cold and cut into tablespoon size pieces
68g coconut oil, cold
About 1/2 cup ice water

Put the flour and sugar in a food processor and pulse just to combine the ingredients. Add the butter and coconut oil and pulse only until the butter and coconut oil are cut into the flour. Gradually add the water, a few tablespoons at a time, until the dough is moist and clumpy. You want to see some pieces of butter. Check to see if the dough will stick together if pinched, and keep pulsing until it does.

Tip the dough out onto a piece of cling wrap, bring it together into a disc and refrigerate for at least 1 hour before rolling out.

Roll out the dough on a floured work surface or in between 2 pieces of baking paper. Lay the dough out into a greased 9 inch pie pan and trim the edges. Place in the fridge for 30 minutes. Preheat the oven to 180 degrees celsius. Blind bake the pastry shell for 20 minutes, then remove the lining and bake for a further 5 minutes.

Filling
1 x 500g pack frozen blueberries
2 tbs sugar
Juice and zest of 1 lemon
1 tbs cornflour mixed with 2 tbs water

Place the blueberries, sugar and lemon zest and juice in a saucepan and cook over medium heat until the blueberries have thawed. Add the cornflour and water and cook for a further few minutes until the liquid has thickened and is clear and syrupy. Remove from the heat and cool for 10 minutes.

Crumble
1 pack Lucky Almond Crumble
80g unsalted butter
2 tbs raw sugar
1/2 ts ground cinnamon

In a medium bowl mix together the Almond Crumble, sugar and cinnamon. Rub in the butter using your fingertips until well combined..

To assemble
Spoon the filling into the prepared pie shell. Sprinkle over the crumble topping evenly over the filling leaving a small gap around the edges to show the gorgeous colour of the blueberries.

Bake in a preheated 180 degree oven (160 degrees fan forced) for approx 20 minutes until the topping is golden brown and the filling is bubbling.

Remove from the oven and allow to cool for 10 minutes before serving with a big dollop of cream.

This recipe makes 1 large 9 inch pie or 4 smaller pies.

Note - this is not a sponsored post however I did receive product for consideration. For more information see Product Talk by Nuffnang.

Thursday, October 18, 2012

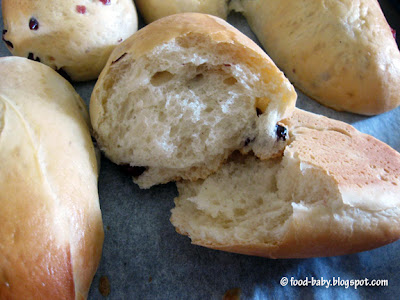
Finger Buns


Another trip down memory lane with these! I can vividly recall being in a particular bakery as a child - rows and rows of sweet treats, the smell of sugar mixing with fresh bread and piping hot sausage rolls. What always caught my eye though were the finger buns with their vivid pink icing and sprinkles. What could be more attractive to a little girl?

Although I have boys I knew these would go down a treat. The buns themselves are made from a simple sweet bread dough with some dried fruit. Nothing wrong with that! Add some pretty icing and sprinkles and you have something really special.


Finger Buns
Recipe from Frills in the Hills

475g plain flour
35g milk powder
75g caster sugar
2 1/2 tsp instant dry yeast
1 egg, lightly beaten
150ml lukewarm water
40g butter, cubed
1/2 cup currants (or sultanas or cranberries)

Place the flour, milk powder, sugar, yeast and currants into the bowl of your stand mixer and mix to combine. Add in the water and egg and mix using the dough hook for about 4 minutes. Add in the butter, one cube at a time, and mix for another 6 minutes or until the dough is sticky and elastic.

Remove the dough from the mixer and place into a large greased bowl. Cover with plastic wrap and leave in a warm place for 1 hour until the dough has doubled in size.

Punch down the dough, give it a quick knead by hand and divide it into 12 even pieces. Roll each piece into a sausage then place them on a greased or lined baking tray. Leave to prove for another hour or until doubled in size.

Bake the buns in a preheated 190 degree oven (170 degrees fan-forced) for about 12-15 minutes. The buns should be risen, golden brown and sound hollow when tapped on the bottom. Remove from the oven and allow to cool on a wire rack.


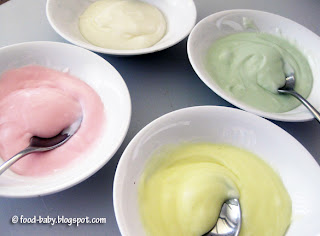
I find most food colourings pretty scary in terms of both the colour and ingredients, so for these I used some all-natural colours. They made some lovely pastel shades which is just what I was after. I guess to get the really bright colours you need the nasty stuff.

Icing

1 cup pure icing sugar, sifted
2tbs soft butter
Few drops of food colouring
Coconut, sprinkles, nuts etc to decorate

In a large bowl beat together the icing sugar and butter until smooth. You may need a teaspoon or so of milk to get the consistency you want. Divide the mix into small bowls and add a few drops of food colour to each. Mix well to incorporate the colour evenly. Spread over the top of the cooled finger buns and top with decorations of your choice.

with slivered almonds

with cachous

with coconut

with chopped walnuts

Making these would be a great rainy-day project (not that we've had any rain much for months) and kids would have lots of fun decorating their own!

This recipe is a keeper.

Thursday, July 5, 2012

Fruit Scones

© food-baby.blogspot.com All rights reservedApart from being absolutely delicious, what I love about scones is that they take no time at all to prepare! There are lots of scone recipes out there, most of which contain cream and most of which I find very rich and a bit heavy. This recipe is one I have been making since I was a kid. It's virtually foolproof. I even make it in a food processor and they still turn out well!

Fruit Scones
Recipe from The Australian Women's Weekly Original Cookbook, ACP 1977, p194

3 cups self-raising flour
1/4ts salt
1/4 cup sugar
60g cold butter, in chunks
1 cup milk
1 egg
1 cup sultanas or dried fruit of your choice (I used mixed fruit)

Preheat the oven to 270/250 degrees celsius fan-forced. Lightly grease a baking tray and set aside.

Sift the flour into a large bowl and rub the butter in using your fingertips. Stop when the mixture resembles rough breadcrumbs. Stir in the sultanas and sugar then add the beaten egg and most of the milk. Use a butter knife to bring the dough together, it should be soft and not too sticky.

Tip the dough out onto a floured surface and gently bring together, patting it out to approximately 2cm thick. Use a 5cm (2 inch) cutter to cut out rounds and place on prepared tray, leaving a centimetre or so between them. Gently press together the scraps and dough and repeat. Brush the tops with milk and bake for 12 to 15 minutes or until they are golden brown and smelling delicious.

Makes approx 12 depending on the size of your cutter.

These are also great to freeze for snacks. Scones do tend to dry out a little when frozen but if you don't overbake them, a quick zap in the microwave will freshen them up. A generous smear of butter also helps!


Tuesday, June 26, 2012

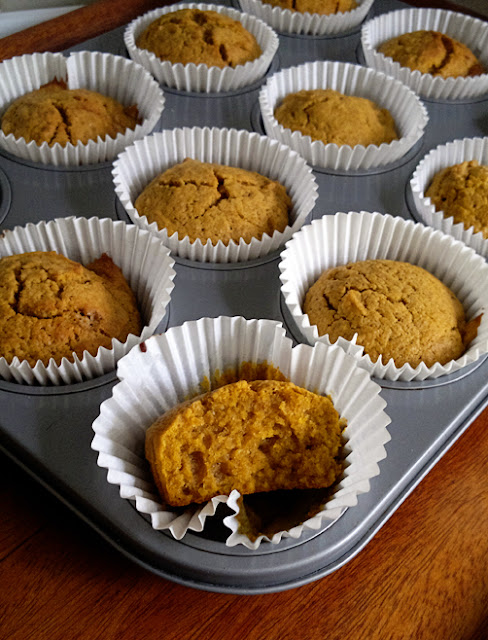
Spiced Pumpkin Muffins

© Susan Lockhart King http://food-baby.blogspot.com All rights reserved

We tend not to make sweets with pumpkin in Australia. Buying pumpkin in a can or even pumpkin pie spice blends are unheard of. But it's actually no trouble at all to make your own and I'm sure it would be cheaper.

I had pureed some pumpkin to stir through the kids' pasta for dinner and ended up with about a cup left over. What to do? A quick search on Tasty Kitchen led me to these pumpkin muffins and wow, they were amazing! The house smelt like Christmas and warm from the oven the muffins were moist and absolutely delicious.

The perfect treat to brighten up a grey and chilly winter's day.

Pumpkin Muffins
Adapted from A Cozy Kitchen via Tasty Kitchen

1 cup plain flour
1/4 cup wholemeal flour
2 ts baking powder
1 cup pumpkin puree
1/2 cup coconut oil, melted and cooled
2 eggs
2/3 cup brown sugar
1/4 ts salt
1/2 ts cinnamon
1/8 ts ginger
1/8 ts allspice
1/8 ts nutmeg

Preheat the oven to 180 / 160 degrees celsius. Line a 12 cup muffin tray with paper liners and set aside.

Whisk together the flours, baking powder and spices in a large bowl. In another bowl whisk together the pumpkin, oil, eggs and sugar until smooth. Pour this mixture over the flours and using a rubber spatula, fold together until just combined.

Divide the mixture among the muffin cups (they should be at least 2/3 full).

Bake for 20-25 minutes (mine took 22) or until golden brown and a skewer inserted into the middle of a muffin comes out clean. Cool in the pan for 5-10 minutes before turning out onto a wire rack. Serve warm or freeze to eat later.

This post is linked up to Crazy for Crust's Crazy Sweet Tuesdays.


Sunday, May 13, 2012

Mothers' Day Baking - Basic Scones

Happy Mothers' Day to all the mums out there! Hope you are all having a lovely day with your special people.

Scones always remind me of my mum. Partly because neither of us really had the knack for making them! And partly because we would always order scones with jam and cream at every cafe we went to.

I've tried dozens of different recipes and although I've come close to great scones, they were mostly just good. This recipe may not be 100% perfect but they were seriously the best scones I've ever made. Light and fluffy and beautifully risen. And they were made with the help of my 3 yo son who absolutely loved rubbing the butter and flour together and making as much mess as possible!

Basic Scones
Recipe from Taste.com.au

3 cups self-raising flour, sifted
80g butter, cubed
1 to 1 1/4 cups milk
plain flour for dusting
Milk for brushing

Preheat oven to 200°C and lightly dust a baking tray with plain flour.

Sift self-raising flour into a large bowl. Use your fingertips to rub the butter into the flour until the mixture resembles breadcrumbs. Add 1 cup of milk and then mix gently with a flat-bladed knife until mixture forms a soft dough, adding a little more milk if required.

Turn onto a lightly floured surface. Knead gently just until the dough comes together. Pat dough into a 2cm-thick round. Using a 6cm round cutter, cut out 9 rounds. Press remaining dough back together and cut out another 3 rounds.

Place scones onto the baking tray, leaving about 1cm between them. Brush the tops with milk. Bake for approx 20 minutes or until golden and well risen. Transfer to a wire rack to cool. Makes 12.

While jam and cream is traditional, I like mine hot from the oven with butter and golden syrup. Delicious! And a perfect treat for mothers' day.

Wednesday, May 9, 2012

Cranberry-Apple Crisp


Apple crumble is one of the easiest and tastiest things you can make for a quick dessert. And of course the bonus is that it makes a great breakfast the next day! 

Rather than make a standard apple crumble or crisp, I was inspired by Dorie Greenspan's version as we just happened to have one last lonely pack of frozen cranberries leftover from Christmas.

Cranberry-Apple Crisp
Recipe adapted from Dorie Greenspan's Baking from My Home to Yours, p422

Topping
3/4 cup plain flour
1/2 cup brown sugar
1/2 cup rolled oats
1/2 cup dessicated coconut
1 ts cinnamon
1 ts ground ginger
125g butter, chopped into small pieces

Filling
4 apples, peeled, cored and chopped into a fine dice
1 cup frozen cranberries
1/2 cup sultanas
1/3 cup sugar
1 tbs plain flour

Preheat oven to 180 degrees Celsius. Spray a 1.8 litre baking dish with oil and set aside.

To make the topping, combine the dry ingredients in a large bowl. Rub the butter into the flour mixture until it resembles coarse breadcrumbs and is clumping together.

To prepare the filling, combine all ingredients and mix well. Pour into prepared baking dish.

Spread the topping evenly over the fruit filling and bake for approx 1 hour or until the top is a deep golden brown and the fruit is bubbling up around the edges. Allow to cool slightly before serving with ice-cream or custard. Enjoy the leftovers (if there are any!) for breakfast the next morning.

Serves 6-8.

This was really, really good! Such a shame we can only buy frozen cranberries for a few weeks a year because they add such a special quality to things like this. Definitely a winner.

Sunday, April 1, 2012

Sunday Baking - Milo Muffins

In a few years I'll be baking treats for my kids' lunchboxes, but for now I am baking for the big kid in my life aka the hubby! We are trying to cut back our spending and making sure he takes lunch with him every day is a big part of that.

We have been planning our dinners pretty carefully for a while so that there are always leftover meals for his lunch, and now I am baking every Sunday so there is something sweet to have with his coffee as well. I'm such a good wife! Ha!

I stumbled across these Milo Muffins on the Essential Kids website but they are actually from one of my favourite bloggers, Melissa at Frills in the Hills.

Milo Muffins
Recipe very slightly adapted from Essential Kids
Makes 12 small or 6 jumbo muffins

1 1/2 cups self raising flour
2/3 cup milo
1 egg
2/3 cup milk
2/3 cup brown sugar
1/2 tsp baking powder
60g butter, melted
Chocolate sprinkles to decorate

Preheat oven to 190 degrees celsius. Place all ingredients in a large bowl and mix until smooth. Pour into muffin papers until 3/4 full. Cover each with chocolate sprinkles and bake for approx 20 minutes.

Cool in tin for 5 minutes then turn out onto a wire rack to cool completely. Suitable to freeze.

I made 6 jumbo muffins which meant 1 for me and 5 for hubby's lunches. He did forget to take one one day and I got a text with sad face that morning!

Tuesday, December 20, 2011

TWD REWIND - French Yoghurt Cake with Marmalade Glaze

I have to say TWD Rewind weeks are always difficult. I mean there's just so much to choose from! When it comes down to it though we all have our favourites and in my case, it tends to be the simpler more homestyle recipes. The ones I want to make over and over again. So this week I chose Dorie's French Yoghurt Cake with Marmalade Glaze on p224-5.

I was so looking forward to this one but I didn't even get a bite. Actually no one did on account of me baking with a tub of yoghurt that had expired a few weeks earlier. Whoops! You really should check your labels kids, BEFORE you bake.

Now I know some people would eat it anyway seeing it's yoghurt and already sour and it was baked etc etc but really who wants to risk a bout of food poisoning the week before Christmas?

Come to think of it there were quite a few mishaps with this cake. I had already poured it into the tin when I realised I'd forgotten to add the oil. After it was baked, and before I realised the yoghurt problem, I opened my new jar of marmalade to discover it was covered in green fuzz. Yuck. Clearly the universe did not want me to eat this cake (don't worry I didn't take use the mouldy marmalade, I had some already opened in the fridge).

Please don't be put off by all this. When made correctly this cake is fabulous! It's moist and tangy and just plain good. You can find all the details and the link to the recipe here.

It's quite sad but this is our second last ever week of TWD. Coming up next week are Kids' Thumbprint Cookies chosen by Dorie herself.

Monday, December 12, 2011

Christmas Baking Craziness

I know I'm not alone in overcommiting before Christmas. I love to make lots of homemade goodies for the family and to give as gifts and between all that and regular baking and bringing cakes etc for Christmas parties I will be spending many, many hours in the kitchen!

This is what I am making this year:

- 2 x christmas cakes (one is gluten free this year for my dad)
- a full-size traditional steamed plum pudding
- a batch of mini fruitcakes
- a peach tart
- a chocolate marquise cake
- choc peanut butter slice
- cranberry cookies
- chocolate peanut butter cheesecake
- a frozen christmas pudding
- sugar cookies to decorate with the kids

I know in a few years that list will blow out even further when we'll be baking gifts for teachers too.

We are having a Christmas eve dinner at our place for close family this year and have finally decided on a menu. I'll be doing a pineapple and brown sugar glazed ham, a boneless, butterflied roast turkey, potato bake and salads with plum pudding and custard for dessert. Yum!

And then we'll be rocking up to do it all again on Christmas Day AND Boxing Day!

Luckily Christmas only happens once a year!

What are you baking this year?

Tuesday, December 6, 2011

Tuesdays with Dorie - Earl Grey Madeleines

Well it's officially the last month of Tuesdays with Dorie. I haven't actually posted a TWD recipe for a while although I have been quietly baking along at home. Now we're really on the home stretch I couldn't miss out and will be baking and posting everything for this month in spite of the craziness that is December!

This week Nicole of Bakeologie chose Dorie's Earl Grey Madeleines. (I will be baking the Honey Fig Tart in a few weeks time for an early Christmas lunch).

You'll notice from my photo that I haven't used a Madeleine pan, basically because I don't have one and couldn't justify splurging on a pan I will only use very occasionally (ha! look at me all grown up and responsible now that I have 2 little mouths to feed!). I used a patty cake pan instead and I think they look lovely.

While I quite enjoy Earl Grey tea I decided to use a tea I picked up at T2 on my recent trip to Melbourne. T2 is a chain of specialist tea stores with the most divine range of teas and associated paraphernalia. I bought a couple of vareties but by far my favourite was the Ginger Spice, a black tea flavoured with ginger, cinnamon, orange and vanilla. Really yummy and fragrant and just perfect for these little cakes.

Photo from www.t2tea.com

I let the batter rest overnight in the pan so it was ready to put straight in the oven the next morning. I thought being so cold it would need an extra few minutes baking but actually these were done (overdone in fact) at the 10 minute mark. Still really tasty and with a lovely perfume from the tea, just slightly drier than they should be. Pity.

I'm sure they won't last long though. I will pop the rest in the freezer and can see myself grabbing one for a yummy snack with my afternoon cuppa. Thanks for a great pick Nicole! You can find the recipe on Bakeologie under today's date.

Monday, November 21, 2011

I'm still here! ... and gluten free chocolate chip cookies

Wow, so it's been a whole 5 months since my last post. I have to say 2011 has completely gotten away from me and now it's nearly Christmas! After a few years of regular baking and blogging I guess I just needed a break. I know my waistline and bank account did too! But with TWD soon coming to an end it's definitely time I checked back into the bloggy world.

We've had a few health hiccups this year and a forray into food intolerances. The boys and I have all seen an allergist and had skin prick tests done. The boys were all clear (which is good and not so good since I am convinced that Oscar has a few food sensitivies that maybe will never show up on a test) and I am only allergic to dust, pollen and cats.

Regardless I am baking with a few more alternative ingredients and trying out some gluten-free and lactose-free products. I made these chocolate chip cookies a few weeks ago and they were absolutely to die for! Hubby had no idea they were gluten free until I told him and honestly they disappeared so fast I had to grab a photo of the lowly last one. Enjoy!


Gluten Free Chocolate Chip Cookies
Adapted from a recipe on Nellbe's Gluten Free Kitchen Table

115g melted butter, cooled
1 egg
1 ts vanilla extract
1 1/2 cups gluten free flour
1/2 cup brown sugar
1 cup chocolate chips

Preheat over to 180 degrees C. Line 2 baking trays with baking paper.

Whisk together melted butter with egg and vanilla extract until combined. Combine gluten free flour, sugar and choc bits in a large mixing bowl. Add butter mixture and mix well. Press mixture, 1 tbsp at a time, into balls. Place on tray and allow room for spreading. Press each cookie down slightly and cook 12-15 mins until golden. Cool on trays for 5 minutes before turning out onto a wire rack to cool completely.

These were fabulous warm out of the oven. Once cooled they settled into crispy-around-the-edges-but-still-chewy-in-the-middle deliciousness.

Next post - Charlie turns 1!

Tuesday, June 21, 2011

TWD - Date Loaf

This week Mary of Popsicles and Sandy Feet (love that name!) chose Date-Nut Loaf. I was intrigued by how this would turn out as it is not the date loaf that I know and love.

I made a half recipe and left out the nuts to make it kid friendly. Oscar adores dates and he scoffed quite a few while helping me whip this up. If you have kids you'll know that his 'help' resulted in a whole lot of cleaning up afterwards!

The date loaf I am used to is rich and dark. The dates are soaked in hot water and bicarb soda which essentially turns them to mush, they are then folded through the batter rather than just being dotted throughout.

To me this was more like a pound cake that just happened to have dates in it. Not that there is anything wrong with that! The cake was moist and buttery and I had a piece warm from the oven with custard. Definitely nothing wrong with that!

This was nice for a change and is a perfect snack cake. Thanks to Mary for her pick this week! You can find the recipe on Popsicles and Sandy Feet under today's date.

Tuesday, May 3, 2011

TWD - Basic Marbled Loaf

We've just had a lovely long weekend here but I have to admit it has messed me up a bit. With 2 short weeks in a row I never seem to know what day it is anymore! Luckily I remembered it was Tuesday today and that means it's TWD time.

This week Carol from The Bake More chose Dorie's Basic Marbled Loaf Cake. Rather than use the playing around suggestions I decided to take a trip down memory lane and make a neapolitan cake. These were everywhere when I was a child and mimic the colours of neapolitan icecream which had chocolate, strawberry and vanilla flavours side by side. In my house the vanilla always got left till last!

I split my batter into 3 lots keeping one plain, adding melted chocolate to the second and healthy dose of pink food colouring to the third. I have to admit I was pretty pleased with the result as my cake was not only pretty but moist and yummy.

We've had a fair bit of cake around here recently because of Oscar's birthday and he's taken to asking for 'more birthday' (meaing cake). Very cute!

Thanks to Carol for a great pick! You can find the recipe on her blog under today's date.
Related Posts Plugin for WordPress, Blogger...