Showing posts with label Birthday. Show all posts

Monday, March 26, 2018

Choc-Hazelnut Ice Cream Sandwiches

gluten free dairy free choc hazelnut ice cream sandwiches with orange essential oil - www.mywholefoodfamily.com

If you've been reading for a while (thank you) you will know that when I started this blog back in 2008 I jumped almost immediately into a blogging group called Tuesdays with Dorie. There were hundreds of members around the world and together we baked and blogged our way through Dorie Greenspan's Baking: From My Home to Yours. It was amazing! But looking back I'm also amazed just how much sugar we were consuming on a weekly basis through those recipes (eeek!).

Things have changed a lot, both from my own health challenges and of course now having 3 children we want to feed them healthy, nourishing food.

Now I only bake for special occasions and I always offer to bring dessert when we go out BUT I still choose recipes free from gluten, dairy and refined sugar.

We had my mother-in-law over for her birthday dinner and after much deliberation I chose to make these ice cream sandwiches for dessert.

Messy, sticky, sweet and SOOO good. I just may have snagged the last one for breakfast the next day  :) #cooksprivilege

Choc-Hazelnut Ice Cream Sandwiches
GF, DF 

Cookies:
150g hazelnut meal
3 tbs coconut oil
2 tbs xylitol
pinch salt
1 ts vanilla extract
1 large egg, beaten

To serve:
100g dairy free dark chocolate (I like Green & Blacks 70%)

3 drops Wild Orange essential oil
Ice cream (I used Weiss Simply Coconut which is dairy-free)

Preheat over to 180 degrees C and line 2 trays with baking paper.

In a medium bowl mix together all cookie ingredients until well combined.

Roll spoonfuls of mixture into balls and place on prepared tray, flattening each with your hand and smoothing the edges to they are all round and roughly the same size. I got 14 from this batch, so 7 ice cream sandwiches. Feel free to make them bigger or smaller but keep in mind the cookies are very filling!

Bake for 8-10 minutes or until very lightly golden brown around the edges. I swapped the trays halfway through.

Allow to cool completely.

Melt the dark chocolate, add the orange essential oil and mix well to combine, then dip each cookie in halfway. Place back on the baking tray and leave to set.

To serve, place a scoop of dairy-free ice cream in between 2 cookies and enjoy! Be ready to lick your fingers as they are pretty messy. 


What's your favourite dessert? xx


Saturday, October 24, 2015

Noah turns 2! and a Frozen Raspberry Cheesecake

You know what they say about best laid plans? Well that was us this week. I had planned the most delicious carrot, orange and ginger layer cake for Noah's birthday and guess what happened. Our oven died. Right in the middle of cooking pizza for dinner 2 days before his birthday. We saved the pizza by cutting it into pieces and cooking them individually in our sandwich press. Bit hard to make a cake like that though!

After a bit of panic and a lot of searching I decided it would be easiest to make a frozen cake of some sort and Wholefood Simply came to the recipe. If you haven't visited this gorgeous blog then you are really missing out.

The recipe I chose was a raspberry cheesecake with chocolate crust which I tweaked a little and decorated to suit a birthday. On that note, a huge happy birthday to our beautiful boy who has filled our lives with such joy these past 2 years. We love you Noah!!


Frozen Raspberry Cheesecake with Chocolate Crust
Slightly Adapted from Wholefood Simply

Crust:
1 cup desiccated coconut
1 cup raw almonds
10 dates, seeds removed
1 tablespoons raw cacao

Line the base of a 20cm springform pan with baking paper. Place all ingredients in a food processor or high speed blender and blend until sticky and well combined. Press firmly into the base of the prepared pan and place in the freezer until required.

Cheesecake – Step 1
2 cups frozen mixed berries
8 dates, seeds removed

Blend all ingredients until well combined, spoon into a bowl and set aside.

Cheescake – Step 2
2.5 cups raw cashews (preferably soaked for a few hours first then drained well)
3 heaped tbs coconut oil
2 ts vanilla extract
juice of one lemon
1/2 cup coconut milk (you may need a little more or less liquid than this so don't add it all at once)

Blend all ingredients until smooth and very well combined. Scrape down the sides of the blender and keep blending until you are happy with the consistency. Add the berry mixture and mix until well combined.  Spread the cheesecake mixture over the base, smooth the top and place in the freezer.

Topping:
1 1/2 cups cold coconut cream
2 tbs maple syrup
2 ts vanilla extract
1 tbs gelatin

Blend all ingredients until thick and smooth. Pour over the cheesecake mixture and return to the freezer for 4 hours or overnight.

Remove from the freezer at least 20-30 minutes before serving.

To make the number 2 on top I simply printed a big number 2 and cut it out to form a stencil. Lay the stencil over the cake and dust on some cocoa. Make sure you remove the stencil very carefully (you might need an extra pair of hands for this). Very simple but very effective!


Thursday, May 30, 2013

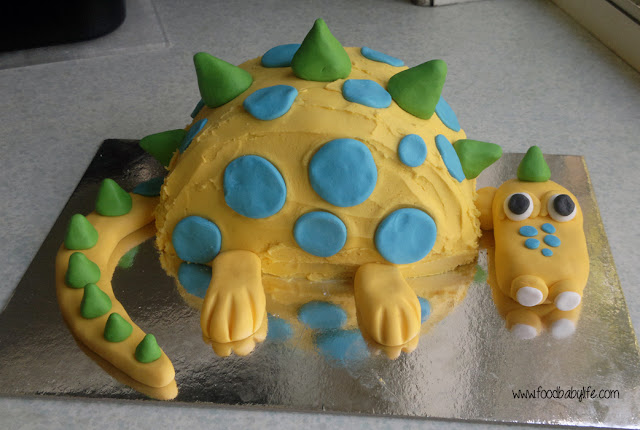
Oscar's 4th Birthday and a Dinosaur Cake

Dinosaur Cake © www.foodbabylife.com

My big boy turned 4 last month! Such a cliche but he is growing up so quickly.

Although he had been asking for a party we decided to keep it low key and do a family outing instead, especially as his birthday fell on a Saturday this year.

Oscar has always loved animals and nature so we decided to head off to Australia Zoo for the day. This is the zoo that Steve Irwin founded on the Sunshine Coast and is a brilliant place to visit with kids. There is heaps to see so I would recommend getting there as soon as they open if you are to have any chance of seeing it all in one day!

We were a little late getting there (having a few toilet stops on the way for the kids) and I had also stupidly invited more family over for birthday cake at home at 4pm. What I hadn't figured on was getting home by 4 actually meant rounding everyone up to leave the zoo about 2.30. Not surprisingly we didn't see everything we wanted to. Oh well, live and learn.

Anyway, we all had a great time. The kids loved seeing all the animals, the giant tortoises, the bird show and of course the crocodiles were big hits. And we still had birthday cake at home to look forward to.

Oscar had been asking for a dinosaur cake for at least 6 months so I had plenty of time to research. I pretty much just googled 'dinosaur cake', looked through all the images and chose one something that looked easy (I found this one here). And it turned out pretty well if I do say so myself!

The body of the dinosaur is an 8 inch round cake split in half and sandwiched together with icing to form a semi-circle shape. As we are trying to stay sugar-free I chose to bake the vanilla cake from David Gillespie's Sweet Poison Quit Plan Cookbook, and then used a normal sugar icing.

The head, tail, legs and spots were made from ready-made fondant icing that I tinted myself using mostly Wilton gel colours. I was really happy with how the colours turned out, they were just what I was hoping for. It was a lot of fun making the shapes too, a bit like playing with play dough!

So another year, another birthday cake. Stay tuned for Charlie's birthday in November!


Tuesday, November 13, 2012

Happy Birthday Charlie!

Digger Cake © food-baby.blogspot.com All rights reserved

Hard to believe but my baby turned 2 last week! Quite honestly it has been the fastest 2 years of my life and my boys are growing up so very quickly.

To celebrate we had a party on Sunday for friends and family. It was supposed to be at the park but rain the day before (the first real rain in months) put an end to that. I had visions of muddy toddlers sliding all over the place! So Plan B was at our place and amazingly we fit 19 adults and 13 children in our lounge/dining room and little backyard. We must live in the Tardis.

Here is the birthday boy checking out his new cubby and opening his presents ...


And onto the important stuff, the food!

As you will have seen above I made Charlie a digger cake. He is obsessed with all things truck and I just I would have to do some sort of truck cake for him. I have 3 kids birthday cake books but unfortunately there was nothing quite right. I was thinking I would have to just wing it (a dangerous idea because cake decorating is really not my strength!) when I came across a digger cake on Cake 2 the Rescue.

This is a local business which sends out cake kits complete with everything you need to make a brilliant cake - cake mix, icing mix, pre-coloured fondant icing in the right amounts, food colouring, a rolling pin, cake lifter and cake board. While I wouldn't normally go for something so pre-packaged it was a real time saver and a lot of fun! And just for the record this is not a sponsored post, I paid for own cake kit and just wanted to give them a shout-out.

Digger Cake © food-baby.blogspot.com All rights reserved

Here is the finished cake with M&Ms 'dirt' and lots of little fingers waiting (or not) to dig in! It was a real hit on the day and Charlie loved it. Everyone loved the taste of the cake but as the decorator I found the cake a bit too spongy. Despite being in the fridge first it still crumbled in parts when I iced it whereas a slightly denser buttercake may have held together better. No big deal really but still.

Keeping with the truck theme I also had a go at decorating some biscuits. I found this cute cutter at Matchbox and used Charlie's favourite colour orange to decorate. This was my first ever attempt at decorating biscuits and I think I did ok. My only real issue came with the tyres. I completely underestimated how much black food colouring I would need to make a real black and of course my icing was far too runny by them and began to ooze and run off the edges of a few of the biscuits. Luckily no one cared!

Truck Cookies © food-baby.blogspot.com All rights reserved

I used a sugar cookie recipe from Sweetapolita which you can find here and an icing recipe from I Am Baker which you can find here. I was really happy with both of these and would definitely recommend them. I also used Wilton gel colours.

So that's it! Another birthday done and dusted. Oscar is already asking for a dinosaur cake for next year so I will have another opportunity to work on my cake decorating skills.

Saturday, July 14, 2012

Crepes for Bastille Day and a blogiversary!


Happy Bastille Day! And happy blogiversary to me!

It's been 4 years and 285 posts since I started this little blog. I had zero clue about what I was doing or where I wanted to go with this, all I knew was that I loved to bake and wanted to share that with my little corner of the interwebs. You can find my first post here. Read it and cringe along with me!

I definitely lost my blogging mojo after the boys were born but now that they are a little older I have a bit more time and am committed to posting at least twice a week and broadening my food horizons. To all my lovely readers and followers, thank you for sticking with me!

In honour of Bastille Day today we made crepes for breakfast served my favourite way, with a squeeze of fresh lemon juice and a sprinkling of sugar. Delicious!

Crepes
From The Australian Women's Weekly Original Cookbook, ACP 1970 p180

1/3 cup plain flour
3/4 cup milk
2 eggs
pinch of salt
1 tbs oil or melted butter

Place the flour in a large bowl along with the eggs, salt, oil and 2 tbs of the milk. Whisk until smooth then add in the remaining milk and beat well. Refrigerate for 30 minutes.

Place a heavy bottomed frypan over medium heat. Grease with a small amount of butter. Pour about 1/8 cup of batter into the pan, tilting to cover evenly. Cook for about a minute, or until the top is dry. Flip and cook on the other side for 10-20 seconds. Turn out onto a plate and repeat until all the batter is used. Makes approx 10-12.


Friday, November 25, 2011

Charlie turns 1


Hard to believe but on 8th November my baby Charlie turned 1! Which means Oscar is now 2 and a half. Which makes me ... well never mind!

Charlie has brought us so much happiness over the past 12 months. All those wonderful firsts - smiles, laughs, rolling over, sitting, standing and just in the last week, those amazing first steps. He's such a different little personality from his brother too, much more independant and a real daddy's boy.

Hubs and I are both only-children so we had no idea what to expect with 2 little ones. While we are certainly busier now and a for a while got a lot less sleep, having 2 kids is awesome. Can't wait to see what the next year brings for both my little men.


Here are a few photos of the birthday boy and his cakes (yep, cakes plural)!

A basic chocolate cake with chocolate buttercream icing and decorated with white chocolate buttons. I made this for his actual birthday.

First ever taste of cake. Yum! Just watch the sugar coma setting in ...

Finger licking good!

The kite cake from p11 of the Women's Weekly Kids' Birthday Cakes cookbook. A basic buttercake with buttercream icing tinted in red, leaf green, violet and lemon yellow. A little rough around the edges but with 2 birthday cakes a year from now on, there's plenty of chance to practice!

At his birthday party in the park.
'whaddya mean no more cake till next year?!'

Monday, August 30, 2010

White Choc Honeycomb Mudcake

In one of those freaky but awesome coincidences my husband and I have the same birthday. So happy birthday to us today!! While he unfortunately is off to uni as usual, I have the day to myself with Oscar off at daycare every Monday. As soon as I drop him there I am off to the hairdressers.

Tonight we are going to the lovely Bretts Wharf for dinner. For the Aussies out there, you may know head chef Alastair McLeod from Ready Steady Cook.

This year I told hubby to choose whatever sort of cake he wanted and we would make it together. After a little searching he came up with the truly gluttonous sounding White Chocolate Honeycomb Mudcake from taste. Now if that doesn't sound like a celebration cake I don't know what does!


White Choc Honeycomb Mudcake

Recipe from taste.com.au

Mudcake:
250g butter, chopped
180g white chocolate, roughly chopped
1 cup milk
1 3/4 cups caster sugar
2 teaspoons vanilla extract
2 eggs, lightly beaten
1 3/4 cups plain flour, sifted
1/2 cup self-raising flour, sifted
2 x 50g Violet Crumble chocolate bars, chopped

White chocolate ganache:
180g white chocolate, chopped
1/3 cup thickened cream

Grease a 6cm-deep, 22cm (base) round cake pan. Line base and side with 2 layers of baking paper. Place butter, white chocolate, milk, sugar and vanilla in a saucepan over medium heat. Cook, stirring, for 5 minutes or until smooth. Set aside for 25 minutes to cool. Preheat oven to 160°C/140°C fan-forced.

Whisk eggs and flours into chocolate mixture. Fold in half the Violet Crumble. Pour mixture into prepared pan. Bake for 1 hour 45 minutes to 2 hours or until browned and a skewer inserted into centre of cake comes out with crumbs clinging (cover cake loosely with foil if over-browning during baking). Cool in pan.

Make ganache. Place white chocolate and cream in a heatproof, microwave-safe bowl. Microwave on high (100%) for 1 minute, stirring with a metal spoon halfway during cooking, or until smooth. Set aside for 15 minutes to cool. Whisk ganache gently to thicken. Spread over cake top. Sprinkle with remaining Violet Crumble. Serve.

(I left the honeycomb pieces out of the cake and used them to fill it instead.

I used 220g white chocolate and 300ml thickened cream to make enough ganache to fill and ice the cake. Chop up the chocolate and place into a heatproof bowl. Place the cream in a small saucepan and stir over medium heat until almost boiling. Pour over the chopped chocolate. Leave for 30 seconds then stir until smooth. Refrigerate until cold. Using an electric beater, whip the ganache until soft peaks.

Slice the cake in half. Place about 1/3 of the ganache mix into a small bowl and fold through some chopped violet crumble. Use this to fill the cake.

Smooth the remaining ganache over the top and sides of the assembled cake. Scatter over more chopped violet crumbles and serve.)


The verdict? ... Delicious but sooooo sweet. I mean seriously SWEET. If I were to make this again I would cut the sugar by half and use plain whipped cream to decorate rather than a ganache. The recipe says it will serve 12 but I think it would be more like 20+. Still a success overall though!

Tuesday, April 20, 2010

Oscar's 1st Birthday Roundup

Hard to believe but my baby is 1 today! The past 12 months have been amazing but it's all gone by so quickly. He's going to be starting school before I know it.

To celebrate we had a party on Sunday down at the waterfront at Manly. We thought the weather was going to spoil it but it turned into a gorgeous day.

38 adults, 7 kids, 1 dog and a ton of food. Sounds like a party to me!

Where's Oscar? Nath worked hard to blow up all these balloons but they didn't last long in the wind

Not too sure about the hat!

Yay, cake!

Hmmm, do I like icing?

Fingerprints in the icing

Who cares about presents when there's bark to play with!


Mummy and Oscar looking a little worse for wear

The car's loaded up with presents. Time for a nap

After spending most of the weekend cooking and baking I didn't even get a photo of the food!

We decided to keep it simple and just have a sausage sizzle, potato salad, pasta salad, green salad, bread and cake.

What you didn't see in the photos are the 48 cupcakes I made. This is one of the 3 leftover that we took home:

I used Nigella's basic cupcake recipe which always works for me. You can find the recipe here. I made a test batch a few weeks ago so felt really confident making 4 doz for the party. But this time I used foil cupcake wrappers and they seemed to cook a lot faster than normal. Mine were done in 13 minutes, not the 15-20 Nigella suggests in the recipe.

I also made a very simple buttercream icing and decorated each one with a freckle.

Buttercream Icing

125g soft butter (I always use salted butter)
3 cups icing sugar, sifted
2 ts vanilla extra

Using the paddle attachment in your mixer, beat the butter until smooth. Turn the speed to low and add the icing sugar in one go. Beat until combined. Add the vanilla then turn up the speed and beat for about 3 minutes. The icing will be thick, white and shiny. Yum!

Oscar's cake was a giant cupcake made using the Wilton pan. I bought this probably 8 months ago and always planned to use it for his first birthday. I was a little worried how it would turn out (there are lots of horror stories of it sticking etc online). I used a packet cake mix for this, figuring it would be easier. I had just 1/2 cup mixture left from 2 boxes. The tin was greased and floured well, the cake baked for 45 minutes and after a 10 minute rest, out popped 2 perfect cupcake halves. Success!

All in all it was a wonderful day and totally worth all the hard work. A big thanks to Nath's mum Di for her help babysitting and cooking on Saturday :-)
Related Posts Plugin for WordPress, Blogger...