Showing posts with label Cheese. Show all posts

Thursday, June 17, 2010

Daring Cooks June - Pâtés and Bread

Wow it feels like ages since I've done a Daring Cooks challenge. Actually that's not totally accurate. It's ages since I completed one on time and got around to posting it!

Our hostesses this month, Evelyne of Cheap Ethnic Eatz, and Valerie of a The Chocolate Bunny, chose delicious pate with freshly baked bread as their June Daring Cook’s challenge! They’ve provided us with 4 different pâté recipes to choose from and are allowing us to go wild with our homemade bread choice.

I didn't follow the pâté recipes provided but I hope what I've done fits within the spirit of the challenge. I made a simple salmon mousse and the sandwich bread.

Salmon Mousse

1 x 415g tin premium red salmon, drained, skin and bones removed
250g cream cheese
approx 200g smoked salmon
juice of 1 lemon
1 1/2 ts gelatine powder

Spray 4 small dariole moulds (I used plastic) with olive oil spray then line with plastic wrap. Then use the smoked salmon slices to completely line each mould, coming right to the top and ensuring there are no gaps.

Place the lemon juice in a small saucepan over low heat. Once warm sprinkle over the gelatine powder and turn off the heat. Stir until the gelatine is completely dissolved then set aside.

Place the tinned salmon and cream cheese in a food processor and process until very smooth, at least 2 minutes. With the motor running, drizzle in the lemon juice mixture and process for another minute or so until completely incorporated and smooth.

Pour the mousse mixture into each mould, tapping the mould on the bench to remove any air bubbles. Cover the tops with plastic wrap and refrigerate for at least 2 hours.

To serve, gently ease each mousse out of the mould and remove the plastic wrap. Garnish with sprigs of fresh dill. Allow to stand at room temperature for 30 minutes before serving with fresh baguette or toast slices.

This mousse is intensely salmon flavoured but the lemon cuts through the richness. A perfect dinner party entrée.

Sandwich Loaf/Baguettes

3 tsp (15 ml) active dry yeast
2 2/3 cups (600 ml) whole milk (3.25 per cent fat), warmed to a temperature of 97ºF (36ºC)
2 1/2 tsp (12.5 ml) salt
2 tsp (10 ml) butter, melted
5 1/3 cups (750g) unbleached white bread flour, + 1/2 cup (75g), for working the dough
2 tbsp (30 ml) butter, for the loaf pan

To make loaves:

In a large mixing bowl, combine the yeast and warm milk, and whisk to dissolve. Whisk in the salt and the melted butter. Gradually sprinkle in the flour, stirring with a wooden spoon.

When the dough becomes too thick to stir, knead it with your hands, for about 5 minutes, until you obtain a smooth, homogeneous dough that is soft and a little sticky. Cover with plastic wrap and let rest 30 minutes.

Knead the dough 20 strokes (still in the bowl), cover again, and let rest for 1.5 hours.

Transfer the dough to a lightly floured work surface, and divide in two. Form each half into a sausage. Transfer the dough to a greased baking sheet. Cover lightly and let rise in a draft-free area for 60 minutes, or until doubled in volume.

Fill a large baking pan with hot water (simmering is fine) and place in the oven. Preheat oven to 450ºF (240ºC). Using a very sharp knife cut 3 slits into the top of each loaf. Spritz the loaves with warm water and sprinkle the tops with sesame seeds (optional).

Put the loaves in then oven and bake for 10 minutes. Do not open the oven door during this time.

After 10 minutes, lower the oven temperature to 400ºF (200ºC) and continue baking for about 25 minutes, or until the loaves are nicely golden. Unmould and let cool on a rack.

Next time I would love to try the proper french bread recipe. It's been on my to-do list for ages but I just ran out of time. I was also worried how my starter would fare overnight considering how cold it has been lately.

TIP: I have always struggled with getting my dough to prove/rise well, especially in winter. But for this challenge I used a tip from Chocolatchic to proof the dough in the car! This worked spectacularly well and I think I will do it every time from now on.

Thanks for a great challenge!

Monday, January 25, 2010

Ten in 10 Update 3 and Garlic Bread

It's usually about this point into a diet that I start to lose motivation and this time is no different. There's nothing I can really put my finger on, I'm just a bit over it all.

I chose not to count calories this week so paid extra attention to how much I ate and exercised 6 days out of 7. I also made sure we ate less red meat and more veges with dinner. The end result? I gained 200g. Could it be 200g of muscle? I hope so! My fitness is definitely improving and I feel I have more muscle tone.

I'm thinking maybe I won't weigh myself at all for the next 2 weeks but rather will focus on how I feel and how my clothes fit.

And now onto something that makes me smile just thinking about it ...

Cheesy Garlic Bread

I made this absolutely delicious garlic bread to accompany some leftover spaghetti. Now I know that sounds like a very carb heavy meal (and it was!) but the pasta was jam-packed with veges. I have to admit I'm not great at sitting down to a plateful of unadorned vegetables. So I tend to 'sneaky chef' myself and fill everything I cook for dinner with hidden veges.

If you have a favourite vegetable recipe please let me know! I'm definitely looking for inspiration :)

I have been continuing to bake from the fabulous Healthy Bread in 5 Minutes a Day cookbook. I made this garlic bread using 1/4 of the master recipe found on p53. But you could use your own favourite bread dough and do the same thing.

Cover a baking tray with a good dusting of cornmeal. Using as light a touch as possible, flatten the dough into a large circle, about 1/2 inch thick. Place on the tray. Sprinkle with 2 cloves of finely minced garlic, a handful of mozzarella cheese and any fresh or dried herbs you like. Dot with butter (about 1 tablespoon total) and then roll up the dough into a sausage shape. Fold under the ends to seal. Using a sharp knife, slash the top of the loaf.

Once again, I won't post the full recipe because I think you should get the book!

My baking hiatus is now almost over. Come February I will be back in the swing of things. It will be interesting to see how that impacts on my Ten in 10 program!

Tuesday, September 22, 2009

Tuesdays with Dorie: Cottage Cheese Pufflets


TWD time again! Jacque of Daisy Lane Cakes chose Dorie's Cottage Cheese Pufflets this week.

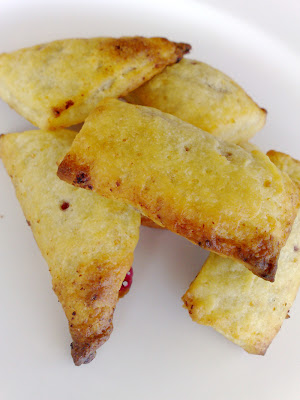
First thought ... what on earth is a pufflet!?? Second thought ... what on earth are they going to look like? Despite reading through the recipe several times I still had no real idea of how these were going to turn out. And now after making them I'm still not sure!

It seems a pufflet is a teeny tiny jam-filled pastry, made from a dough that is quite similar to last week's turnover dough. The main difference was that this dough was the softest, stickiest dough I have ever made! Despite multiple chills in the fridge between every stage it was really hard to manage. I rolled it out between sheets of baking paper and had to freeze it in order to peel off the top layer of paper. After cutting I then had to scrape each piece off the paper with a knife.

End result?

Tasty but definitely not puffy. I will call them flatlets instead. The boysenberry jam I used was brilliant. I only rolled about 1/6th of the dough (the rest is frozen) and I got 7 flatlets. I think I will roll them a bit thicker next time and will make them at night when it is (slightly) cooler.

Thanks for picking the pufflets Jacque! You can find the recipe at Daisy Lane Cakes.

Monday, May 25, 2009

Daring Cooks May - Ricotta Gnocchi

"Better late than never" has become my motto recently! While I wasn't one of those people who thinks a baby would just fit right into our household without any disruption, I have been amazed at how quickly time passes now.

The hours and days are just flying by and Oscar is now 5 weeks old. At the end of each day if he is fed, clean and happy and I have had a shower and 2 decent meals then I call that a total success!

Which brings me on to my first Daring Cooks challenge which I was really excited about. While I love to bake (and eat what I've or anyone else has baked) I think I am more of a cook. It is what I do everyday and nothing makes me happier than feeding my family.

I actually managed to complete the challenge before the posting date, but then promptly forgot to post it, or anything else for that matter.

The taste test ...

(These were incredibly difficult to photograph) Amazingly for a cheese freak like myself this was a little too ... cheesy. And definitely rich! I think part of my ambivilence comes down to simply being so tired that day that I couldn't think straight (this was my first time in the kitchen post baby and probably should've gone with something I had made before).

I had absolutely no problems making these though. The texture was perfect, they cooked well and didn't fall apart despite my very rough shaping job. Hubby wasn't keen on the texture. He loves gnocchi but of the potato and flour variety where there is a little bite to each piece.

I would make these again though, perhaps with lemon rather than sage to cut through the richness. All in all a great first challenge!

Ricotta Gnocchi
Recipe from Judy Rodgers' The Zuni Café Cookbook

Yield: Makes 40 to 48 gnocchi (serves 4 to 6)

For the gnocchi:
1 pound (454 grams/16 ounces) fresh ricotta (2 cups)
2 large cold eggs, lightly beaten
1 tablespoon (1/2 ounce) unsalted butter
2 or 3 fresh sage leaves, or a few pinches of freshly grated nutmeg, or a few pinches of chopped lemon zest (all optional)
½ ounce Parmigiano-Reggiano, grated (about ¼ cup very lightly packed)
about ¼ teaspoon salt (a little more if using kosher salt)
all-purpose flour for forming the gnocchi

For the gnocchi sauce:
8 tablespoons (227 grams/1/4 pound/4 ounces) butter, sliced
2 teaspoons water

Step 1 (the day before you make the gnocchi):

Preparing the ricotta. If the ricotta is too wet, your gnocchi will not form properly. In her cookbook, Judy Rodgers recommends checking the ricotta’s wetness. To test the ricotta, take a teaspoon or so and place it on a paper towel. If you notice a very large ring of dampness forming around the ricotta after a minute or so, then the ricotta is too wet.

To remove some of the moisture, line a sieve with cheesecloth or paper towels and place the ricotta in the sieve. Cover it and let it drain for at least 8 hours and up to 24 hours in the refrigerator. Alternatively, you can wrap the ricotta carefully in cheesecloth (2 layers) and suspend it in your refrigerator for 8 to 24 hours with a bowl underneath to catch the water that’s released. Either way, it’s recommended that you do this step the day before you plan on making the gnocchi.

Step 2 (the day you plan on eating the gnocchi):

Making the gnocchi dough
. To make great gnocchi, the ricotta has to be fairly smooth. Place the drained ricotta in a large bowl and mash it as best as you can with a rubber spatula or a large spoon (it’s best to use a utensil with some flexibility here). As you mash the ricotta, if you noticed that you can still see curds, then press the ricotta through a strainer to smooth it out as much as possible. Add the lightly beaten eggs to the mashed ricotta.

Melt the tablespoon of butter. As it melts, add in the sage if you’re using it. If not, just melt the butter and add it to the ricotta mixture. Add in any flavouring that you’re using (i.e., nutmeg, lemon zest, etc.). If you’re not using any particular flavouring, that’s fine. Add the Parmigiano-Reggiano and the salt.

Beat all the ingredients together very well. You should end up with a soft and fluffy batter with no streaks (everything should be mixed in very well).

Step 3: Forming the gnocchi:

Fill a small pot with water and bring to a boil. When it boils, salt the water generously and keep it at a simmer. You will use this water to test the first gnocchi that you make to ensure that it holds together and that your gnocchi batter isn’t too damp.

In a large, shallow baking dish or on a sheet pan, make a bed of all-purpose flour that’s ½ an inch deep. With a spatula, scrape the ricotta mixture away from the sides of the bowl and form a large mass in the centre of your bowl. Using a tablespoon, scoop up about 2 to 3 teaspoons of batter and then holding the spoon at an angle, use your finger tip to gently push the ball of dough from the spoon into the bed of flour. At this point you can either shake the dish or pan gently to ensure that the flour covers the gnocchi or use your fingers to very gently dust the gnocchi with flour. Gently pick up the gnocchi and cradle it in your hand rolling it to form it in an oval as best as you can, at no point should you squeeze it. What you’re looking for is an oval lump of sorts that’s dusted in flour and plump.

Gently place your gnocchi in the simmering water. It will sink and then bob to the top. From the time that it bobs to the surface, you want to cook the gnocchi until it’s just firm. This could take 3 to 5 minutes. If your gnocchi begins to fall apart, this means that the ricotta cheese was probably still too wet. You can remedy this by beating a teaspoon of egg white into your gnocchi batter. If your gnocchi batter was fluffy but the sample comes out heavy, add a teaspoon of beaten egg to the batter and beat that in. Test a second gnocchi to ensure success. Form the rest of your gnocchi. You can put 4 to 6 gnocchi in the bed of flour at a time. But don’t overcrowd your bed of flour or you may damage your gnocchi as you coat them.

Have a sheet pan ready to rest the formed gnocchi on. Line the sheet pan with wax or parchment paper and dust it with flour. You can cook the gnocchi right away, however, Judy Rodgers recommends storing them in the refrigerator for an hour prior to cooking to allow them to firm up.

Step 4: Cooking the gnocchi:

Have a large skillet ready to go. Place the butter and water for the sauce in the skillet and set aside. In the largest pan or pot that you have (make sure it’s wide), bring at least 2 quarts of water to a boil (you can use as much as 3 quarts of water if your pot permits). You need a wide pot or pan so that your gnocchi won’t bump into each other and damage each other. Once the water is boiling, salt it generously.

Drop the gnocchi into the water one by one. Once they float to the top, cook them for 3 to 5 minutes (as in the case with the test gnocchi). When the gnocchi float to the top, you can start your sauce while you wait for them to finish cooking.

Place the skillet over medium heat and melt the butter. Swirl it gently a few times as it melts. As soon as it melts and is incorporated with the water, turn off the heat. Your gnocchi should be cooked by now. With a slotted spoon, remove the gnocchi from the boiling water and gently drop into the butter sauce. Carefully roll in the sauce until coated. Serve immediately.
Related Posts Plugin for WordPress, Blogger...