Showing posts with label Kid-friendly. Show all posts
Showing posts with label Kid-friendly. Show all posts
Tuesday, February 7, 2017
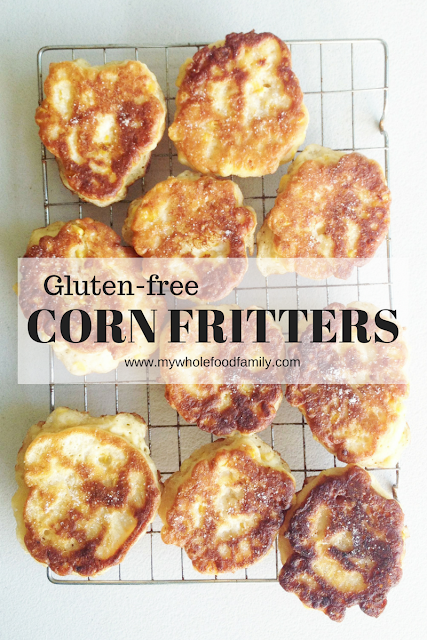
Gluten-free Corn Fritters
My grandmother was a great cook. Nothing especially fancy but the sort of homemade, stick to your ribs, oh-so-tasty fare that grandmothers are renowned for.
Her jam tarts in particular were spectacular!
But it was her corn fritters that seem to have stuck in my mind most clearly.
I had gone with her and friend for a week's stay on Tangalooma, a family-friendly resort on an island about an hour's boat trip away. We were in a downstairs garden apartment with a small kitchen where we could cook for ourselves and not have to eat out all the time.
I can so vividly remember coming in from the beach all wet and sandy to the smell of corn fritters frying and then burning my tongue eating them as soon as they came out of the pan.
There's just something about that combination of sweet and salty, crispy fried outside and soft fluffy middle that I can't resist!
These days no one in my family apppreciates a corn fritter quite as much as I do but they are a family favourite nonetheless.
You can think of these as a savoury pancake and top them any way you like.
I shared on Facebook during the week that I had leftover fritters topped with some smoked trout and sauerkraut (haha I just realised as I wrote it down that it rhymes!) for lunch the next day.
My kids also love them topped with crispy bacon and maple syrup. SO good!
Gluten-free Corn Fritters
2 cups gluten free plain flour
3 ts gluten free baking powder
1/2 ts salt
2 eggs
1 x 400g tin corn, drained
3/4 cup rice milk
Oil for shallow frying (Olive oil, coconut oil or ghee is great for these)
Place the flour, baking powder and salt into a large bowl and whisk together. Add the eggs, corn and milk and fold together with a spatula until well combined. (You may need slightly more or less milk than this, it seems to vary with every batch and probably depends also how well drained your corn is).
Preheat your frying pan over medium-high heat. Add enough oil to generously cover the base of the pan. When it starts to shimmer you are ready to fry.
Dollop spoonfuls of mixture into the pan and flatten out slightly. Fry for about 3 minutes then flip and fry on the other side until crisp, golden brown and cooked through.
Remove from the pan and place onto a wire rack over a baking tray. This ensures the fritters stay crisp on the bottom (nothing worse than a soggy bottom!)
Repeat with remaining mixture.
Makes approximately 16.
Are there any foods you feel really nostalgic about from your childhood?
Let me know below!
Susan
Monday, October 17, 2016
Sage and Apple Fritters (SRC)
There are some food combinations that just work - think peanut butter and chocolate, tomato and basil, lemon and blueberries to name just a few.
Well, you can now officially add sage, apple and maple syrup to that list.
Because WOW. So yummy!
This isn't my invention, though. Credit must go to Helen from Casa Costello, whose blog I was assigned for this month's Secret Recipe Club.
Helen had my blog back in May and made my Thumbprint cookies, and I remember then flicking through her recipes and looking forward to getting her blog sometime.
Helen is from the UK and mum to 3 girls. She is a self-described 'massive foodie' and has been working with food and cakes since she was since 16.
Speaking of cakes, Helen is also a fantastic cake decorator and shares lots of her creations on her #BakeoftheWeek challenge. My boys particularly liked this Police Car Cake. Gorgeous isn't it?
When it came to choosing a recipe I took ages to decide, but I knew I wanted something pretty simple and of course, it had to be gluten and dairy free (or easy to convert). I loved the sound of Helen's Walnut and honey granola and Scrambled eggs with style. And this Lemon Frangipane Pie looks fabulous.
In the end though these Apple fritters with sage were calling my name. I've never used sage in this way before. Typically I only use it in stuffing at Christmas time. Which probably explains why it was so hard to find at the shops right now, no one else uses it much either!
My husband eventually found a little pot of sage that Mr 7 immediately took outside and replanted into a bigger pot. It's still very young but we got enough off it for this recipe and 2 perfect little leaves for garnish.
I've always loved fritters, especially tuna and corn fritters, but the rest of family doesn't share my same level of enthusiasm.
That may have changed with this recipe!
Apple, sage and maple syrup are a match made in heaven.
I made only a few changes to the recipe to suit our way of eating - using gluten free flour, non-dairy milk and frying in coconut oil. I also reduced the sugar and am glad I did because between the apples and maple syrup I found them very sweet!
All 3 of my boys loved these and were literally licking their plates clean. Mr fussy-5 even ate an extra sage leaf (covered with maple syrup) and declared it 'really yummy.' So huge for him to eat something green voluntarily even if he did have to smother it in syrup!
These would be perfect for a weekend brunch and will definitely be on the menu at our place again.
Sage and Apple Fritters
Adapted from Apple fritters with and without sage
2 large red apples
125g gluten free plain flour
1 ts baking powder
1/2 ts salt
1/2 ts cinnamon
2 ts rapadura sugar (or sweetener of choice)
150ml rice milk
1 large egg
6 sage leaves
coconut oil for frying
In a medium bowl whisk together the flour, baking powder, salt, cinnamon and sugar.
Peel the apples and chop into very small pieces. Add them to the dry ingredients and toss to combine.
In a small jug beat together the milk and egg together then pour into the flour and apples and mix well. Finely chop the sage leaves and stir through.
Melt 2 tablespoons of coconut oil in a large heavy-based frypan over medium heat.
Dollop in spoonfuls of mixture and flatten out into pancake shapes.
Cook until gold brown then flip and cook on the other side until cooked through.
Remove and place on a rack while you cook the remaining fritters.
Serve with a drizzle of maple syrup.
Makes 10 fritters.
Thanks for a great recipe Helen! I will definitely be making these again.
Wednesday, June 22, 2016
Best Ever Dairy-free Macaroni and Cheese
I gave up dairy cold-turkey in December 2013 and honestly it was really hard. Not just giving up a food I loved, but the fact that dairy hides in so many foods that you wouldn't expect!
It was the right thing to do for the sake of bub's reflex and dairy intolerance (and for my health too) but I was completely addicted to dairy and ate loads of it - milk, cheese, cream, ice cream, you name it.
At first I just completely avoided it and didn't look for alternatives but as time went on, I started really missing the creaminess that only dairy gives. I perfected dairy-free ice cream and dairy-free lasagne a while ago, which brought macaroni and cheese to the top of the list. It's one of my husband's favourite meals and he has mentioned it often over the past few years.
After a bit of experimentation, mac and cheese is back on the table!
So while this is not exactly the same as the original it is creamy, full of flavour and has a delicious cheesiness from the nutritional yeast. It is the ultimate comfort food and the kids will never know there are hidden veggies.
We LOVE this dish and it's become a regular feature on our meal plans.
If you're dairy free give it a go and let me know what you think!
Best Ever Dairy-free Macaroni and Cheese
2 tbs extra virgin olive oil
375ml rice milk
3 tbs spelt flour
2 tbs nutritional yeast flakes
1/2 ts garlic powder
1/2 ts onion powder
1/2 ts turmeric
140 diced sweet potato
140g diced pumpkin
500g macaroni, cooked per packet instructions
Crispy bacon and fresh parsley to garnish
Put the water on to boil for the macaroni. Add the macaroni and cook as per packet instructions while the sauce is cooking.
Place the sweet potato and pumpkin into the bowl and chop for 8 secs / SP 8 or until very finely chopped.
Scrape down the sides of the bowl and add all remaining ingredients. Cook for 12 minutes / 100 degrees / SP 4.
The sauce should be smooth but if it's not, puree for 30 secs / slowly increasing from SP 3 - 9.
Drain the macaroni and return to the pot. Pour over the sauce and mix well.
Serve topped with crispy bacon and fresh parsley.
Serves 4-6
Wednesday, July 15, 2015
Pizza-Pasta
This is another of the kid-friendly meals I found on Better Homes and Gardens a few weeks ago. It sounded easy and delicious and was a nice twist on both pizza and pasta, both of which we eat about once a fortnight.
So this dish is pretty much exactly what it sounds like, all your favorite pizza toppings on bed of pasta. So simple I can't believe I've never thought of it before! As with last time there were no quantities available as I copied it down directly from the show but I have included what I used and my method.
I knew Mr 6 would love it - he eats pretty much anything except visible onion which absolutely must be picked off even if he can't taste it. Mr 4 would be a different matter. He has slowly come around to pizza but not with sauce. He generally has a plain base with olives, pineapple and cheese and calls it 'cheesy bread.' He is also just starting to come around to pasta but definitely not with any thing else touching it. In the end he ate some pasta from around the edges of the plate (none with melted cheese on) and a few olives but wasn't particularly impressed. Anyone else with fussy kids? I would love to hear your tips and tricks!
Pizza-Pasta
Slightly adapted from Better Homes and Gardens
For the sauce:
2 stalks celery
2 onions
2 large carrots
2 cloves garlic, crushed
2 ts dried italian herbs
1 jar tomato passata
1 tbs tomato paste
1 tbs rice malt syrup
salt and pepper to taste
2 tbs olive oil
The toppings:
Pepperoni
Olives
Mozzarella cheese
The base:
Your favourite pasta (I used penne) cooked to al dente per packet instuctions
To make the sauce, finely chop the celery, carrot and onion and fry off with the olive oil in a large pan over medium-high heat. When it is just starting to soften, add the garlic and cook for another few minutes.
Add the remaining ingredients and simmer for about 15 minutes until the vegetables are completely cooked and the sauce is thick and smells amazing.
You can use the sauce as is or puree it like I did using a stick blender or food processor (you will need to let it cool down a bit first).
To assemble the dish, place a serve of pasta in each bowl (ovenproof), top with a generous amount of sauce then the pepperoni, olives and cheese. Place the bowls under the grill for a few minutes until the cheese melts. Make sure you let the bowls cool down before giving them to the kids!
Serves 6
Tuesday, June 30, 2015
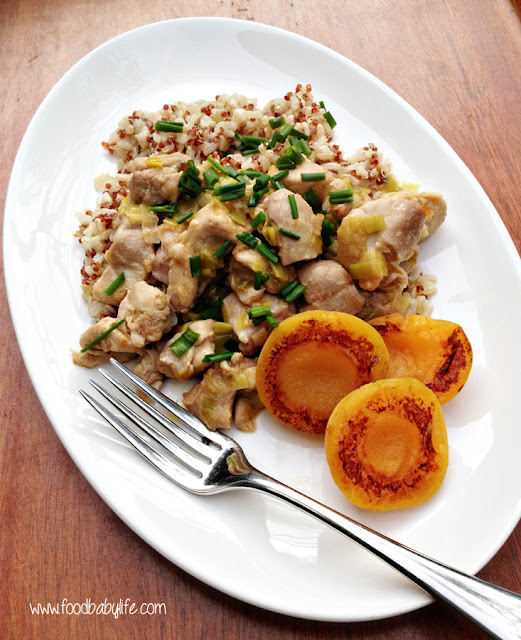
Apricot Chicken
When I was growing up, apricot chicken was one of my favourite dinners. There's just something so delicious about that combination of sweet and savoury.
Last week on Better Homes and Gardens, Fast Ed did a series of 'kid-friendly' dishes which included apricot chicken and I realised my kids have never tried it. This is an updated version of the one I would have had growing up, which almost certainly would have included a packet of french onion soup mix!
The boys actually love watching BHG with me. Oscar really likes the gardening and pet segments, Charlie likes the building and of course we all love the cooking. So when we saw this recipe and the boys wanted to try it, of course we had to.
I copied it down directly from the show but you can view the video with the recipe here. It doesn't give all the exact quantities so I have included what I used below. The recipe said to use a rice and quinoa blend which I have seen around but never tried. As it was on special this week we got a bag and it was great. Really filling and much more interesting and nutritious than regular rice.
Fast Ed's Apricot Chicken
Serves 6
3 tbs butter
2 leeks, finely sliced
2 cloves garlic, crushed
1kg chicken thigh fillets, cut into 2cm pieces
1/4 cup flour
1 x 400ml tin apricot nectar
400ml chicken stock
1 x tin apricot halves
salt and pepper to taste
fresh chives
rice and quinoa to serve
Melt 1 tbs of the butter in a large pan over medium-high heat and saute the leeks until they are starting to soften. Add the crushed garlic and cook together until the leeks are tender and collapsed. Remove from the pan.
Dust the chicken pieces in flour and set aside. Cook your rice or quinoa using your preferred method and keep warm until ready to serve.
Add another 1 tbs of butter to the pan and fry off the chicken in 2 batches until it is well browned. Use the remaining 1 tbs of butter for the second batch of chicken pieces. Return the leek mixture and all the chicken to the pan and pour in the apricot nectar and chicken stock. Stir well and simmer, uncovered, for 15-20 minutes until the chicken is cooked through and the sauce has reduced and thickened a little. Check for seasoning and sprinkle in some fresh chopped chives just before serving.
In a separate non-stick pan over medium-high heat, place the apricot halves in, cut side down, and fry until golden brown. Remove and keep warm.
Serve the apricot chicken with rice or quinoa and the fried apricot halves.
The taste test ... we loved this! My 1yo and 6yo went absolutely nuts for it and wanted seconds and then thirds. This is definitely going into our rotation of meals.
Monday, January 26, 2015
Tater Tot Shepherd's Pie (SRC)
Happy New Year! And happy Australia Day to all my fellow Aussies! Hard to believe we are already at the end of January. Christmas seems like a distant memory, school starts tomorrow and we have our first Secret Recipe Club post for 2015!
I am so excited for another year of SRC. For those who are new, each month we are assigned a blog in secret to peruse, choose a recipe from and post on the same day. Today is the reveal day for Group D.
This month I was assigned Baking and Creating with Avril. Avril describes her food as 'nothing too fancy but always made with love and happiness'. I love this! I headed straight to the kid-friendly section and found so many recipes that my kids would love like the Blueberry Pie Pancakes, Cookie Sticks and Yummy Zucchini Cookies and I've bookmarked them to try.
I'm always on the lookout for dinner ideas though and was really tempted by Avril's Risotto and Beef Stuffed Tomatoes but when I saw a recipe called (Carrie's Famous) Tater Tots Shepherd's Pie I just had to check it out. I mean who is Carrie and why is it famous? I also had no idea what tater tots were and quickly learned they are the same as potato gems here in Australia!
In her post Avril describes how her friend Carrie made this casserole while they were away for a week's holiday as a part of a group of 9 girlfriends and their 7 children. How awesome would that have been? I am definitely raising the idea of a girls' week away with my friends!
The classic shepherd's pie has mashed potato on top but strangely none of my kids are that keen on mashed potato, whereas I could eat it by the bowlful. They do however, absolutely adore potato gems/tater tots and we do get them as a treat every now and then. So how could we go wrong with a shepherd's pie topped with potato gems!
I couldn't resist making one change to the recipe and that was to add something tomato-y to the meat. I used a tin of condensed tomato soup and loved the flavour but it did make the bottoms of the potato gems a little mushier than how they appeared to be in the original recipe. No matter, it was delicious! Rich savoury mince with corn, cheese and crunchy topped potato gems. Just divine and a perfect kids meal.
(Carrie's Famous) Tater Tot Shepherd's Pie
Adapted from Baking and Creating with Avril
1.5kg beef mince
1 medium onion, chopped
1 tsp garlic salt
1/2 tsp ground pepper
1 can condensed tomato soup
2 tsp Worcestershire sauce
1 can creamed corn
1 can sweet corn, drained
1-2 cups grated cheddar cheese
1 bag frozen Tater Tots (Potato Gems)
Preheat oven to 180 degrees C / 350 degrees F.
Over medium heat, saute chopped onion in a little oil until soft. Add in the beef mince and cook until well browned, then turn off the heat and drain any extra grease. Stir in the tomato soup, garlic salt, pepper and Worcestershire sauce.
Pour the meat mixture into a 9 x13 baking dish, then spoon over the creamed corn and drained can of sweet corn. Sprinkle a layer of grated cheese over corn, layer frozen tater tots over grated cheese and then sprinkle with more cheese to finish.
Bake for 25-30 minutes (check after 20 minutes to make sure casserole is not getting too brown).
Thanks for a brilliant recipe Avril (and Carrie). We all loved it!
Wednesday, June 26, 2013
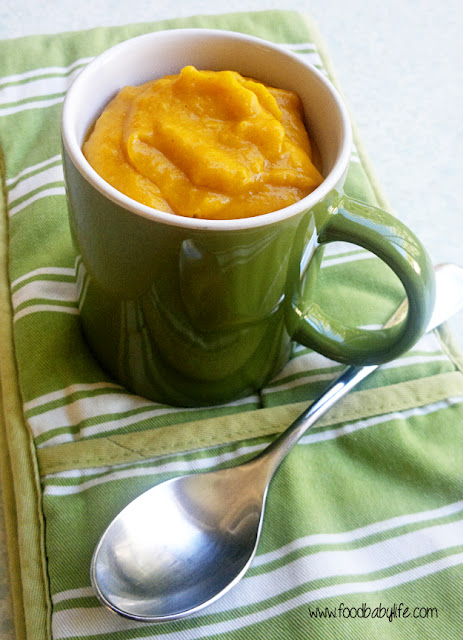
Roasted Pumpkin and Apple Soup
Winter has well and truly arrived this week. While we're still getting glorious sunny days, the nights and early mornings are absolutely freezing. We have so far avoided having heaters on but a few more days like this and that will change!
In our house cold weather is soup weather. I love the fact that both my boys love soup, especially my 4 year old. If you haven't tried soup with your kids yet it's really worth a go, just be prepared for some mess!
We've had pumpkin soup a few times recently and I've always stuck to my tried and true recipe which includes garlic, ginger and coriander. This time I thought I would make something a little lighter and sweeter, so decided to not only include some apple but also to roast all the ingredients first, something that really brings out the natural sweetness.
The taste test ...
Pumpkin and apple really are a match made in heaven! My kids absolutely devoured this for lunch. Both had seconds. You'll notice from the photo how thick this soup is. Not only does it make quite a hearty meal it also makes it easier for little kids to handle.This was a winner and will be added to our regular rotation.
Roasted Pumpkin and Apple Soup
1/4 large pumpkin (I like jap or kent for soup, my piece was 1.6kg)
2 small green apples
1 potato
1 large onion
1/4 ts cinnamon
1/4 ts cumin
3-4 cups stock (chicken or vege work well)
1 tbs olive oil
Salt and pepper to taste
Preheat oven to 190 degrees C / 170 degrees fan-forced.
Chop up the pumpkin into thick slices, removing the seeds but leaving the skin on. Wash and core the apples, leaving them whole with the skin intact. Wash the potato and chop into quarters, leaving the skin on. Top and tail the onion and remove the skin.
Place all veggies into a large baking dish. Sprinkle over the spices, drizzle on the oil and toss to combine.
Place in the oven and roast for 45 -60 minutes or until all the vegetables are soft, golden and cooked through. Keep an eye on the apples and onion as they will be done before the potatoes and take them out if they are getting too brown.
Remove from the oven and allow to cool slightly before scooping out the flesh of the apples and veggies into a food processor or blender. Leave any hard or overcooked edges and all the skin behind.
Blitz until well combined. Add the stock and blitz for 2 minutes or until completely smooth (if you want a thinner soup just add more stock now). Season with salt and pepper to taste. Pour the soup into a large saucepan and simmer gently until warmed through. Serve with hot buttered bread rolls.
Serves 4.
Monday, May 27, 2013
SRC - Chicken and Apple Rice Paper Rolls
Well it's reveal day for Group D of the Secret Recipe Club! This month I was delighted to be given Natural Noshings by Nora. I came across Nora's blog quite a few months ago and had already flagged a number of recipes to make.
We have been making a real effort over the past 6 months or so to cut out processed foods and remove refined sugar from our diet. We have a pantry full of oats, coconut oil, chia seeds, natural nut butters and raw cacao. Natural Noshings has some amazing recipes that are gluten free and use real whole ingredients with nothing artificial or processed in sight.
I have bookmarked some of the sweet treats to make like the Oatmeal Raisin Cookie Dough Bites (which will be the perfect after kindy snack for my 4 year old) and the Healthy Nutella (which my peanut butter loving 2 year old will go nuts for - pun intended!).
Yet again though I have chosen to make a main because quite simply I couldn't go past these. Nora calls them spring rolls but in Australia spring rolls use a different wrapper and are baked or fried. We call these rice paper rolls. But really whatever you call them they are little parcels of deliciousness!
Adding the apple was a stroke of genius. The sweetness of red apple paired with the chicken and peanut sauce was fantastic. My kids adored these. Well actually Charlie my 2 year old couldn't be convinced that the rice paper wrappers were actually edible so he just ate the fillings and lots of sauce.
The original recipe had apple and cabbage but as usual I couldn't pass up the opportunity to get some extra veges into the kids. All the colours of the rainbow crammed into something they can roll up and dip in a yummy sauce (my version of the sauce has a few extra flavours added). All in all a healthy and delicious dinner!
Apple and Chicken Rice Paper Rolls with Peanut Sauce
Adapted from Spring Rolls on Natural Noshings
For the rolls:
12 rice paper wrappers
4 small chicken thighs (marinated in a little soy sauce and sesame oil then baked and cut into strips
1 medium red apple, sliced into matchsticks
1 large carrot, peeled and cut into matchsticks
1 medium avocado, sliced thinly
1 small red capsicum, thinly sliced
½ bunch fresh coriander, roughly chopped
For the peanut sauce:
3 tablespoons hot water
3 tablespoons peanut butter (mine was smooth, all natural)
juice of 1 lime
1 tablespoon soy sauce
1 teaspoon rice malt syrup
1 teaspoon grated fresh ginger
½ teaspoon sesame oil
To prepare the sauce, place all the ingredients in a small jug and whisk to combine.
To prepare the rice paper rolls, fill a large shallow bowl with just warm water. Working with one wrapper at a time, submerge it in the water and allow to soften (about 30 seconds) turning once or twice. Carefully remove from water and lay flat on a damp tea towel.
Half way between the centre of the wrapper and the edge closest to you, layer on some carrot, capsicum, avocado, chicken, apple and chopped coriander, leaving a gap of about an inch on each side.
Take the edge closest to you and fold it over the filling. Roll it once more and then fold the shorter left and right sides inward, like you would a burrito. Then continue wrapping and rolling until sealed. Place on serving platter, leaving a little room between them as they will stick together.
Repeat with remaining wrappers and serve with the peanut sauce!

Thursday, October 18, 2012
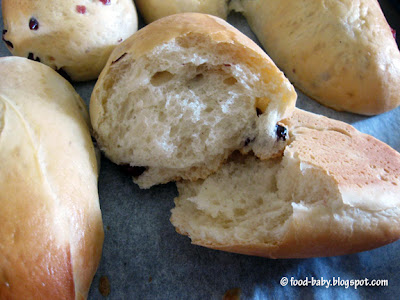
Finger Buns
Another trip down memory lane with these! I can vividly recall being in a particular bakery as a child - rows and rows of sweet treats, the smell of sugar mixing with fresh bread and piping hot sausage rolls. What always caught my eye though were the finger buns with their vivid pink icing and sprinkles. What could be more attractive to a little girl?
Although I have boys I knew these would go down a treat. The buns themselves are made from a simple sweet bread dough with some dried fruit. Nothing wrong with that! Add some pretty icing and sprinkles and you have something really special.
Finger Buns
475g plain flour
35g milk powder
75g caster sugar
2 1/2 tsp instant dry yeast
1 egg, lightly beaten
150ml lukewarm water
40g butter, cubed
1/2 cup currants (or sultanas or cranberries)
Place the flour, milk powder, sugar, yeast and currants into the bowl of your stand mixer and mix to combine. Add in the water and egg and mix using the dough hook for about 4 minutes. Add in the butter, one cube at a time, and mix for another 6 minutes or until the dough is sticky and elastic.
Remove the dough from the mixer and place into a large greased bowl. Cover with plastic wrap and leave in a warm place for 1 hour until the dough has doubled in size.
Punch down the dough, give it a quick knead by hand and divide it into 12 even pieces. Roll each piece into a sausage then place them on a greased or lined baking tray. Leave to prove for another hour or until doubled in size.
Bake the buns in a preheated 190 degree oven (170 degrees fan-forced) for about 12-15 minutes. The buns should be risen, golden brown and sound hollow when tapped on the bottom. Remove from the oven and allow to cool on a wire rack.
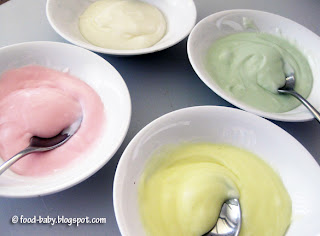
I find most food colourings pretty scary in terms of both the colour and ingredients, so for these I used some all-natural colours. They made some lovely pastel shades which is just what I was after. I guess to get the really bright colours you need the nasty stuff.
Icing
1 cup pure icing sugar, sifted
2tbs soft butter
Few drops of food colouring
Coconut, sprinkles, nuts etc to decorate
In a large bowl beat together the icing sugar and butter until smooth. You may need a teaspoon or so of milk to get the consistency you want. Divide the mix into small bowls and add a few drops of food colour to each. Mix well to incorporate the colour evenly. Spread over the top of the cooled finger buns and top with decorations of your choice.
with slivered almonds
with cachous
with coconut
with chopped walnuts
Making these would be a great rainy-day project (not that we've had any rain much for months) and kids would have lots of fun decorating their own!
This recipe is a keeper.
Thursday, September 6, 2012
Peanut Butter Ice Cream
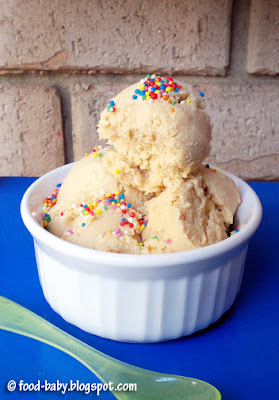
I blogged a few days ago about the amazing Aztec "Hot" Chocolate Ice Cream I made for our Father's Day dinner. Well I also made a more kid-friendly ice cream. Both my boys love peanut butter so when I saw this recipe it was perfect. It's also such an easy recipe with no cooking involved at all that older kids would be able to make it themselves!
If you love peanut butter you will LOVE this ice cream. I served it with hundreds and thousands but I think having it in a sundae with hot chocolate fudge sauce and a scattering of roasted salted peanuts would be divine. Yum!
Peanut Butter Ice Cream
From The Perfect Scoop by David Lebovitz p50
180g smooth peanut butter
180g sugar
330ml full cream milk
330ml pure cream
Pinch of salt
1/2 ts vanilla extract
Puree all ingredients in a food processor until smooth. Chill thoroughly in the fridge then churn in your ice cream machine according to the manufacturer's instructions.
Makes approx 1 litre.
Wednesday, August 22, 2012
Chocolate and Zucchini Muffins
I don't really need much of an excuse to bake. And when recipes like this come along you don't need one! Not only will you probably have all the ingredients already, they're healthy! Well healthier anyway.
The recipe seems pretty flexible so you could use whatever type of milk or oil suits you. Some chocolate chips or grated orange zest would be lovely additions!
So how did they taste? These muffins were moist, really chocolatey and slightly fudgy tasting. There was absolutely no detectable zucchini flavour and both the boys loved them and kept asking for 'more cake please.' This is definitely a keeper!
These would be a perfect treat for the lunchbox, just not everyday because they are still pretty sweet.
Chocolate and Zucchini Muffins
Recipe slightly adapted from Vegie Smugglers
1 1/4 cups self-raising flour
3/4 cup traditional rolled oats
1/4 cup raw cacao powder
1/2 cup coconut sugar
1/2 tsp cinnamon
1 egg
3/4 cup non-dairy milk
3/4 cup coconut or macadamia oil
1 tsp vanilla essence
1 small zucchini, finely grated
Preheat the oven to 180 degrees Celsius (160 degrees fan-forced). Grease a 12 cup muffin tray or line with paper liners.
In a large bowl mix together the flour, oats, cocoa, cinnamon and sugar. In a separate bowl mix together the milk, egg, oil, vanilla and grated zucchini.
Pour the liquid ingredients into the dry ones and mix gently until well combined. Divide the mixture evenly between your muffin holes and bake for 25 minutes or so, until they spring back when touched and a skewer comes out clean. Make sure you check a few minutes earlier, mine were one at 22 minutes. Leave to cool in the tin for 5 minutes before turning out onto a wire rack.
Makes 12.
If you haven't been there before make sure you check out Vegie Smugglers for more great kid-friendly meal ideas!
Subscribe to:
Posts (Atom)

