Showing posts with label Noah. Show all posts
Showing posts with label Noah. Show all posts
Thursday, October 30, 2014
Banana Layer Cake with Whipped Chocolate Ganache Frosting
So Noah was lucky enough to have 2 cakes for his first birthday - his smash cake on the weekend and then another cake on his actual birthday. I love the combination of banana and chocolate and knew as soon as I saw this cake on Whipped that it would be perfect for my little birthday boy. I made only minor changes to the cake recipe and smothered it in a gorgeous dairy free chocolate ganache.
The cake was a big hit with everyone but I unfortunately didn't get any great pictures of it. Noah may not look too happy in this shot but believe me the cake disappeared in record time. This cake eating is serious business!
Banana Layer Cake (Dairy Free)
Adapted from Whipped
2 cups plain flour
1 ts baking powder
3/4 teaspoon bicarb soda
1/4 teaspoon salt
1 cup dextrose*
1/3 cup olive oil
2 ts vanilla extract
3 large eggs
1 cup mashed ripe banana (around 3 medium bananas)
1/2 cup coconut yoghurt (or regular yoghurt if not dairy free)
Preheat oven to 180°. Grease and line 2 x 8 inch round cake pans and set aside.
Combine dry ingredients in a small bowl, stirring together with a whisk.
In a stand mixer or food processor, combine the dextrose, oil, vanilla, mashed banana and eggs and beat at medium speed until well combined. Add in the flour mixture and yogurt alternately, beginning and ending with flour mixture.
Pour the batter evenly into the prepared pans. Bake at 180° for 30-35 minutes (mine were done at 25 minutes so check early and often) or until a skewer comes out clean. Allow to cool in the pans for 10 minutes before removing from the pans and cooling completely on wire racks.
*If you want to use regular sugar you will need to check the original recipe as I made a few minor changes to compensate for the dextrose.
Whipped Chocolate Ganache Frosting
For the frosting I adapted Quirky Cooking's dairy free chocolate ganache which I have previously used as a tart filling here. I chilled it for a few hours then whipped it in the thermomix with the butterfly attachment for 20 seconds or so until it was thick and fluffy. I popped it back in the fridge for 10 minutes before icing the cake.
To assemble the cake:
Level the tops of the cakes if needed (I only level the bottom layer), then smooth about 1/3 of the frosting on top of one cake layer. Gently place the second layer on top and spread the remaining frosting over the top and sides of the cake. Decorate with sprinkles. The cake will keep covered in the fridge for up to 3 days.
Saturday, October 25, 2014
Noah's 1st Birthday Smash!
A big happy birthday to my beautiful Noah!! He turned 1 on Tuesday and is the sweetest little boy. Sigh. Why do children have to grow up so quickly?!
I've made a concerted effort this year to do some special things for Noah, partly just because I wanted to and partly because I didn't want him to look back at photos and feel like he missed out! He is the third of 3 boys after all.
So for the past year I have been taking a photo of him every week in the same spot and lying on the same little blue striped blanket. It got harder and harder as the year went on to keep him on that blanket but we now have 52 lovely little photos that show his progression from teeny tiny baby to big, solid 1 year old.
I also decided to do a cake smash for him (something I never did for the other 2). The only thing was his dairy intolerance (or allergy, we're not sure which yet), which made choosing a cake and icing recipe quite tricky. Luckily a grain and dairy free smash cake popped up in my facebook feed one day. Perfect!
I thought I had planned well but we still had a few hiccups such as my camera dying after only a few photos despite being fully charged, the sun shining under the fence more than expected so we had to hunt around for something to block it and then then the actual smash being far less messy than anticipated! Seriously he didn't even need a bath just a good wipe down. Without a real buttercream there just wasn't as much to smear around.
Still, he had an absolute ball! Lots of cake eaten and squished in chubby fists and sat on. So, so cute and lots of fun for all of us to watch.
Bottom line even if your little one has allergies a smash cake is still possible!
Coconut Flour Smash Cake
Slightly adapted from Urban Poser
(Makes a 2 layer 4 inch smash cake)
1/2 cup (60g) coconut flour, sifted
1/4 tsp salt
1/4 tsp baking soda
5 large eggs
1/2 cup (112g) coconut oil
1/2 cup (175 ml) rice malt syrup (or honey to be grain free)
1 tsp vanilla extract
1 tsp lemon juice
Preheat oven to 180 degrees Celsius. Grease and line 2 x 4 inch cake pans with parchment paper (mine were spring form pans which made for very easy removal of the cakes).
In a small bowl, sift all the dry ingredients together and set aside. Then separate 2 of the eggs (yolks from the whites), setting the whites aside.
In a large bowl whisk together the 3 whole eggs, two egg yolks, coconut oil, honey, vanilla and lemon juice until they are well combined. Then whisk in the flour mixture till completely smooth, with no lumps.
In another bowl beat the egg whites till soft peaks form (looks like softly whipped cream). Gently fold the egg-whites into the batter till theres is only a few streaks of whites visible.
Pour half the batter into the prepared cake pans and bake 20-25 minutes or until the tops springs back when lightly pressed (mine took 30 minutes and one was ready before the other, perhaps had slightly more mixture in that pan). Allow the cake to cool for 5-10 minutes, then carefully remove from the pan and cool completely.
Filling:
I used a few tablespoons of my homemade roasted strawberry chia seed jam.
Coconut Butter Frosting (Thermomix)
Recipe adapted from Clever Cook
200g coconut butter (I made my own, see recipe below)
2 tbs dextrose
3 cubes of ice
juice of one lemon
dash of cold water if required
a few drops of natural food colouring
Place the first 4 ingredients into the mixing bowl and process on speed 9 for 20 seconds. Scrape down the bowl and repeat. If the coconut butter is not soft and fluffy, add a dash of water and continue (I needed 4 tablespoons of water to get the right consistency). Add the food colouring little and little, processing in between until you get the desired colour. Use immediately.
Store the covered cake in the fridge but remove it at least 1 hour before serving to allow it to soften.
Coconut Butter (Thermomix)
Recipe from Super Kitchen Machine
400g dessicated coconut
Place into the mixing bowl and process 3 minutes / 37 degrees / speed 8. That's it!
Pour into a jar and store at room temperature. It will be liquid but will harden as it cools.
Tuesday, November 5, 2013
Pumpernickel Loaf (Baking with Julia)
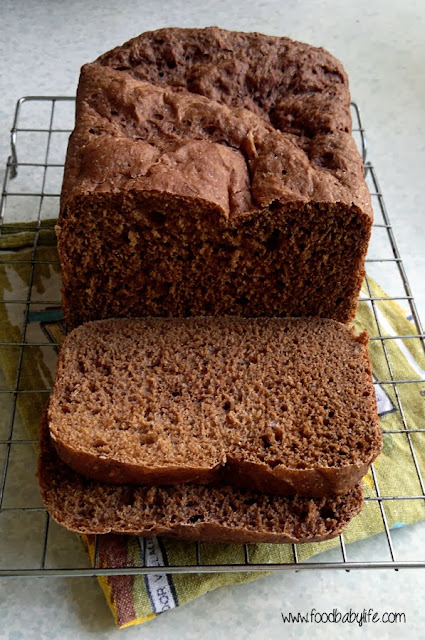
So I had to cheat a little with this week's recipe. Seeing as I have no mixer and I had a baby 2 weeks ago (and am therefore not at all interested in kneading bread when it is compared with pumping iron!) I made my pumpernickel loaf in the breadmaker.
Luckily the recipe book which came with my breadmaker included a rye and caraway bread so I was able to simply adjust it to be more like this week's recipe. I added coffee, cocoa, yoghurt and molasses and was really pleased with the result. I was intending to just make the dough and then shape and bake the loaf in the oven but with 3 kids including a newborn demanding to be fed that just wasn't going to happen!
I loved the complex flavours in this loaf and it was fabulous slightly warm with lots of cream cheese. This recipe is definitely a keeper!
Monday, October 28, 2013
Chocolate Frozen Yoghurt with Caramelised Bananas (Secret Recipe Club)
Secret Recipe Club time! I really wasn't sure whether to participate this month or not as our baby's due date was 30th October. Luckily though I made a great call figuring he would be early and I was right! Our third gorgeous little boy arrived on Monday 21st October.
 |
| Noah Patrick, 3.85kg and 53cm long |
I will be taking next month off so we can settle in without any pressure on me to cook but I will back with SRC in December/January. Meanwhile my hubby has really stepped up and made us some delicious meals including macaroni and cheese and a slow-roasted pork belly. Yum!
It feels like a lifetime ago when I made my pick for this month's SRC. I was assigned the Bewitching Kitchen by Sally and once again I was really spoilt for choice when it came to choosing a recipe. Sally is Brazilian and it was fascinating to read her story, explore her traditional Brazilian recipes and also read about her background in science (my husband is a microbiologist).
When it came to actually choosing a recipe though I couldn't go past ice cream, which has been my major vice this pregnancy. Interestingly enough as I write this after his birth my sweet tooth has virtually gone and I'm wanting smoked salmon, sushi and brie!
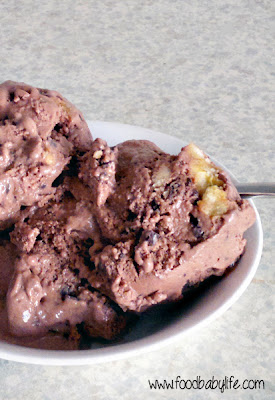
So for this month I chose Sally's Chocolate Frozen Yoghurt with Caramelized Bananas. This recipe is worth making just for sheer deliciousness but make sure you check out her post for a beautiful photo and story of her mother, the world's expert on caramelised bananas!
Oh and please excuse the terrible photo. It wasn't quite firm enough to scoop properly and it didn't last long enough for me to take another one!
Chocolate Frozen Yoghurt with Caramelised Bananas
Recipe very slightly adapted from Bewitching Kitchen
40g butter
3 large ripe bananas, cut into thick slices
3 tbs brown sugar
2 tbs lemon juice
125ml plus 60mls full cream milk (divided)
2 1/2 tablespoons cocoa powder
2/3 cup sugar
Pinch of salt
1 ts vanilla extract
1 1/3 cups Greek yogurt
60g dark chocolate, finely chopped
Melt the butter in a non-stick pan over medium heat. Add the sliced bananas in a single layer and sprinkle over the brown sugar. Cook, turning once, until caramelised. This will take 5-8 minutes. Add the lemon juice and swirl the pan to completely dissolve the sugar.
Remove the pan from the heat. Scrape three-quarters of the bananas into a food processor, add the 60 mls of milk and process until smooth. Transfer to a small bowl and place in the freezer for 15 minutes or until completely chilled. Chop the remaining bananas and freeze until chilled.
In the same food processor bowl beat together the cocoa, sugar, salt, vanilla and the remaining 125 mls of milk. Add in the yogurt and then the banana puree and process until smooth.
Transfer the mixture to an ice cream maker and churn until nearly frozen. Mix in the chopped bananas and pieces of chocolate. Scrape the frozen yogurt into an airtight container, cover and freeze until firm, at least 2 hours.
Enjoy!

Sunday, October 27, 2013
Subscribe to:
Posts (Atom)


