Showing posts with label Refined Sugar Free. Show all posts

Sunday, May 27, 2018

Wild Orange Chickpea Blondies

wild orange chickpea blondies with doTERRA essential oils - gluten free, dairy free, nut free, refined sugar free - from www.mywholefoodfamily.com


I was searching for the perfect guilt-free treat for Mother's Day and came up with these!

If you're a fan of the combo of chocolate and orange you will love them. And even better, they're free from gluten, dairy, nuts and refined sugar!

I've since made another 2 batches of these and both times left the chocolate off the top. 

This makes them less rich and the ideal treat for my kids' lunchboxes. 

They have no idea it's healthy and the chickpeas give them a hit of protein as well.

Wild Orange Chickpea Blondies

1 can chickpeas, drained and rinsed
2 large eggs
1/2 cup rice malt syrup
1/3 cup coconut oil
1/4 cup gluten-free plain flour
1/2 ts gluten-free baking powder
pinch salt
10 drops Wild Orange essential oil
50g dark chocolate, roughly chopped (I used Green & Blacks organic 70%)

Preheat oven to 180 degrees C. Line an 8-inch square baking pan with paper and set aside.

In a food processor or Thermomix, beat together the chickpeas, eggs, syrup and coconut oil until smooth (30 seconds / SP 7). Add remaining ingredients (except for chocolate) and mix until just combined (10 seconds / SP 4). Scrape down the bowl as needed.

Pour batter into prepared tin. Sprinkle over chopped chocolate and bake for 25 minutes or until a toothpick comes out clean.

Cool in the tin before slicing into 16 pieces.

Leave the chocolate off and they make the perfect lunchbox treat too.

Enjoy!


Susan x

Friday, March 16, 2018

Ginger Oat Slice


I've come home from doTERRA's Australia/NZ Convention in Sydney this past weekend with a full heart, a mind bursting with possibilities and ... a chopping board! 

There was a lot of merchandise on offer but as a foodie, I couldn't pass this up, especially as it's the perfect prop for all my oil-infused treats.

This was a super easy slice I made for the kids' afternoon tea yesterday. Basic pantry ingredients with a gorgeous ginger flavour from the ginger essential oil. I love using my oils like this - no need to worry about that bottle of ginger powder in the pantry that's long expired, or the fresh piece of ginger going soft in the fridge. #cookingwithoils

If you'd like to learn more about using essential oils in your food make sure you download the free cheat at the bottom of this post!

Ginger Oat Slice


100g melted butter
100g dried dates
1 cup rolled oats
1 cup desiccated coconut
1ts vanilla extract
Pinch salt
3 drops Ginger essential oil

Place all ingredients in the Thermomix or food processor and blitz until well combined. TMX - melt butter with dates 5 mins / 100 deg / SP 1. Add remaining ingredients and mix 10 secs / SP 8.

Press into a lined 8inch square brownie pan and place in the fridge to set. Slice into squares.

My kids LOVED this but full disclosure, I haven’t tasted it because of the gluten! (insert sad face here).


I will have to whip up a dairy and gluten free version for myself because this smelled amazing and was devoured in about 5 minutes. 

Happy cooking! 
Susan xx

Friday, February 2, 2018

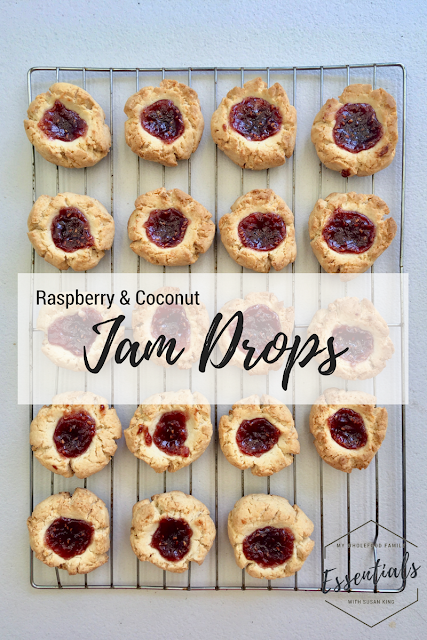
Jam Drops (free from Gluten, Dairy, Nuts and Refined Sugar)


raspberry and coconut jam drop cookies - free from gluten, nuts, dairy and refined sugar - from www.mywholefoodfamily.com

Do you have a picky eater?

I feel your pain.

My picky eater has recently gone from picky to downright ridiculous and we are left with very few foods that he finds acceptable.

He's started rejecting a few favourite recipes that I have healthified so for these, I kept it really simple.

A 'white' dough with homemade raspberry jam (that I blitzed the chia seeds for by the way so they wouldn't get spotted and rejected). The things we do!

These freeze beautifully and being nut-free they are perfect for school lunches or a quick after-school treat.

I hope your kids enjoy them as much as mine!

raspberry and coconut jam drop cookies - free from gluten, nuts, dairy and refined sugar - from www.mywholefoodfamily.com

Jam Drops
Free from gluten, dairy, nuts and refined sugar

2 cups gluten-free flour (I used Orgran brand)
1/2 cup desiccated coconut
1 ts gluten-free baking powder
pinch salt
1/3 cup rice malt syrup
1/3 cup + 1 tbs coconut oil
1 ts vanilla paste
1 egg

Jam to top (I adapted my strawberry chia jam recipe found here - note that I blitzed 1/2 cup chia seeds in the Thermomix first to make a powder and used some of that to make the jam)

Preheat oven to 180 degrees C. Line 2 baking trays with baking paper and set aside.

In a medium bowl, stir together the flour, coconut, baking powder and salt. Add all remaining ingredients (except jam) and mix until well combined. You should have a stiff dough that can be easily rolled into balls.

Roll spoonfuls of mixture into balls and place on the prepared tray (I got 20 from this batch). Use your thumb or the end of a wooden spoon to make an indent for the jam.

Place a small amount of jam on each biscuit, 1/2 ts or so.

Bake for 15 minutes or until golden brown. I rotated the trays halfway through.

All to cool on the tray for 5 minutes before placing on a wire rack to cool completely.

Makes approx 20

Jam drops are such a nostalgic treat for me. And these ones even more so because they remind of an Iced Vovo which I loved as a child! What's your favourite childhood bikkie? xx


Friday, December 9, 2016

Christmas Bliss Balls


Christmas Bliss Balls - free from gluten, dairy and refined sugar - from www.mywholefoodfamily.com

4.57 am.

Why do I always wake up at 4.57am these days??

Today I got up straight away and crept downstairs to enjoy the extra quiet time by myself. And at the bottom of the stairs, I took a deep breath and smelt ... Christmas.

After going to the markets on the weekend our fruit bowls are full of mangoes, pineapples and peaches and the smell instantly transported to me my childhood Christmas holidays on the Gold Coast!

The power of smell is truly amazing don't you think?

I can't quite believe it but today is the last day of school for the boys. All the breakup parties, concerts and swimming carnivals are done and Christmas will be here before we know it.

This year I'm easing myself into some Christmas cooking with some simple and oh-so delicious bliss balls that have some of the best flavours of Christmas time.

These little beauties are free from gluten, dairy and refined sugar and taste fabulous. I defy you to taste one and not get a smile on your face!

They were also a great way to use some of the blackstrap molasses which I bought but then couldn't remember why!

I've just included the Thermomix ingredients here but of course a food processor or high powered blender will also do the job.

Super quick and no baking - the perfect Christmas treat!

Christmas Bliss Balls

3/4 cup rolled quinoa
3/4 cup organic sundried dates
1/2 cup raw almonds
A thumb-sized piece of ginger (grated)
1 tbs blackstrap molasses
zest of 1 orange
1/2 ts vanilla extract
1/2 ts cinnamon
14 ts salt
1/8 ts ground cloves

Place the quinoa flakes and almonds into the Thermomix and blitz for 8 seconds / SP 9.

Add all remaining ingredients and process for 30-40 seconds / SP 8, or until the mixture is sticky and holds together.

Roll spoonfuls into balls and store in the fridge.

Makes 16-18 balls.

Do you have a favourite food or smell that reminds you of Christmas?

Monday, September 19, 2016

Coconut Flour Pancakes (SRC)

Coconut flour pancakes - free from grains, dairy and refined sugar - from www.mywholefoodfamily.com

It's Secret Recipe Club time!

For those who don't know, each month SRC members are assigned a blog in secret from which to choose and prepare a recipe. Then we all post on the same day and have fun working out who had who!

This month I was assigned the blog Dessert Before Dinner by Stephanie. Stephanie recently moved to LA with her husband and cat and she loves making bread and ice cream. Just like me she used to make lots of desserts but after she got married she focussed more on main meals and 'real food.' Stephanie had my blog for SRC last month so it was fun to have a look around her site this month!

Here are just a few of her recipes that caught my eye:

Lemon Caper Quinoa Patties, Coconut Flour Pancakes, Apple Stuffed Pork Tenderloin, Coconut Milk Kanten, Coconut Flour Cake with Fudge Frosting, and Cinnamon Lime Panna Cotta just to name a few!

Given that I am off both gluten and dairy at the moment, and have a pantry full of coconut products, I had to go with Stephanie's coconut flour pancakes.

I make pancakes at least once a week for the kids, and sometimes for my lunch as a treat while I'm studying. I have made coconut flour pancakes before but this recipe was a little different, using dried coconut and some spices.

Stephanie says the recipe serves 2 for breakfast, but I got just 4 perfect little pancakes from the mixture which would be a hearty serve for 1 around here!

These were reminiscent of the oatmeal pancakes I've made for brunch previously, with the shredded coconut giving a similar chewy texture to the oats. So if you are newly off gluten and want something substantial for breakfast, these pancakes not only taste great they will keep you full until lunchtime.

Coconut flour pancakes - free from grains, dairy and refined sugar - from www.mywholefoodfamily.com

Coconut Flour Pancakes
Recipe from: Dessert Before Dinner

2 eggs
2 tbs milk (almond or coconut would be good)
1 ts honey
2 tbs coconut flour
2 tbs shredded coconut
1/8 ts bicarb soda
1/8 ts cinnamon
1/8 ts nutmeg

Heat up a frypan over medium heat.

In a small bowl mix together the eggs, milk, honey, bicarb and spices. Add the coconut flour and shredded coconut and mix until just combined.

Grease the pan with a little coconut oil and dollop in 4 spoonfuls of mixture, flattening each out into a pancake.

Fry for 2-3 minutes on each side or until cooked through.

Serve with maple syrup and strawberries.

Thanks for a great recipe Stephanie!

Saturday, July 23, 2016

Superfood Bliss Balls

Superfood Bliss Balls - free form gluten, nuts and refined sugar - from www.mywholefoodfamily.com

What a week! I don't normally post on a Saturday but after attempting to write up this post for days now is my first chance! Mr 2 has been home from daycare this week with some sort of virus that caused conjunctivitis and just as it started to clear he broke out in spots. Before having children I had no idea there were so many illnesses that caused spots! Being the third child we didn't even take him to the doctor (he's completely fine now by the way).

Anyway between having a clingy and sick 2 year old hanging off me, and trying to complete two whole subjects before the September school holidays,  I haven't had a whole lot of spare time.

So this week, yet again, bliss balls saved my life.

I have made a ton of different bliss balls over the past few years, but it was actually only once I had my third baby that I really appreciated them. When Mr 2 was very little I used to make a batch of bliss balls every week and had them stashed in the freezer for a quick breakfast, a mid-afternoon pick me up or a late night snack while feeding.

This week there quite a few times when I was hungry but didn't want to make anything from scratch, so I grabbed 2 of these from the freezer and was completely satisfied.

These ones are a little different in that I have specifically chosen ingredients to suit my health at the moment. There is no gluten, nuts or refined sugar and they have an extra boost of superfoods. Think antioxidants from the raw cacao, zinc from the pumpkin seeds, calcium from the tahini, fibre and essential minerals from the dates, good fat from the coconut, along with the amino acids, minerals and hormone balancing properties of maca.

Oh, and they're totally delicious!

As with anything containing chia seeds, make sure you check your teeth before venturing out in public!

Superfood Bliss Balls
Recipe by me

2 tbs (20 g) raw cacao
1 tbs (15 g) maca powder
1/4 cup (40g) chia seeds
1 cup (150g) pumpkin seeds
1 cup (65g) desiccated coconut
40 g tahini
1/4 tsp sea salt
80 g semi-dried dates
30 g coconut oil
zest of one orange

Place all ingredients into the food processor and blitz until the mixture clumps together (Thermomix 20 seconds / speed 6).

With damp hands, roll spoonfuls of mixture into balls.

Makes about 20

Store in the fridge or freezer.

What's your go-to snack?

Friday, July 15, 2016

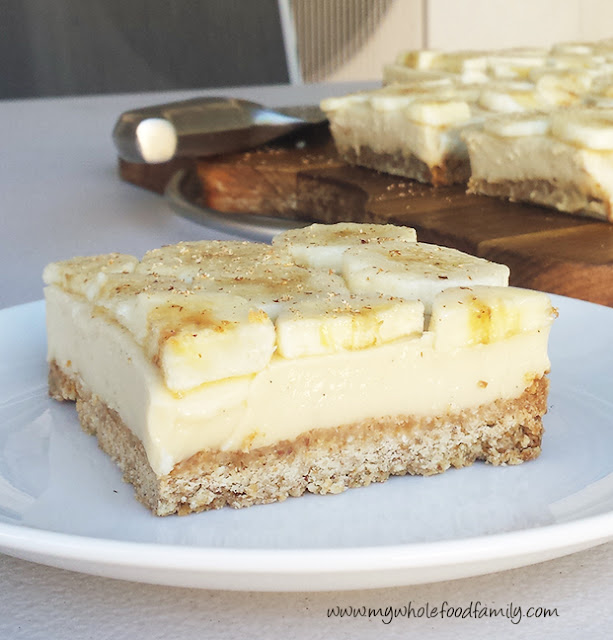
Wholefood Banana Custard Slice (Gluten and Dairy Free)


Baking desserts has always been one of my favourite things - not only because I get to eat what I make, but also because bringing out a special dessert to the table always lights people up. I love it when people love my food!

Not too many years ago I was baking regularly and going through a staggering amount of sugar. Rather than beat myself up about that I choose to see that just by making it myself I was avoiding all the artificial additives you find in processed versions of desserts.

After quitting sugar and when food intolerances became an issue for the boys and me, I was worried  I wouldn't be able to bake anymore, or at least not anything that other people would enjoy. While I've had quite a few flops I am now at a point where I can quite easily convert a recipe to be free of wheat or gluten, dairy and refined sugar without any drama.

And the results can be spectacular!

You know how you always have a soft spot for the sweets from your childhood? For me it's custard - think vanilla slice, custard tart or just plain custard with sliced bananas. So with that in mind I decided to create my own version - something that would be free of gluten, dairy and refined sugar, something that would be sweet and luscious and feel a bit special.

I had the opportunity to bake it when we had family over for morning tea during the school holidays and I had some time to play in the kitchen. I find a slice is always a crowd-pleaser and it's certainly easy to do a big tray of something and slice it up to feed everyone.


We all LOVED this slice. Perfect for morning or afternoon tea, but special enough for dessert.


Banana custard slice - gluten, dairy and refined sugar free - www.mywholefoodfamily.com

Wholefood Banana Custard Slice (Gluten and Dairy Free)

Base:

1 cup buckwheat flour
1 cup desiccated coconut
1/2 cup almond meal
2 tbs coconut sugar
150g coconut oil

Custard:

400ml coconut cream
300ml rice milk
4 egg yolks
2 tbs arrowroot flour
125g rice malt syrup
1 vanilla bean, split and scraped (save the bean for something else)
2 tbs gelatine (I use Great Lakes - the red one)

Topping:

3 bananas, thinly sliced
1/2 lemon, juiced
fresh nutmeg

Preheat the oven to 180 degrees Celsius. Grease and line a 20 x 30 cm slice tray with baking paper and set aside.

To make the base, mix all ingredients together (TMX - 6 secs / SP 4), then tip into the prepared tin and press in firmly with your hands or the back of a large spoon.

Bake for 15-20 minutes - when done it will be  evenly golden brown and still a little soft, it will firm up as it cools.

Remove from the oven and place the tin on a wire rack to cool completely.

While the base is cooking, start to prepare the custard.

If you're using the Thermomix, place all custard ingredients into the bowl and cook for 9 minutes / 90 degrees / SP 4.

No thermomix? Place the coconut cream, milk and vanilla into a medium pan over medium heat until it starts to steam. Meanwhile, use a whisk to beat together the egg yolks, arrowroot and syrup until smooth. When the milk is steaming pour it over the egg mixture and whisk together. Place a few tablespoons of the mixture into a small bowl, sprinkle over the gelatine and stir to dissolve. Pour all the custard mixture back into the pan, add the gelatine mixture and cook over low heat until it starts to thicken, stirring constantly with a large spoon or spatula. This could take 20 minutes so be patient!

Leave the custard to cool for 10 minutes before pouring over the cooked base, then place in the fridge to chill until set (at least 4-6 hours or overnight).

Just before serving, slice the bananas into thin rounds and place in a large bowl. Sprinkle over the lemon juice and toss gently to combine, making sure all the banana gets the juice. The lemon stops the banana going brown but also adds a lovely flavour.

Using the baking paper on each side as a handle, carefully lift the slice out of the tin and place onto a serving board. Gently slide the paper off and discard.

Layer on the banana pieces and dust the top generously with nutmeg.

Cut into 12-16 pieces and enjoy!

What was your favourite childhood sweet treat?

Monday, May 16, 2016

Chocolate Pecan Pie (SRC)

Wholefood Chocolate Pecan Pie - wheat free - no refined sugar - from www.mywholefoodfamily.com

I've been doing a lot of baking lately but it's been all muffins, bliss balls and breads. It seems like aaaages since I've made a proper dessert - something the kids get really excited over and that seems a bit special.

As this is my first month with Group C in the Secret Recipe Club (after moving across from Group D) I thought I would celebrate and choose something sweet and out of the ordinary!

This month I was assigned The Avid Appetite by Rachel who lives in Jersey City with her husband and gorgeous daughter Penelope (the cutest name ever). I loved spending time on Rachel's blog and   apart from a love of food (obviously), found we have a quite lot in common such as loving overnight oats for breakfast to being a fan of both Castle and Gretchen Ruben!

I was really spoilt for choice when it came to selecting a recipe and there were loads that I bookmarked for later. I love the sound of her Vanilla Cinnamon Quinoa for a protein-packed breakfast, I'm intrigued by the Pumpkin Butter and my boys would go crazy for these Banana Bars with Chocolate Frosting.

It was the Chocolate Pecan Pie adapted from a Paula Deen recipe that really caught my eye though (I have a bit of a soft spot for Paula Deen after reading her autobiography a few years ago).

(Does anyone else remember 'pecan pie' scene from When Harry Met Sally?)

I was prepared to make a few changes in order to fit in with our wholefoods way of eating, and just a couple of simple switches later we had the most amazing, but not too sweet, dessert!

We LOVED this. Perfectly short pastry, sweet nutty filling with little pops of dark chocolate. What's not to love?

Try as I might though I couldn't get a clean slice. I mean, is there a trick to slicing a pecan pie neatly without all the nuts smooshing out the sides? Still the taste made up for the messiness. DELICIOUS!

Wholefood Chocolate Pecan Pie - wheat free - no refined sugar - from www.mywholefoodfamily.com

Chocolate Pecan Pie
Adapted from Paula Deen via The Avid Appetite

Shortcrust Pastry (my own recipe):

300g wholemeal spelt flour
2 ts coconut sugar
160g cold butter, diced
1/3 cup cold water, approx

Place all ingredients except the water into a food processor and blitz until it forms breadcrumbs. Add the water a little at a time until the dough comes together and forms a ball. Wrap in plastic and place in the fridge to chill for 30 minutes.

Roll out the dough in between 2 sheets of baking paper, large enough to fit a 22cm tart dish. Either wrap the remainder of the dough and place in the freezer for another time or roll it flat and cut out cookies to bake at the same time as the pie. My boys love this!

Preheat the oven to 190 degrees Celsius.

Filling:

2 cups pecans
3 large eggs, beaten
3 tbs melted butter, cooled
1/2 cup rice malt syrup
1 tbs molasses
1/2 cup coconut sugar
100g dark chocolate, chopped (I used Lindt 85%)

Scatter pecans over the uncooked pastry shell.

Place the eggs, butter, syrup, sugar and chocolate into a mixing bowl and whisk together until well combined. Pour the mixture over the pecans.

Place the pie onto a baking sheet and cook for 10 minutes. Lower the temperature to 180 degrees and cook for a further 25 minutes or until set.

Remove from the oven and place on a rack to cool completely.

Thanks for a great recipe Rachel! My family loved it.

Thursday, May 12, 2016

Peanut Butter Banana Muffins

Peanut Butter Banana Muffins - wheat free, dairy free, no refined sugar - from www.mywholefoodfamily.com

There are some flavour combinations that just work.

And peanut butter and banana is definitely one of the best!

While peanut butter gets a bad rap sometimes (and of course if you're allergic you should steer well clear), it's actually packed with protein, potassium, magnesium and good fat that will help keep you full.

My Mr 5 has lots of sensory issues to do with food but he has always loved peanut butter so it's a staple at our place. We buy tubs of freshly ground peanut butter from our local health store, that is made from 100% organic peanuts, nothing else added.

Staying away from commercial varieties which are full of added salt, sugar and vegetable oils is a good idea. Most supermarkets will have at least one brand of natural peanut butter so check the health food section and get reading those labels.

Apart from sandwiches we add peanut butter to smoothies, spread it on celery and top with sultanas to make ants on a log and serve with apple slices. And now we can add muffins to the list because these were delicious!

My boys absolutely devoured these - they couldn't get enough and ate 3 each for afternoon tea (and yes still ate dinner afterwards).

Banana Peanut Butter Muffins

1 cup wholemeal spelt flour
1 cup buckwheat flour
1 tbs baking powder
1/3 cup coconut sugar
pinch salt
2 ripe bananas
1/2 cup peanut butter
1/4 cup coconut oil
3/4 cup coconut milk
2 eggs
1 ts vanilla extract

Preheat the oven to 180 degrees Celsius / 160 degrees fan-forced. Line a 12 cup muffin tray with paper liners and set aside.

In a large bowl, whisk together the flours, baking powder, salt and sugar.

In a medium bowl, mash the bananas and peanut butter together until smooth. Add the eggs and beat until well combined. Add the oil, milk and vanilla and mix to combine.

Pour the wet ingredients into the dry ingredients and stir together with a fork until only just combined.

Spoon the mixture evenly into the prepared tin and bake for 15-20 minutes or until golden brown and the top springs back when you press lightly.

Leave in the tin for 5 minutes before turning out onto a wire rack to cool completely.

Serve with a big glass of milk and watch kids and big kids smile!

Makes 12.

Are you a peanut butter fan?

Thursday, February 25, 2016

Dairy Free Spelt Chocolate Chip Muffins

Dairy free spelt chocolate chip muffins www.mywholefoodfamily.com

I actually can't remember the last time I baked anything with chocolate chips. Being dairy free my chocolate choices are quite limited and I tend to stick with blocks of 85% cocoa chocolate like Lindt or Green & Blacks which are naturally free of dairy.

But when I spotted these dairy free chocolate chips in the bulk section of the my health food store I had to grab some and make something for the boys. And what else to bake but chocolate chip muffins?!

I got 10 from this recipe but you could easily make 12 instead (I normally would) just by making them slightly smaller.

This is a simple and delicious recipe that is free from wheat, dairy, nuts and refined sugar.  Perfect for the after school munchies!

Spelt Chocolate Chip Muffins (Dairy free)

Wet ingredients:
2 eggs
1/3 cup coconut oil
1/3 cup coconut sugar
2 ts vanilla extract
3/4 cup rice milk

Dry ingredients:
1 2/3 cup wholemeal spelt flour
3 ts baking powder
pinch salt

Filling:
1/2 cup dairy free chocolate chips
2 tbs chocolate chips, extra

Preheat oven to 180 degrees / 160 degrees fan-forced.

Line a muffin tray with paper liners and set aside.

-----------

Thermomix instructions - add the wet ingredients into the bowl and mix for 5 secs / SP 4.

Add the dry ingredients and mix for 5 secs / Sp 4, scraping down the bowl if needed.

Add the 1/2 cup chocolate chips and mix for 4 secs / SP 3 / Reverse.

-----------

No thermomix? Combine the wet ingredients in a small bowl. Combine the dry ingredients in a large bowl. Pour the wet into the dry and mix until just combined.  

-----------

Spoon the mixture into the prepared tray and sprinkle the extra chocolate chips over the top.

Bake for 12-15 minutes or until the top springs back and they are evenly golden brown.

Turn out onto a wire rack to cool.

Makes 10-12 depending on the size of your muffin tray.

Thursday, February 11, 2016

My Frozen Peanut Butter Cream Pie (Dairy Free)


I absolutely love peanut butter. I know lots of people do but unlike most people it's not something I grew up eating. In fact I don't ever remember having it as a kid. I do remember craving it when I was pregnant though and ate stacks of spelt toast with peanut butter and a sprinkle of sea salt all 3 times!

We only buy the good stuff these days, that is freshly ground 100% peanut butter with no oils or salt or anything else added. It's brilliant on crunchy green apple or even just straight from the tub on a spoon.

I was in the mood for something sweet and cool and peanut-buttery and came up with this gorgeous pie for dessert one weekend way back when I should have been packing for our move. I made it again last month and it was equally delicious. A crunchy chocolate base topped with smooth and creamy filling that was almost like ice cream. Yum!

I splurged on medjool dates for this which you can find in the fresh food section of Coles and Woolies near the herbs. You could definitely use regular dried dates instead they may just take a little extra blitzing for the filling to become really smooth.

This sets hard in the freezer so be sure to take it out at least 20 minutes before serving.

Enjoy!

My Frozen Peanut Butter Cream Pie (Dairy Free)

Base:
200g raw almonds
75g medjool dates
20g coconut oil
20g raw cacao
pinch salt

Place all ingredients into the food processor and blitz until the mixture forms sticky crumbs (TMX 30 secs / SP 5). Press the mixture into the base of an 8 inch spring form pan lined with baking paper and place into the freezer while your prepare the filling.

Filling:
200g natural peanut butter
60g medjool dates
270ml coconut cream
30ml milk of choice
20g maple syrup or raw honey

Wipe out the processor (no need to wash it) and add all ingredients. Process until smooth, around 30 seconds to 1 minute depending on your machine (TMX 30 secs / SP 7). Pour over the prepared base and place back into the freezer to set for 4-6 hours or overnight.

Remove from the freezer at least 20 minutes before serving.

Serves 8

Thursday, January 21, 2016

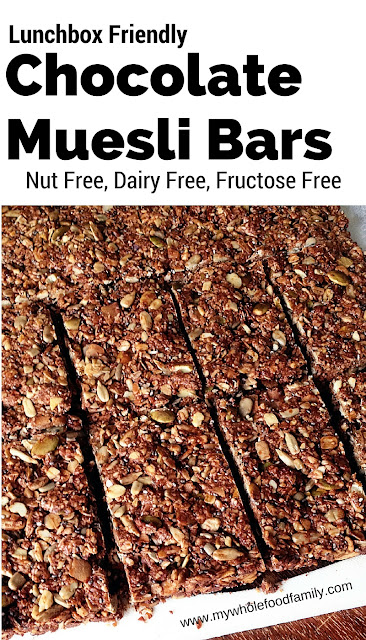
Lunchbox-friendly Chocolate Muesli Bars (Nut, Dairy and Fructose Free)

Lunchbox friendly chocolate muesli bars - nut free dairy free fructose free - from www.mywholefoodfamily.com

I've been making these muesli bars for the kids for years now but with all 3 kids off to school or daycare this year (sob) I can officially call them 'lunchbox friendly.'

If you want to eat fewer processed foods, then making your own snacks like these is a great place to start.

Store bought muesli bars, especially the ones plastered with statements like 'no added sugar', '99% fat free' and 'no artificial colours or flavours' can be full of rubbish ingredients. (I will be doing a post on how to read product labels next month so keep an eye out for that!)

These use a mixture of seeds instead of nuts, coconut oil instead of butter and rice malt syrup instead of sugar. If you have no problems with dairy then use butter by all means and you could also replace the syrup with either honey or maple syrup (although this means they won't be fructose free).

They are absolutely delicious and really filling too so my kids will having one of these and a piece of fruit in their lunchbox for morning tea next week at school. It will keep them going for hours!

Chocolate Muesli Bars

140g rice malt syrup
90g coconut oil
2 1/2 cups rolled oats
1 cup shredded coconut
1 cup pumpkin seeds
1 cup sunflower seeds
1/4 cup chia seeds
1/4 cup sesame seeds
2 tbs raw cacao
3 ts vanilla extract
1/2 ts salt

Preheat oven to 160 degrees C / 140 degrees C fan-forced.

Line a 20 x 30 cm slice pan with baking paper and set aside.

TMX - melt together the syrup, coconut oil and vanilla extract for 2 minutes / 80 degrees / SP 2. Add all remaining ingredients and process for 20 seconds / SP 4.

No TMX? Melt the syrup, coconut oil and vanilla in a small pot over medium heat. Place all remaining ingredients in a large bowl and toss to combine. Pour over the syrup mixture and mix really well.

Tip the mixture into the prepared pan and press down well.

Bake for approximately 25 minutes. Use your nose with this one, the house will smell amazing and it will look evenly browned. Do not overcook!

Remove from the tin by lifting the baking paper on each side and slice into bars while still warm. Leave until completely cooled. Store in an airtight container or freezer.

Makes 16-20 but you can slice them into whatever size bars you need


Monday, January 11, 2016

Pumpkin Boiled Fruit Cake


We're going old school with this one - and it doesn't get much more retro than a boiled fruit cake!

I know not everyone is a fan of fruit cake but we love them. They are very much a treat in this house though as being full of dried fruit they are also packed with sugar. I still had half a bag of mixed dried fruit leftover from making Christmas cakes and a visitor coming for morning tea so it seemed like to the perfect opportunity to make this again.

It is adapted from an old family recipe that I can remember my mum making in the 80s (yep I'm that old!). It is has no sweetener apart from the dried fruit (tick), wholemeal flour (tick) and mashed pumpkin (big tick for hidden veggies).

The pumpkin gives it a lovely warm colour and helps keep it moist, although unlike other fruitcakes this one is best eaten on the day or the day after baking but no longer. Even my pumpkin-hating husband and super fussy Mr 5 loved this and the entire cake was demolished between 6 of us.

I didn't do it this time around but I have been extra sneaky in the past and added a grated zucchini into the fruit mixture and it virtually disappears once boiled. Love those hidden veggies :)


Boiled Pumpkin Fruit Cake

450g organic mixed dried fruit (I used sultanas, raisins and currants)
125g butter
1 cup water
2 ts mixed spice (cinnamon, nutmeg and allspice)
2 cups wholemeal spelt flour
2 ts baking powder
1 cup cold mashed pumpkin
2 large eggs

Place the fruit, butter, water and spice into a large pot and bring to the boil over medium high heat. Let bubble for 5-10 minutes or until most of the liquid is gone and the fruit is plump and sticky. Allow to cool completely.

Preheat the oven to 170 degrees C / 150 degrees fan-forced. Grease and line a deep 8 inch cake pan and set aside.

Add the beaten egg and pumpkin and mix well.

Fold through the flour and baking powder (I never bother sifting but you can whisk them together in a bowl before adding if you like).

Pour the mixture into the prepared tin and bake for approximately 1 1/2 hours. Watch the top and cover with foil if it is getting too dark.

Cool in the tin and serve sliced with butter and a cup of tea.


Saturday, October 24, 2015

Noah turns 2! and a Frozen Raspberry Cheesecake

You know what they say about best laid plans? Well that was us this week. I had planned the most delicious carrot, orange and ginger layer cake for Noah's birthday and guess what happened. Our oven died. Right in the middle of cooking pizza for dinner 2 days before his birthday. We saved the pizza by cutting it into pieces and cooking them individually in our sandwich press. Bit hard to make a cake like that though!

After a bit of panic and a lot of searching I decided it would be easiest to make a frozen cake of some sort and Wholefood Simply came to the recipe. If you haven't visited this gorgeous blog then you are really missing out.

The recipe I chose was a raspberry cheesecake with chocolate crust which I tweaked a little and decorated to suit a birthday. On that note, a huge happy birthday to our beautiful boy who has filled our lives with such joy these past 2 years. We love you Noah!!


Frozen Raspberry Cheesecake with Chocolate Crust
Slightly Adapted from Wholefood Simply

Crust:
1 cup desiccated coconut
1 cup raw almonds
10 dates, seeds removed
1 tablespoons raw cacao

Line the base of a 20cm springform pan with baking paper. Place all ingredients in a food processor or high speed blender and blend until sticky and well combined. Press firmly into the base of the prepared pan and place in the freezer until required.

Cheesecake – Step 1
2 cups frozen mixed berries
8 dates, seeds removed

Blend all ingredients until well combined, spoon into a bowl and set aside.

Cheescake – Step 2
2.5 cups raw cashews (preferably soaked for a few hours first then drained well)
3 heaped tbs coconut oil
2 ts vanilla extract
juice of one lemon
1/2 cup coconut milk (you may need a little more or less liquid than this so don't add it all at once)

Blend all ingredients until smooth and very well combined. Scrape down the sides of the blender and keep blending until you are happy with the consistency. Add the berry mixture and mix until well combined.  Spread the cheesecake mixture over the base, smooth the top and place in the freezer.

Topping:
1 1/2 cups cold coconut cream
2 tbs maple syrup
2 ts vanilla extract
1 tbs gelatin

Blend all ingredients until thick and smooth. Pour over the cheesecake mixture and return to the freezer for 4 hours or overnight.

Remove from the freezer at least 20-30 minutes before serving.

To make the number 2 on top I simply printed a big number 2 and cut it out to form a stencil. Lay the stencil over the cake and dust on some cocoa. Make sure you remove the stencil very carefully (you might need an extra pair of hands for this). Very simple but very effective!


Sunday, September 6, 2015

Fluffy Father's Day Pancakes

Happy Father's Day to all the Dads!!! I hope you are all being spoilt this morning.

My hubby missed out on breakfast in bed this morning as we have to be up early and all pitch in to be ready for swimming at 8am. BUT I did make him a yummy breakfast. Apologies for the terrible photo, it was very dark and very early!

These were some of the lightest and fluffiest pancakes I've made, which you can't always say about pancakes made without wheat flour and buttermilk (I've made some real duds over the years believe me!).  Hubby and the kids LOVED them and they were the perfect start to Father's Day.

Hope you're having a great weekend :)


Fluffy Father's Day Pancakes

2 cups wholemeal spelt flour
1 tbs aluminium free baking powder
1 tbs coconut sugar
pinch salt
2 eggs
1 ts vanilla extract
270ml can Ayam coconut milk
1/2 -2/3 cup rice milk (or any  milk you like)
maple syrup and banana to serve
coconut oil for cooking

Place a large pan over medium heat.

In a large bowl place the flour, baking powder, coconut sugar and salt and whisk together. In a jug or small bowl, mix the eggs, vanilla, coconut milk and 1/2 cup of the milk together.

Pour the wet ingredients into the dry ingredients and mix until only just combined. The batter should be thick but if it is too thick and sticky add more milk, a little at a time until it is smooth and spoonable.

Drop some coconut oil into the pan and swirl to coat. Place spoonfuls of the mixture into the pan (I can fit 4 pancakes in my 10 inch pan). Cook until bubbles appear on the surface then turn and cook for another 2 minutes or so until golden brown and cooked through.

Place directly onto serving plates and top with sliced banana and a generous drizzle of maple syrup.

Enjoy!


Wednesday, September 2, 2015

Chocolate Chunk Cookies

Spelt Chocolate Chunk Cookies © www.foodbabylife.com

Well the house is officially ours!!! We picked up the keys this afternoon and the boys were thrilled with the big yellow bow tied on the front door.  So now it all begins in earnest. We have trades booked to start sanding and polishing the floors upstairs first thing in the morning as well as measuring the stairs for new carpet. So much to do and so little time! Moving day is Monday 14th so we are officially on a countdown now.

I knew this afternoon would be a whirlwind so I took the time this morning to make something easy and delicious for afternoon tea. These are easily the best cookies I've made for ages. The rice flour gives them a little shortbready crunch and the big chunks of chocolate are a great surprise. SO tasty and they were mixed, baked and ready to eat within 30 minutes.

I guarantee you'll have happy little campers if you make these for afternoon tea!!

Chocolate Chunk Cookies

1 1/4 cups wholemeal spelt flour
1/4 cup rice flour
1/4 cup flaxseed meal
1/2 ts bicarb soda
1/4 ts salt
4 tbs rice malt syrup
4 tbs coconut oil, melted
1 ts vanilla extract
50g dark chocolate (Lindt 70% is good for this), roughly chopped

Preheat oven to 170 degrees celsius. Line  baking tray with baking paper and set aside.

Mix all ingredients together in a large bowl. Roll into walnut-sized balls and place on the prepared tray.

TMX - place all ingredients except chocolate in mixing bowl and mix for 10 secs / SP 4. Add the chocolate and mix on reverse / 6 secs / SP 3.

Bake for 10-12 minutes. They will still be soft but will firm up once they cool to become crunchy around the edges and chewy in the middle, just the way I like them!

Makes approx 16.

Monday, August 31, 2015

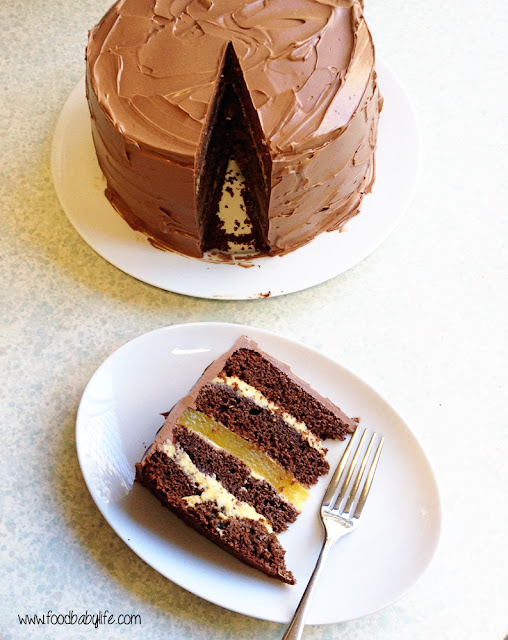
Happy birthday to me! and a chocolate-orange celebration cake

Spelt Chocolate Orange Celebration Cake © www.foodbabylife.com

Actually that should read happy birthday to us as my husband and I are lucky enough to share the same birthday! Being Sunday we had to get up early to get the kids to swimming for 8am and also do some more packing and cleaning in preparation for our move. But after lunch we got to relax a little and we had family over for birthday cake for afternoon tea and Indian takeaway for dinner (I refuse to cook dinner on my birthday!).


Now some people might think it's a bit sad having to make your own birthday cake but as a baker I really enjoy it and bonus, I know exactly what's in it and can tweak the recipe to suit our needs.

Chocolate and orange is one of my all time favourite combinations and after much (much, much) thought I decided to make a chocolate cake, sweet orange curd, orange jelly and a chocolate swiss meringue buttercream. Wow it sounds decadent when you write it out like that!

We are mostly sugar-free (fructose-free) in this house and while I wanted this cake to be special I didn't want to go overboard on the sugar. My sweeteners of choice these days are rice malt syrup (which although processed is fructose-free and a great alternative to honey and golden syrup) and coconut sugar (which does contain fructose but is unrefined). I also wanted to use spelt rather than wheat flour and no dairy other than the grassfed butter we use everyday.

I made a few small changes to the recipes I found and was really happy with the result. Everyone loved the cake and it was certainly impressively tall! It had all the flavour I was hoping for and it wasn't too sweet.

I popped the cake in the fridge for an hour or so which was a mistake as it seemed to dry the cake out a little (I know it was really moist before that as I got to eat the trimmings - cook's privilege!).  It would be much better to simply assemble the cake as close as possible to serving and leave it at room temperature until ready.

I especially loved this cake and it will become my go-to spelt chocolate cake from now on!

Spelt Chocolate Orange Celebration Layer Cake © www.foodbabylife.com

Spelt Chocolate Cake
Slightly adapted from Bake with Spelt
makes 2 x 8 inch cakes

230g unsalted butter, at room temperature
1 1/2 cups coconut sugar
6 large eggs, at room temperature
2 ts vanilla extract
300g white spelt flour
40g raw cacao
1 tbs aluminium free baking powder
80ml (1/3 cup) rice milk

Preheat the oven to 170 degrees celsius fan-forced. Grease and line the bases of 2 x 8 inch round baking pans.

Using a stand mixer, thermomix or electric beaters, beat together the butter and coconut sugar until light and fluffy. Add the eggs one at a time, beating well after each addition, then beat in the vanilla.

Sift together the flour, cacao and baking powder then add to the butter mixture, alternating with the milk until the mixture is smooth and well combined.

Divide the batter evenly into the prepared pans and bake for 25-35 minutes. The cakes will have pulled away from the sides a little, spring back in the middle and a skewer inserted into the middle will come out clean (mine took 31 minutes).

Leave in the pans to cool for 10 minutes before turning out to cool completely on a wire rack.


Sweet Orange Curd
Adapted from Tenina

200g rice malt syrup
zest of 2 oranges and 1 lemon
200g fresh orange juice
240g cold butter, cut in cubes
1 ts corn flour
4 whole eggs
2 egg yolks

Place butter into the thermomix bowl and chop 5 seconds / SP 5.

Add all remaining ingredients and cook for 10 minutes / 80 degrees / SP 5.

Cook for a further 3 minutes / 90 degrees / SP 6.

Pour into sterilised glass jars. Place in the fridge once cooled.


Fresh Orange Jelly

500ml fresh orange juice, strained to remove the pulp
1 1/2 tbs gelatin powder (I use Great Lakes)

Grease and line the base of an 8 inch round cake pan.

Place the orange juice into a small pot over low heat. Once the juice is just warm to touch, turn off the heat and sprinkle over the gelatin, whisking continuously until it is completely dissolved and there are no lumps.

Pour immediately into the prepared pan and refrigerate until needed.


Chocolate Swiss Meringue Buttercream
Slightly adapted from Thermomix Recipe Community

85g egg whites, at room temperature
170g coconut sugar
pinch of salt
340g unsalted butter, very cold and cut into cubes
100g 85% dark chocolate, melted and cooled

Make sure the thermomix bowl is completely clean, dry and free of grease.

Weigh in the coconut sugar and mill for 1 minute / SP 9.

Weigh in the egg whites and salt and mix for 3 minutes / 60 degrees / SP 3.

Check that the sugar has dissolved by rubbing a small amount of the mixture between your thumb and finger. It should be completely smooth. If not, repeat for another minute or so.

Insert the butterfly and whip for 10 minutes / SP 4 until the bowl is only slightly warm and the mixture is glossy and has double in volume.

With the machine running on SP 3 for 6-8 minutes, add the butter a few pieces at a time. Once it is all incorporated, pour in the melted and cooled chocolate and whip until light and fluffy.

Use immediately or keep in the fridge until required (bring back to room temperature and re-whip with the butterfly on SP 4.

Spelt Chocolate Orange Celebration Layer Cake © www.foodbabylife.com

To assemble the cake

Choose your favourite large cake plate or stand and place a small dollop of the buttercream in the middle to secure the cake.

Trim the tops from each cake if they have domed and then slice each cake evenly in half horizontally so you have 4 layers.

Place one half down on the plate and top with 1/3 of the orange curd. Spread evenly to the edges. Top with another cake half and press down lightly. Smooth over a tablespoon of curd and then carefully place on the prepared jelly. Top with another tablespoon of curd and another layer of cake. Repeat with another cake layer and 1/3 orange curd.

Top with final layer of cake.

Cover top and sides of cake with buttercream icing.

Best assembled close to serving and kept at room temperature until ready.

Serves 12 (at least)

So there you go!! A marathon recipe but none of the components are too tricky and best of all, I was able to keep it free of wheat and refined sugar!



Sunday, August 9, 2015

Spicy Carrot Loaf Cake and some news

Spicy Carrot Loaf Cake © www.foodbabylife.com

Oh it feels like ages since I've been here! The last month or so has been a bit of a blur of phone calls and emails but it feels like the right time now to share our news ... we bought a house!!! After being in a rented townhouse for the past 5 years we are thrilled that soon we will have a house of our own. We are moving in the middle of September and have already started packing. We've accumulated a lot of stuff as well as had 2 more children since we moved in here and there is a lot of sort out. I'm loving the chance for a clear out though and we have passed on bags and bags of stuff to the Salvos already.

In all the busyness my diet has slipped a little and my health started suffering as a result. Nothing major but constant colds and the stress of studying for exams and house-hunting took their toll on my thyroid and I've been feeling exhausted. After trip to the naturopath I am back on the right path and taking the time to cook and bake for all of us properly.

I'm really loving my spices at the moment. Not sure whether it's just my body's way of wanting to warm up this winter but whatever the reason, I can't get enough! I needed to make something for afternoon tea and decided to use up some veggies at the same time. This cake used 4 medium carrots but you could use pumpkin, zucchini or even parsnips for this recipe or even a combination of these.

This was an easy and absolutely delicious cake. My boys loved it and Oscar told me it was the best cake I'd ever made! I of course loved that it go some extra carrot into them along with the amazing health benefits of cinnamon, ginger and turmeric in winter.

I left the walnuts out of this batch but if you don't have littlies add them in for some yummy crunch.

Spicy Carrot Loaf Cake

250g grated carrot
2 large eggs
1/4 cup extra virgin olive oil
1/4 cup rice malt syrup
1 cup wholemeal spelt flour
1 ts baking powder
1/4 ts bicarb soda
2 ts cinnamon
1 ts turmeric
1 ts ginger
1/4 ts ground cloves
pinch salt
1/2 cup natural raisins
1/2 cup walnuts, roughly chopped (optional)

Preheat oven to 170 degrees celsius / 150 degrees fan-forced. Grease and line an 8 inch loaf pan (mine was pyrex).

Place the carrot, eggs, oil, syrup and raisins in a large bowl and mix well. Sift the flour and spices together and then add to the wet mix, folding through until only just combined.

Pour the mixture into the prepared tin and smooth the top.

Bake for approximately 1 hour. It will be golden brown and fragrant and the middle will spring back when pressed lightly. Remove from the oven and leave to cool in the tin for half an hour before turning out onto a wire rack.

Slice and serve with butter (if not dairy free).

Thursday, July 23, 2015

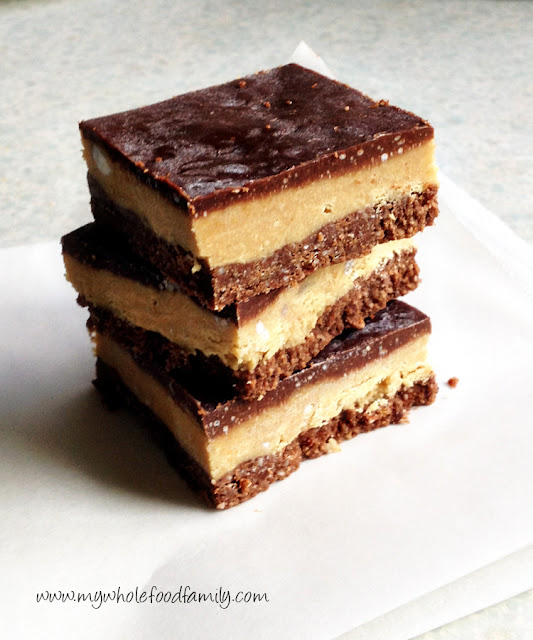
Healthy Peanut Butter Slice

 healthy peanut butter squares - www.mywholefoodfamily.com

One of my all time favourite things is peanut butter and chocolate. For many years I've made Nigella's Peanut Butter Squares every Christmas and I always get requests for it. But seeing we're nowhere near Christmas and I'm baking a little healthier these days I thought it was time I tweaked the recipe and came up with my own peanut butter slice.

I had all of these ingredients in the pantry and it took probably 10 minutes to whip up which I love. It is gluten-free, dairy-free and refined sugar free but certainly not flavour free and be warned, it is VERY rich so a little goes a long way!

healthy peanut butter squares - www.mywholefoodfamily.com
Healthy Peanut Butter Slice

Crust:
1 cup almond meal
1/2 cup dried pitted dates
2 tbs raw cacao
2 tbs coconut oil (solid)
pinch salt

Filling:
200g natural peanut butter
1 tbs coconut oil
2 tbs rice malt syrup
pinch salt

Topping:
1/3 cup raw cacao
1/4 cup coconut oil
3 tbs rice malt syrup

Grease and line an 8 inch square brownie pan and set aside.

Place all crust ingredients in your food processor and blitz until sticky and well combined. Press into the base of the prepared tin and place in the fridge.

Wipe out the bowl then add all filling ingredients and blitz until smooth. Taste and add another pinch of salt if desired. Pour mixture over the top of the chilled base and smooth with a spatula. Place back in the fridge.

Place the topping ingredients in a small saucepan over low-medium heat and stir until smooth and well combined (TMX 3 mins/50 degrees/SP 2). Pour over the peanut butter filling and smooth with a spatula.

Place in the freezer until set. Delicious frozen but for best results remove from the freezer about 10 minutes for slicing into squares and serving.

Makes 16 pieces (or more if cut smaller squares!)

Thursday, June 18, 2015

Fudgy (almost) Grain-free Chocolate Brownies

Fudgy Grain-free Chocolate Brownies © www.foodbabylife.com

I have been on the search for the perfect 'healthy' brownie for more than a year now. I've tried literally dozens of recipes, and a few of them have actually been pretty good like this Healthier Chocolate Brownie.

But I still hadn't found one I was completely happy with in terms of both taste and ingredients. Until now. This brownie recipe comes from Eat Drink Paleo where Irena describes them as the brownies that blew her away. And now that I've made them I completely agree!

Now my husband would say that the best part of a brownie is the crispy edges but I actually prefer the fudgy middle and that's what these brownies deliver unlike so many others.

My kids loved these and they disappeared so quickly I barely had a chance to take a photo. They had no idea there was sweet potato in them, and you certainly can't taste it, but that must be what makes the texture so fudgy and delicious.

The only change I made was to use rice malt syrup instead of honey. This makes them fructose free but no longer paleo as rice is obviously a grain, hence the (almost) grain-free of the title!

These would make a fabulous dessert served with berries and coconut cream or dairy-free ice-cream but we had them simply dusted with extra cacao powder.

The original recipe said to bake for 25-30 minutes but this made my first batch too dry so second time around I baked for just 20 minutes and they were perfect.

Fudgy (almost) Grain-free Chocolate Brownies 
Slightly adapted from Eat Drink Paleo

1 medium sweet potato (approx 2-3 cups grated)
2 whole eggs
1/2 cup coconut oil, melted
1/3 cup rice malt syrup
2 ts vanilla extract
1/2 cup raw cacao powder
1 ts baking powder
1 ts bicarbonate of soda
2 1/2 tbs coconut flour

Preheat oven to 180 degrees C / 160 degrees fan-forced. Grease and line an 8 inch square baking pan.

In a large mixing bowl, place the sweet potato, eggs, vanilla, syrup and coconut oil and mix together until well combined. Next stir through the cacao, baking powder and bicarb soda, and then add the coconut flour mixing until only just combined.

Pour the mixture into the prepared tray and bake for 20-25 minutes. Remove from the oven and allow to cool for 10 minutes before carefully removing from the tin. Serve dusted with extra cacao powder and some berries.

Related Posts Plugin for WordPress, Blogger...