Sunday, October 5, 2008

Anzac Biscuits in October

So Anzac biscuits are normally baked in April on Anzac day to commemorate the Australian and New Zealand troops landing at Gallipoli in 1915. I always make them then but really they are fantastic to make any time.

Part of their appeal is they they contain ingredients that I always have in the pantry and can be whipped up at a moment's notice.

There is a lot of debate as to how they should end up - soft or hard, chewy or crunchy. Personally I go for crunchy on the outside and slightly chewy in the middle. I mounded these up a bit and didn't cook them for quite as long as I normally would. But follow the instructions and you will get thinner biscuits perfect for ice-cream sandwiches!

Anzac Biscuits
Recipe from the Australian Women's Weekly Original Cookbook, 1977, p187

1 cup traditional rolled oats (not instant)
3/4 cup dessicated coconut
1 cup plain flour
1 cup sugar (I like raw sugar for these)
1 1/2 ts bicarb soda
2 tbs boiling water
125 g butter
1 tbs golden syrup

Combine oats, sifted flour (I generally don't bother sifting), sugar and coconut. Melt the butter and golden syrup together over a gentle heat. Mix bicarb with boiling water and add to the the butter mixture. It will froth up like a crazy science experiment. Stir this mix into the dry ingredients.

Spoon dessertspoonfuls of mixture onto greased oven trays, allowing room for them to spread.

Bake at approx 150 deg C for 20 minutes or until they are a deep golden brown. They will be very soft straight out of the oven so don't try to move them until they are cool.

Makes approx 30.

Tuesday, September 30, 2008

Tuesdays with Dorie: Classic Crème Brûlée

To say I was excited about this week's recipe is an understatement. Crème brûlée is one of my favourite desserts to order when we eat out and when done well, takes custard to a whole new level.

I have to say I was sceptical about the cooking method. I'm used to baked custards cooked at a higher temp in a water bath. I was also thrown by just how low the temperature was. 200F sounds low but when you convert it to celsius it's almost ridiculous!

Anyhoo, I baked my 4 little ramekins at just under 100 deg C but it took much, much longer than stated to set. After 60 minutes they were still liquid. I ended up giving them 1 hr 40 minutes and then left them in the switched off oven with the door open to cool down to room temperature.


The taste test ...

Sublime. This may be the best tasting baked custard I have ever had. The slow cooking seems to do amazing things for the texture. It was rich, lucsious and incredibly silky. Each serve looked really small but I couldn't have eaten a bigger one! We borrowed a blow torch to do the tops and it worked really well. I think we may end up buying one!

A big thank you to Mari of Mevrouw Cupcake for this week's choice. Now that I know how easy it is I will definitely be making these again, probably using some of the playing around ideas.

Next week - Caramel-Peanut-Topped Brownie Cake!

Saturday, September 27, 2008

Daring Bakers September - Lavosh Crackers with Pesto Rossi

Yay for a savoury DB challenge! I know this is only my second challenge but I was delighted to be making something savoury this month. I was equally delighted to have an 'alternative' challenge. I've had lots of problems with food allergies over the years and I know how frustrating it can be trying to find something you can eat at parties etc. This was a two-part challenge - first to make Lavosh crackers (either regular or gluten-free) and then to create a vegan dip to go with the crackers, and that was a little trickier!

I decided not to go for a gluten-free cracker here purely because I didn't have the ingredients. The regular flour recipe was an absolute breeze. I even kneaded it by hand (usually I cheat and use the dough hook in my mixer) and it took a full 15 minutes to meet the stretch and windowpane tests.

I used my pasta maker to roll out the dough which allowed me to get a really even end result. I took it down to the second thinnest setting which made it a little easier to manage, then used a pizza cutter to make rectangles. The only frustrating part was having to do so many batches and waiting for the tray to cool down in between.

I decided to keep them pretty plain, just sprinkling the tops with sesame seeds and some sea salt, as the dip I chose has a bit of kick. I don't make dips very often and it was quite difficult to find something that was actually vegan (meaning no animal products whatsoever) rather than just vegetarian. In the end I just decided to do Pesto Rossi, which means red pesto in Italian. It is actually a pasta topping but I though it would work well with the crackers.

Pesto Rossi
(this is not my recipe but I can't remember where I got it from)

3 chargrilled red capsicum (roasted using whatever method works for you)
3 slow roasted roma tomatoes (again everyone has their own way of doing this)
1 tbs balsamic vinegar
1 clove garlic
1/4 cup extra virgin oilive oil
1/4 cup ground hazelnuts

Blitz all ingredients in a food processor and serve. It really is that easy! To make a non-vegan variety you can add a 250g block of cream cheese into the mixer and process until smooth. This is great as a dip or over pasta.

All the taste testers absolutely loved this and everyone wanted the recipe!

A big thank you to Natalie from Gluten A Go Go and Shel of Musings From the Fishbowl for this month's challenge. I really enjoyed it and will definitely be making these crackers again!

Thursday, September 25, 2008

Banana Buttermilk Muffins


I love muffins. When I used to work in the city my bus stop was right next to a Muffin Break and believe me there is nothing more tempting at the end of a horrible day than a big fat muffin! These days I don't make them very often but after today's taste test that might change. I couldn't find a recipe that exactly suited the ingredients and quantities I had so I made up my own. The combination of raw and brown sugars gives a rich caramel colour and flavour that complements the banana perfectly. Next time I plan on making them with a proper streusel topping but for a shortcut, the extra brown sugar makes a lovely crunchy top.

Banana Buttermilk Muffins

A food. baby original

2 cups plain flour
3 ts baking powder
1 ts bicarb soda
pinch of salt
3 ts cinnamon
1/2 cup raw sugar
1/4 cup brown sugar
1 egg
1 cup buttermilk
125g butter, melted
1 1/2 very ripe bananas, mashed
approx 1/3 cup brown sugar, extra

Preheat oven to 200 deg. Line a 12 cup muffin tray with paper liners.

In a large bowl combine the flour, baking powder, bicarb, salt, raw sugar and brown sugar. Stir to combine. In a small bowl combine the buttermilk, egg and melted butter and whisk to combine.

Add the liquid ingredients to the flour mixture and stir with a fork a few times. Then add the mashed banana and continue to stir until it only just comes together. Be careful not to overmix!

Spoon the mixture in the prepared trays. I used jumbo trays and filled each cup just barely halfway. Using the extra brown sugar, sprinkle a little (or a lot!) on top of each muffin.

Bake at 200 deg for 10 mins then swap the trays if you need to and bake for a further 10 minutes at 180 deg.

Cool in the tins for a few minutes before turning out onto a rack.

Enjoy!

Tuesday, September 23, 2008

Tuesdays with Dorie: Dimply Plum Cake

I was absolutely thrilled with this week's pick. This is exactly the type of recipe I love to make and the type of cake I love to eat! I'm also a big fan of fruity desserts and cakes in general so a big thank you to Michelle of Bake-en who chose Dorie's Dimply Plum Cake!

Unfortunately it's not stone fruit season here in Australia so I had to make do with tinned plums instead. They worked surprisingly well but were a little mushier than I had hoped.

The taste test ...

Fabulous! I baked mine the day before we were going to eat it. This type of cake tends to keep well and actually taste better the next day anyway. It was moist and buttery and gently flavoured with orange and cardamom. I can see myself making this cake often, just switching around the fruits and flavourings. I will definitely be trying it with fresh fruit come Christmas time. I think nectarines would be brilliant.

We had this as part of an afternoon tea for family and it got a big thumbs up from all the tasters. The other treats were chicken sandwiches (with the crusts cut off because otherwise it's not proper afternoon tea food just lunch!), an apple and cinnamon bun and this month's daring bakers challenge which I will be posting about next weekend. Overall a wonderful spread!

Next week - I'm so excited I can hardly type! - Creme brulee!!!

Sunday, September 21, 2008

Caramel Heaven

I think I love caramel even more than chocolate. It's a big call I know but when you feel like drinking a whole jugful of caramel sauce it's pretty clear you're a caramelaholic!

Last night we had pancakes with icecream, homemade caramel sauce and crushed peanuts for dessert. Yum! The perfect Saturday night dessert really - easy, fun and delicious.

Best Ever Pancakes
From Modern Classics No 2 by Donna Hay, p 56

2 cups plain flour, sifted
3 teaspoons baking powder
1/2 cup caster sugar
1 egg
1 1/4 cups milk
3/4 cup buttermilk
75 g butter, melted

Place the flour, baking powder and sugar in a bowl. In a separate bowl place the milk, buttermilk, butter and egg and whisk until combined. Add the milk mixture to the flour mixture and whisk until smooth.

Heat a non-stick frying pan over medium heat. Pour 1/3 cup mixture for each pancake into the pan, doing as many per batch as your frypan will hold. Cook until bubbles appear on the surface then turn and cook for another minute or until golden.

Keep the pancakes warm while you cook the remaining batter. Makes 15

Caramel Sauce
From Modern Classics No 2 by Donna Hay, p 96

3/4 cup brown sugar
1 cup pure cream

Combine in a small saucepan over medium heat and stir until sugar is disolved. Increase the heat and simmer rapidly for 8 minutes or until the sauce thickens. Allow to cool until thick enough to spoon over cake or icecream.

Easy and absolutely heavenly! Probably best NOT eaten regularly :)

Friday, September 19, 2008

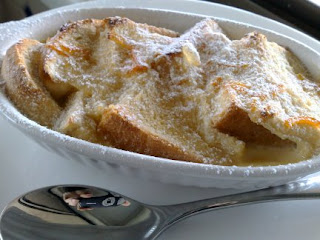
Bread and Butter Pudding for One

For me lunch is the trickiest meal of the day. As I work from home I generally have lots of time to think about and plan meals. Mostly I try to make enough dinner so there are leftovers to eat the next day. But when that doesn't happen I spend ages gazing into the fridge and pantry to find something yummy that won't take ages to make. Lately I've resorted to noodles or baked beans on toast and that just won't do!

Today I decided to make one of my favourite things in the world. While it feels incredibly decadent just to have dessert for lunch, this is actually pretty healthy (no cream!) and has carbs and protein and even fruit if you count the marmalade! Or at least that's what I keep telling myself :)
Bread and Butter Pudding for One
A food.baby original

2 slices of white bread
1 egg
1 tbs caster sugar
1/2 cup milk ( I use reduced fat)
2 ts soft butter
1 tbs orange marmalade (or any other jam you like - 100% fruit is best otherwise you might find it too sweet)

Preheat oven to 180 deg C.

Remove the crusts from the bread and spread one side of each evenly with butter (I actually left the crusts on this time because we had really yummy bread). Slice into quarters or whatever shape will work best for your baking dish. Layer into a greased ramekin or small baking dish. Make sure you leave lots of pointy edges facing up as these will get nice and crunchy.

In a small bowl beat the egg, sugar and marmalade together and set aside.

Place the milk into a small saucepan and bring to the simmer. Once the milk is hot pour over the egg mixture, beating constantly to ensure there are no lumps.

Pour the milk and egg mix over the bread and let sit for about 15 minutes to absorb. This will make the pudding lighter and not stodgy.

Place the ramekin into a larger baking dish and pour enough hot water to come half way up the sides of the ramekin. Bake for approx 20 minutes or until the top is crunchy and golden and the pudding feels set. Allow to cool for a few minutes before digging in. It will firm up as it cools. Delicious!

Wednesday, September 17, 2008

Beef and Sweet Potato Samosas

It's been ages since we had Indian food. I'm always a little wary of trying new places because I have a major sensitivity to MSG and food dyes, and so many supposedly reputable restaurants cram their food full of artificial rubbish. It drives me crazy!

Ok, rant over.

Making your own Indian food can be a little time consuming but the results can be amazing. We have a Butter Chicken recipe which is out of this world good (I will definitely be posting about it soon!) that requires marinating overnight. This time around I was looking for something quicker but still with great flavours and that would be good for lunch the next day. These Beef and Sweet Potato Samosas fit the bill perfectly!

You can definitely play around with the type and quantity of spices here. I prefer warm, aromatic spices to anything that makes your mouth explode, so this recipe is tailored that way. It also makes a LOT of samosas, so they make wonderful party food.

Beef and Sweet Potato Samosas
A food.baby original

500g beef mince
1 large orange sweet potato, diced finely
1 large onion, diced finely
4 cloves garlic, chopped
1 thumb sized piece of fresh ginger, grated
1tbs mango chutney
2 ts ground coriander
2ts ground cumin
2 ts tumeric
4 ts garam masala
1/4 ts chilli powder
500 ml chicken stock
2 tbs plain flour
7 sheets puff pastry
1 egg, beaten
salt and pepper

Heat a large frypan over medium-high heat and add a tablespoon of ghee or vegetable oil. Once hot, add the onion and fry for a few minutes or until translucent. Add the garlic, ginger and the sweet potato and fry, stirring constantly for around 5 minutes until the sweet potato starts to soften slightly. Remove the mixture from the pan.

Add a little more oil if you need to, then add the beef mince and fry until cooked through, breaking up the lumps as you go. When it is about half cooked, add all the spices and continue to cook, stirring until the beef is done.

Return the vegetable mix to the pan and stir to combine. Sprinkle over the flour and stir well for a few minutes to cook out the raw flour. Pour over the chicken stock. This will deglaze the pan, picking up all the yummy spices and flavour stuck on the bottom. It will look like far too much liquid at this stage. Reduce the heat to low, stir in the chutney, cover and simmer for about 20 minutes.

If a lot of liquid remains, increase the heat and remove the lid. Cook stirring occasionally until the mixture is thick. This is basically like a pie filling and if it is runny your pastry will go soggy.

Once you are happy with the consistency, remove from the heat and allow to cool for at least 15 minutes.

To prepare the samosas, preheat the oven to 220 deg C. Place a sheet of puff pastry on a board and cut into 4 equal squares. Place about a tablespoon of filling into the centre of each square. It is always a bit of trial and error to see how much filling will fit. Using a pastry brush, brush beaten egg over the cut edges. Fold each square into a triangle, pressing down on the edges with a fork to seal in the filling. Place on a lightly greased baking tray. Brush the tops with beaten egg.

Bake for approx 20 minutes or until the pastry is puffed and golden brown.

This amount of filling will make about 30 samosas which is more than most people need. You can freeze the samosas uncooked. Just thaw in the fridge overnight before baking as usual.

Serve with your favourite sauces. We used spicy tomato and yoghurt & garlic. Yummy!

Tuesday, September 16, 2008

2 Blog Awards! (but no TWD)

While I was away in Sydney I picked up not one but two blog awards! A big thanks to Laura from She's Cookin' Now and Lisa from Magic Sprinkles who presented me with the Brilliante Weblog Award.
I still feel like such a newbie, this being only my third month of blogging, but there's a real sense of community and support in the food blogosphere. So thank you to everyone who is reading and commenting!

Here are the rules of the award so that I can pass it on to others:

1. when you receive a diamond, make a post about it on your blog,
2. name the blogger who gave you the award,
3. award the diamonds to seven other bloggers,
4. link to them in your post and
5. let them know that you are passing this fab award onto them

Hmmmm which seven to pass it on to? I check in with literally hundreds of blogs, all of whom are wonderfully unique. Seeing I got the award twice I'm going to choose 14! In no particular order:

1. Linda from Butter Sugar Flour

2. April from Abby Sweets

3. Melissa from Made By Melissa

4. Laura at Hungry and Frozen

5. Cakelaw from Laws of the Kitchen

6. Bridget from The Way the Cookie Crumbles

7. Caitlin from Engineer Baker

8. Lisa at Spicy Icecream

9. Beth and Nathan at Our Sweet Life

10. Priscilla at Priscilla's Baking Adventures

11. Krista at Goodies First

12. Tammy from Wee Treats by Tammy

13. Rebecca from Ezra Pound Cake

14. The gang at Little Foodies

I haven't been around to tell everyone yet but I will be doing that at some point today.

Now you'll notice there are no Chocolate Chunkers here today. For a number of reasons I decided to opt out this week, including the fact I ran out of time but also the fact I couldn't face yet another chocolate biscuit. Sorry to Claudia of Fool for Food! I'm definitely not a chocoholic but I am SO excited about the next 2 picks. First up is Dorie's Dimply Plum Cake. Yum!

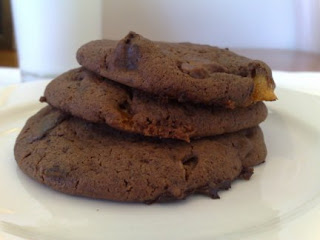
Back to chocolate for a moment, I froze most of my Whopper Drops after the last challenge and was curious how they would be. Well, they are insanely good straight out of the freezer. I thought they would be rock hard but they actually were quite soft and ready to eat immediately. They'd be perfect for an icecream sandwich because they would help the icecream stay cold and not run everywhere. Brilliant!

Next week: Dimply Plum Cake. Woohoo!

Tuesday, September 9, 2008

Tuesdays with Dorie: Chocolate Whopper Malted Drops

Through the wonders of technology this post should be appearing on Tuesday (fingers crossed). I am away in Sydney this week and made these yummy biscuits on Saturday.

Rachel of Confessions of a Tangerine Tart chose this week's recipe for Chocolate Whopped Malted Drops, which is a bit of a mouthful but were easy to make and absolutely delicious! I actually made mine without Malteasers (which I think are the same as Whoppers in the states), instead using up a block of Whittakers Dark Ghana and a few mini Crunchies.

The taste test ...

These are rich, sweet and intensely chocolatey! Despite the lack of malteasers the malt flavour did come through from the malted milk powder. Due to the sheer volume of chocolate (I think I went a little overboard) they needed a lot longer than 2 minutes to rest when they came out of the oven. As soon as I tried to move one, the melted chocolate oozed out the bottom, stuck to the lifter and the whole thing broke apart in a gooey (albeit tasty) mess. The next lot I left for about 15 minutes and they were perfect.

I froze most of the batch but left a few out to snack on before we leave as well as some for the lovely people who are coming to look after our furbabies while we are away. Enjoy!

I have no idea what's coming up next week as I couldn't find it anywhere, so I look forward to being surprised!

Tuesday, September 2, 2008

Tuesdays with Dorie: Birthday cake instead of cookies!

It was my birthday on Saturday and I turned the big 3-0. Being somewhat contrary I am actually excited about entering my 30s and can't wait to see what they bring! I also share my birthday with my husband which makes it a pretty special day :-)

As a result of overindulging all weekend though I decided to sit out TWD this time around. There's only so much sugar, butter and chocolate a girl can take. First there were the mountains of profiteroles with leftover chocolate pastry cream and sauce. Then for our birthday we made the mother of all cakes ... Dorie's Cocoa Buttermilk Birthday Cake!

I know it's a bit sad making your own birthday cake but this was totally worth it and was surprisingly little effort for a big result. I'm also pretty fussy and would never want a mass produced, artificially flavoured cake, particularly for such a special occasion.

This cake was so impressive but a lot bigger than I expected. I couldn't actually get the lid on the cake container so it ended up in the fridge naked (so to speak).

The cake was rich, chocolatey and almost fudgy while still being perfectly cooked and somehow light at the same time. I love yoghurt in cakes and the buttermilk gives the same effect. The chocolate malt buttercream came together easily and was absolutely divine. I could eat it with a spoon! And did in fact as we had a bit left over. We topped it with a swirl of malteasers which was the perfect accompaniment.

I am leaving for a week in Sydney on Sunday but am looking forward to making next week's recipe, Chocolate Whopper Malted Drops, ahead of time and eating them on the plane!
Related Posts Plugin for WordPress, Blogger...