Thursday, July 5, 2012

Fruit Scones

© food-baby.blogspot.com All rights reservedApart from being absolutely delicious, what I love about scones is that they take no time at all to prepare! There are lots of scone recipes out there, most of which contain cream and most of which I find very rich and a bit heavy. This recipe is one I have been making since I was a kid. It's virtually foolproof. I even make it in a food processor and they still turn out well!

Fruit Scones
Recipe from The Australian Women's Weekly Original Cookbook, ACP 1977, p194

3 cups self-raising flour
1/4ts salt
1/4 cup sugar
60g cold butter, in chunks
1 cup milk
1 egg
1 cup sultanas or dried fruit of your choice (I used mixed fruit)

Preheat the oven to 270/250 degrees celsius fan-forced. Lightly grease a baking tray and set aside.

Sift the flour into a large bowl and rub the butter in using your fingertips. Stop when the mixture resembles rough breadcrumbs. Stir in the sultanas and sugar then add the beaten egg and most of the milk. Use a butter knife to bring the dough together, it should be soft and not too sticky.

Tip the dough out onto a floured surface and gently bring together, patting it out to approximately 2cm thick. Use a 5cm (2 inch) cutter to cut out rounds and place on prepared tray, leaving a centimetre or so between them. Gently press together the scraps and dough and repeat. Brush the tops with milk and bake for 12 to 15 minutes or until they are golden brown and smelling delicious.

Makes approx 12 depending on the size of your cutter.

These are also great to freeze for snacks. Scones do tend to dry out a little when frozen but if you don't overbake them, a quick zap in the microwave will freshen them up. A generous smear of butter also helps!


Tuesday, July 3, 2012

TWD BWJ - Biscotti

© food-baby.blogspot.com All rights reserved

I think every baker has something they fear, whether it be caramel, pastry or decorating cakes. For me in the past it has been biscotti. Sounds crazy for something so simple but I have never been able to get it right! So in an attempt to overcome this silly fear I made this week's pick twice (which I never do).

I have a huge bag of raw almonds in the fridge so that's what I went with rather than buying hazelnuts. 

Batch one I made with almonds, vanilla and cinnamon and replaced the booze with milk. The dough mixed up well, looked great when it was baked but then pretty much fell apart when I sliced it. So I ended up with chunky crumbly-edged tooth-breakers. Really tasty dunked in tea but not much good for anything else!

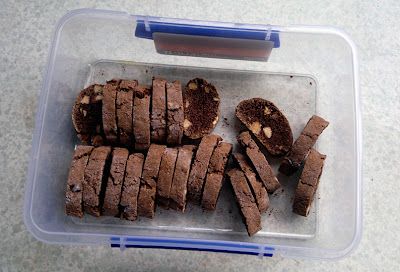
Batch two I made with almonds, cocoa and brandy. I chopped the nuts up more finely and when it came time to slice I used my best serrated knife and took it really slowly. 

© food-baby.blogspot.com All rights reserved

Success!  These were pretty much the perfect biscotti. I got the size right, they sliced cleanly and were lovely and toasty. And of course delicious! I would happy giving these as gifts come Christmas time which is a pretty big tick of approval!

Our hosts this week are Jodi of Homemade and Wholesome and Katrina of Baking and Boys. They will have the recipe for the original hazelnut biscotti on their blogs so make sure you go and check it out!

Monday, July 2, 2012

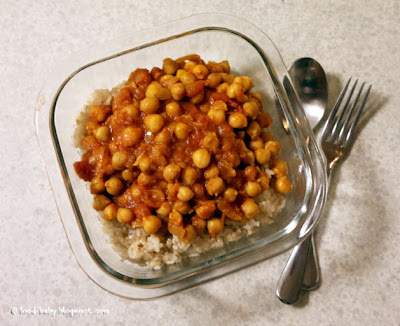
Meatless Monday - Chole Chaat (Chickpea Curry)

© food-baby.blogspot.com All rights reserved
Chole Chaat is basically a chickpea and tomato curry flavoured with ginger and garam masala. It is hearty and warming and just perfect for this ridiculous cold-snap we are having in Brisbane at the moment. 

It is hands-down one of our favourite meals and both our boys practically lick their plates clean when we have this for dinner, which is a pretty big tick of approval! I honestly don't think I was eating chickpea curry at 19 months old!

Like most curries it tastes better the next day so make it ahead of time, even a few hours, if you can.

Chole Chaat
Adapted from A Little Taste of India, Murdoch Books, 2003 p129

3 cans of chickpeas
2 tbs ghee or oil
1 onion, finely diced
1 ts ground coriander
1 ts ground cumin
1 ts ground turmeric
1 ts garam masala
2 cm piece fresh ginger, grated
2 red chillies, finely diced (or 1/2ts hot chilli powder)
1 tin diced tomatoes
1 tbs veggie stock powder

Heat the oil in a large saucepan over medium-high heat and cook the onion until golden and softened. Add the dry spices and cook 1 minute. Add the ginger, chilli and tomato and stir to combine. Add the chickpeas and 1 tomato tin of water along with the stock powder. Season with salt and pepper to taste.  Bring to the boil then reduce the heat to low and simmer for 5 - 30 minutes. Serve with brown rice and a sprinkling of fresh coriander.

Serves 4. 

This post is linked with Veggie Mama's Meatless Mondays:


Sunday, July 1, 2012

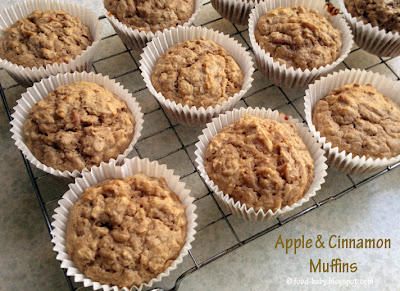
Sunday Baking - Apple and Cinnamon Muffins


© food-baby.blogspot.com All rights reserved
I've been thinking a lot about healthy lunchbox ideas recently. My husband takes his lunch to work every day (saving us literally thousands of dollars a year!) and always likes a little sweet something to have with his morning coffee. It's now also only a matter of months until Oscar starts kindy next year when having interesting and healthy treats will become even more important. 

These apple and cinnamon muffins are something I've been making for awhile and are a bit of a twist on what can be a sugar and fat-filled indulgence. They stay really moist and are perfect to freeze for lunches.

Apple & Cinnamon Muffins
Recipe by me

3/4 cup self-raising flour
3/4 cup wholemeal plain flour
1/4 cup rapadura or brown sugar
1 ts baking powder
1 ts cinnamon
1 cup rolled oats
1 cup low fat milk
1/4 cup coconut oil
1 ripe banana, mashed
1 large apple, washed and grated (skin and all)
1 egg

Preheat oven to 180 / 160 degrees celsius. Line a 12 cup muffin tray and set aside.

In a large bowl add the flours, baking powder, cinnamon, oats and sugar and whisk to combine. 

In a smaller bowl place the milk, egg, coconut oil and banana and whisk together. 

Add the grated apple to the dry ingredients then pour over the wet ingredients. Using a fork, stir until only just combined.

Spoon the mix into the prepared tray and bake for 20-25 minutes or until golden brown and a skewer comes out clean. Makes 12. Suitable to freeze.

I was pretty happy with this batch but they did stick to the paper cases a bit. Not a huge problem though and Oscar loved eating the extra 'cake' on the paper!

Tuesday, June 26, 2012

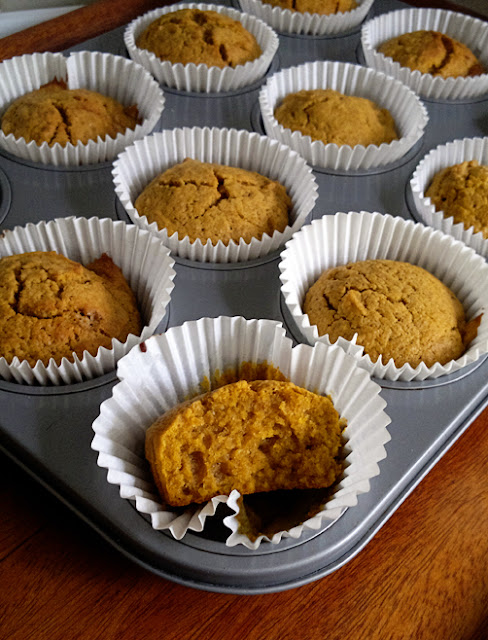
Spiced Pumpkin Muffins

© Susan Lockhart King http://food-baby.blogspot.com All rights reserved

We tend not to make sweets with pumpkin in Australia. Buying pumpkin in a can or even pumpkin pie spice blends are unheard of. But it's actually no trouble at all to make your own and I'm sure it would be cheaper.

I had pureed some pumpkin to stir through the kids' pasta for dinner and ended up with about a cup left over. What to do? A quick search on Tasty Kitchen led me to these pumpkin muffins and wow, they were amazing! The house smelt like Christmas and warm from the oven the muffins were moist and absolutely delicious.

The perfect treat to brighten up a grey and chilly winter's day.

Pumpkin Muffins
Adapted from A Cozy Kitchen via Tasty Kitchen

1 cup plain flour
1/4 cup wholemeal flour
2 ts baking powder
1 cup pumpkin puree
1/2 cup coconut oil, melted and cooled
2 eggs
2/3 cup brown sugar
1/4 ts salt
1/2 ts cinnamon
1/8 ts ginger
1/8 ts allspice
1/8 ts nutmeg

Preheat the oven to 180 / 160 degrees celsius. Line a 12 cup muffin tray with paper liners and set aside.

Whisk together the flours, baking powder and spices in a large bowl. In another bowl whisk together the pumpkin, oil, eggs and sugar until smooth. Pour this mixture over the flours and using a rubber spatula, fold together until just combined.

Divide the mixture among the muffin cups (they should be at least 2/3 full).

Bake for 20-25 minutes (mine took 22) or until golden brown and a skewer inserted into the middle of a muffin comes out clean. Cool in the pan for 5-10 minutes before turning out onto a wire rack. Serve warm or freeze to eat later.

This post is linked up to Crazy for Crust's Crazy Sweet Tuesdays.


Monday, June 25, 2012

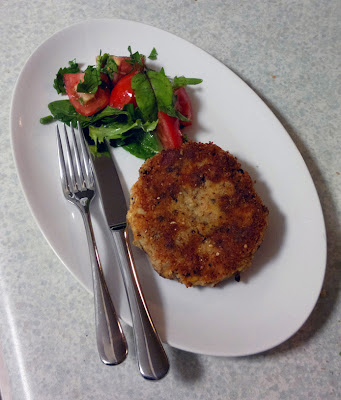
Meatless Monday - Vege Bean Patties

© Susan Lockhart King http://food-baby.blogspot.com All rights reserved

Recently I've been trawling some old magazines and cookbooks looking for cheap eats. My mother in law lent me a set of Women's Weekly Menu Planners from the late eighties and that's where I found this little gem aka Vegetable Bean Patties. Think a veggie burger, but old school.

It was exactly the type of thing I was after. Cheap, easy, no fancy ingredients and something I could make with very little notice given we already had all the ingredients in the pantry. I also did most of the work in food processor so it took next to no time to make. You could of course do the grating and chopping by hand.

And the verdict? Yum!

I made a very simple salad of baby leaves, parsley and tomato dressed with lemon juice and olive oil and it was all absolutely delicious. We will definitely be having this again!


Vegetable Bean Patties
Slightly adapted from The Australian Women's Weekly Menu Planner No 6, ACP 1988 p24

2 cups mashed potato
1 can red kidney beans, drained and rinsed
2 carrots (about 250g) grated
1 egg
1/2 red onion, finely diced
1 ts curry powder
1 1/2 cups dry breadcrumbs
olive oil for shallow frying

Place the mashed potato in a large bowl.

Using a food processor, add the onion and pulse a few times or until broken up. Add the kidney beans and pulse again until coarsely chopped and combined. Switch to the grating attachment and grate the carrots. Add it all to the potato. Add the lightly beaten egg and curry powder and mix with you hands until well combined.

Divide mixture into 8 equal portions, roll into patties and roll each patty in breadcrumbs.

Heat the oil in a large frypan over medium-high heat. Add the patties (in batches if you need to) and cook until golden brown on both sides and heated through. Remove and drain on paper towel. Serve with a salad.

Wednesday, June 20, 2012

Best Ever Custard

© food-baby.blogspot.com All rights reserved

There are probably a dozen different varieties of custard at the supermarket - full fat, low fat, skinny, extra thick, pouring, chocolate flavoured, brandy flavoured, snack size ... you name it. But do any of them even come close to homemade? Nope!

The beauty of a good custard is you can just eat it straight out the pot or serve it very simply with some passion fruit or sliced bananas and you have a little bowl of heaven.

I was inspired to make some yesterday afternoon after watching Gary make a gorgeous apple strudel with cream and custard on Masterchef. This is his recipe with only a few minor changes. It is seriously the best custard I have made. Ever. It will most definitely be served with our Christmas pudding this year, and probably quite a few times before then as well!

Custard
Recipe very slightly adapted from MasterChef

300ml pure cream
200ml low fat milk
5 egg yolks
1/4 cup caster sugar
25g corn flour
1 ts vanilla extract

Place the cream and milk in a saucepan over a medium heat and heat until just before boiling.

Whisk the egg yolks, sugar and vanilla in a large bowl until thick and pale before whisking in the corn flour. 

Pour half of the hot cream into the egg mixture whisking continuously. Pour this mix back into the saucepan with the remaining milk/cream and return to a medium low heat. Stir continuously with a wooden spoon or heatproof spatula until the mixture is thick and coats the back of the spoon. 

Strain the custard through a fine sieve to remove any stray bits of egg. Serve immediately or to serve later, place this bowl over another bowl of iced water and stir until cooled to room temperature.


Tuesday, June 19, 2012

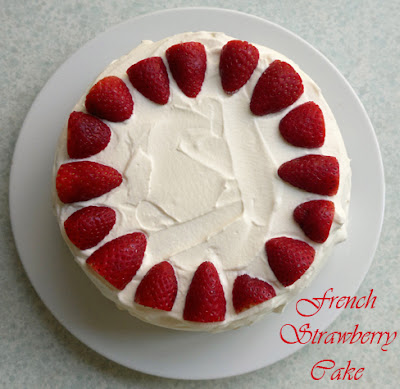
TWD BWJ - French Strawberry Cake

© Susan Lockhart King http://food-baby.blogspot.com All rights reserved

Strawberries, cream and a vanilla genoise? Yes please!

This week we have the very gorgeous French Strawberry Cake hosted by Sophia of Sophia's Sweets and Allison of Think, Love, Sleep, Dine.

I was planning on making this to take to my mother in law's place for Sunday lunch, but we ended up going down the night before instead which meant I was in a mad rush to get the cake made and cool enough to ice before leaving. Thanks to the P & Q I knew lots of others had trouble with their cakes not rising and there not being enough cream to decorate with.

While a traditional genoise requires beating the eggs over a bain marie this recipe didn't say that. To compromise I placed my eggs in a bowl of warm water while I got everything else ready.

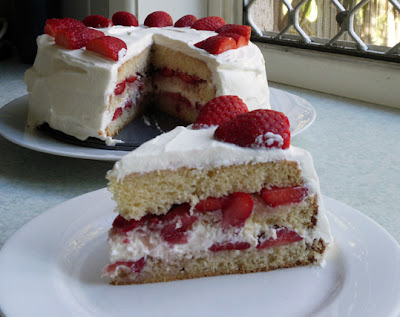
I took lots of care whipping up the eggs and followed the recipe to a T and was lucky enough to end up with a cake tall enough to slice into 3 (very wonky) layers! I also made extra cream and even had some left over.

The taste test ...

© Susan Lockhart King http://food-baby.blogspot.com All rights reserved
This was heaven on a plate. Strawberries and cream are a perfect match and when you add in a lovely light sponge cake you really can't beat it. Not much to say really other than we loved it and it didn't last long!

You will find the recipe on Sophia's and Allison's blogs.

Sunday, June 10, 2012

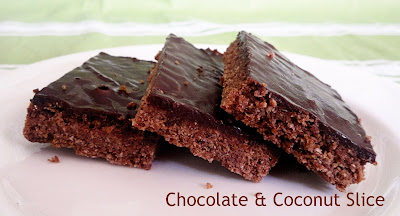
Sunday Baking - Chocolate and Coconut Slice

Chocolate and Coconut Slice © Susan Lockhart King http://food-baby.blogspot.com.au

Another childhood favourite this week! This slice brings back memories of school fairs, fancy morning teas and Grandma's house. With a crunchy chocolate base covered with smooth chocolate icing, it will disappear pretty quickly. This is such an easy and yummy treat to make. In fact, you will probably have all the ingredients in the pantry right now. So get baking!

Chocolate and Coconut Slice
Recipe slightly adapted from Taste.com.au

3 weetbix or similar
85g dessicated coconut
100g raw sugar
150g self-raising flour
150g melted butter
2 tbs cocoa
1 ts vanilla extract
1 cup icing sugar
1 tbs cocoa extra
20g soft butter
1-2 tbs hot water

Preheat the oven to 180 /160 fan-forced degrees celsius. Lightly grease a slice pan (20 x 30cm approx) and line with baking paper. 

Crush the weetbix into a large mixing bowl. Add the coconut, sugar, flour and cocoa and stir well. Pour the melted butter over the dry ingredients. Add the vanilla and mix well to combine. Tip the mixture into the pan and smooth out to make level, then press down with the back of a spoon (if you don't press it down at this stage it may be too crumbly when cooked). Bake for 15 minutes. Remove from the oven and ice while hot. 

To make the icing, sift the icing sugar and cocoa into a bowl. Add the softened butter and start to mix through. Add 1 tablespoon of hot water and stir well to combine. If it is too thick add a little extra water. Pour over the hot slice and smooth into the corners. Allow to cool completely before slicing in the pan. 

Makes 24 pieces.

Tuesday, June 5, 2012

TWD BWJ - Oasis Naan and Creamy Prawn Curry

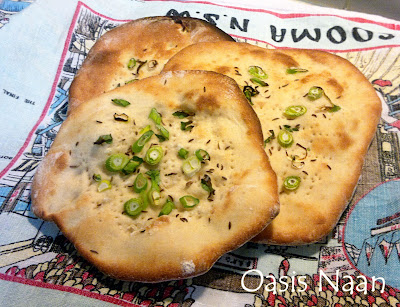
Oasis Naan © Susan Lockhart King http://food-baby.blogspot.com.au

After the calorie-laden treats of the past few weeks of BWJ I was delighted to have a simple savoury recipe this week, and even more delighted that it was naan! We love Indian food around here and cook it quite often but we have never really made our own naan. 

This was a very simple bread, just 4 ingredients. I baked them on a pizza stone so they were lovely and crispy on the bottom. They just never got the flat middle and puffed edges that I think was intended, maybe my oven doesn't get hot enough for them to puff up? The parts that did puff up sank as soon as they were taken out.

I even happened to have an unopened packet of caraway seeds in the pantry (no idea what that was bought for!) so could make them exactly as per the recipe for a change. Though I did make one with just sesame seeds on top so my boys didn't have to pick off 'the green'.

I served our naan with a creamy prawn curry which we had also never made before. Truly this was one of the most delicious things I've ever eaten! And so simple. We are already imagining this sauce on chicken and fish and making it for guests. Absolutely delicious. 

Our hosts this week were Maggie of Always Add More Butter and Phyl of Cabbages & King Cakes. They will have the recipe up for the Oasis Naan. The curry recipe is below.

Creamy Prawn Curry © Susan Lockhart King http://food-baby.blogspot.com.au

Creamy Prawn Curry
Adapted from A Little Taste of India, Murdoch Books 2003, p104-105

400g prawns (peeled, raw, frozen)
2 tbs oil
2 spring onions, finely sliced
1/2 ts ground turmeric
1/2 ts ground cinnamon
1/2 ts ground cumin
1/8 ts ground cloves
7 cardamon pods
1 ts chilli paste
3cm piece fresh ginger, grated
3 cloves garlic, crushed
1 x 400ml tin coconut milk

Heat the oil in a large heavy based fry pan. Fry the spring onions for 1 minute then add the turmeric, cinnamon, cloves, cumin, cardamon, garlic and ginger. Fry for 2 minutes. Add the chilli, coconut milk and some salt to taste and bring to the boil. 

Reduce the heat to low and add the prawns. Simmer for 5 minutes or until the prawns are cooked through and the sauce has thickened. Garnish with extra sliced spring onions and serve with rice and/or naan. Serves 4.


Monday, June 4, 2012

Meatless Monday - Vegetarian Sausage Rolls

Vegetarian Sausage Rolls © Susan Lockhart King http://food-baby.blogspot.com.au

Ahh the humble sausage roll. Full of who-knows-what and definitely not very good for you. We've had party sausage rolls at both the kids' birthday parties and they do bring back memories of childhood. Both my boys seem to like the pastry and accompanying tomato sauce the best anyway so I had my fingers crossed they wouldn't miss the meaty filling with this vegetarian version. 

The original recipe contains chopped pecans and I had planned on soaking some almonds to use instead, but we got home late so that wasn't an option. Although I think chickpeas would work here too I decided to use chopped mushrooms and was really happy with the result. 

The house smelled wonderful while these were cooking and we could hardly wait for them to cool down to tuck in. The verdict? Hubby loved them, the boys asked for seconds and then thirds ... definitely a winner and a great start to the week. Enjoy!


Vegetarian Sausage Rolls
Adapted from Green Gourmet Giraffe

250g cottage cheese
1 medium onion, finely diced
1 cup finely diced mushrooms
1 clove garlic, crushed
3 eggs
1/2 cup rolled oats
1/2 cup rolled quinoa
1/2 cup breadcrumbs
2 tbs soy sauce
1 heaped ts vege stock powder
3 sheets puff pastry
1 extra egg, beaten for glaze
Sesame seeds for sprinkling

Preheat the oven to 220 / 200 degrees celsius. Thaw out the pastry and set aside.

Combine all filling ingredients in a large bowl and mix well to combine.

Place one sheet of pastry on a flat surface and slice in half to form 2 rectangles. Spoon the filling mix down the middle third of each rectangle, lengthways. Brush one edge of each rectangle with beaten egg. Fold the long edge nearest to you over the top of the filling then overlap with the glazed edge. Place on a baking tray lined with baking paper, seam side down. Repeat with the remaining 2 sheets of pastry. 

Brush the top of each non-sausage roll with beaten egg and sprinkle with sesame seeds. Use a sharp knife to mark the top of the pastry where you would like to cut them after they are cooked, in halves, thirds or quarters.

Bake the rolls for 20-25 minutes or until golden brown and cooked through. Allow to cool for 5 minutes before serving with salad and tomato sauce.

Makes 12 large or 24 small sausage rolls.


Related Posts Plugin for WordPress, Blogger...