Why the Hulk? Because it's green of course!
I know I am a little late jumping on the green smoothie bandwagon but it wasn't from lack of interest, rather from lack of equipment. While I am the queen of kitchen gadgets one thing I don't have is a blender (well actually I do have one that fits on top of my 35 year old Kenwood Chef mixer but it's pretty much useless so it doesn't count).
I saw this gorgeous green smoothie on The Healthy Chef blog and was immediately inspired to try it. I loved the tip she had about replacing the fresh spinach leaves and ice with cubes of frozen spinach. Genius!
I first attempted to make it in my food processor. It blitzed all the ingredients quite well but I was still left with lots of large spinach flecks. I then tipped the mix into a jug and tried to blend it with my stab mixer. It frothed up a bit more but still left lots of green specks.
Despite the fact it looked more like a herb bechamel than a smoothie I drank it anyway. It was AWESOME.
My 3 year old who watched me make it also had a taste and then begged to lick the spoon, the glass and anything else this smoothie may have touched. It was that good.
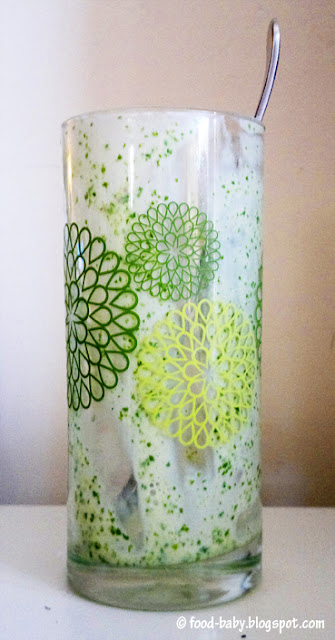
I took a pic of my now empty glass covered in spinach flecks just to have some sort of photo to accompany this recipe. Hopefully it doesn't put you off your breakfast.
Blender or no blender I will be making this again (and again, and again ...). Such a fantastic way to get in some extra greens and even better that it tastes so good. And no you can't taste the spinach at all!
Hulk Smoothie
Adapted from The Healthy Chef
As with most smoothie recipes this is very adaptable. You can use plain or flavoured yoghurt, any type of milk you like and any kind of sweetener. What you see here is what I used and really enjoyed but the possibilities are endless ...
1/2 cup almond milk
100g good vanilla yoghurt (I used Jalna)
1 ts rice malt syrup
1 ts white chia seeds
1 banana
3 cubes frozen spinnach
generous pinch of cinnamon
Combine all ingredients in a blender. Blend until smooth and serve immediately.
Serves 1.
Wednesday, September 19, 2012
Tuesday, September 18, 2012
Baking with Julia - Whole Wheat Bread
Umm not sure if anyone noticed but I completely forgot (and I mean completely) about the last Baking with Julia recipe. It was for an Upside-Down Nectarine Chiffon Cake and it sounded delectable. But I forgot. So it's now on my to-bake list and I will get to it eventually.
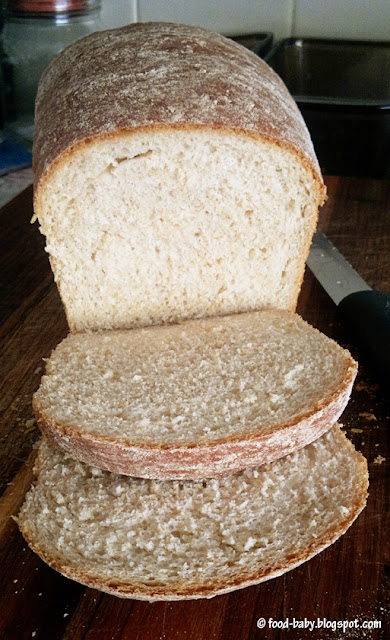
This week was another bread recipe which I was really happy about. Bread in general makes me happy! As with the White Loaves recipe from way back in February this was an easy to put together loaf which baked up perfectly.
I knew I wouldn't be using molasses or malt extract (I'm trying to avoid buying ingredients that won't get used regularly) but didn't worry because I always have treacle in the pantry. Except this time I didn't. Oops. So I subbed golden syrup for both the honey and the malt extract and got a gorgeously golden and slightly sweet loaf that we all loved.
As usual I snagged the crust while it was still warm and enjoyed it with a smearing of butter. You really can't beat homemade bread fresh from the oven!
I cut and froze most of the 2 loaves, using most of it for toast and it was fabulous.
This recipe is definitely a keeper!
Our hosts this week are Michele of Veggie Num Nums and Teresa of The Family That Bakes Together. They will post the recipe for this lovely loaf so make sure you check it out!
Monday, September 10, 2012
Oaty Pancakes with Strawberries
I am the early riser in the family. Morning is my favourite time of the day and my alarm goes off at 5.30am every day. When the mood strikes I get up and exercise, or I'll just have a cup of tea and enjoy some peace and quiet, mentally preparing myself for another busy day with my 2 little people.
After yet another long week of illness in the food.baby household a yummy Sunday breakfast was definitely in order so that's what I spent my early morning doing.
Usually after having a breakfast of pancakes made with white flour and loads of sugar I will crash a few hours later, starving and with a headache. Recently though I've been making simple changes to our diet, swapping white rice for brown, always buying wholemeal or multigrain bread, reduced fat cheese and the like. So my challenge was to make some pancakes that the kids would actually eat while still being pretty healthy.
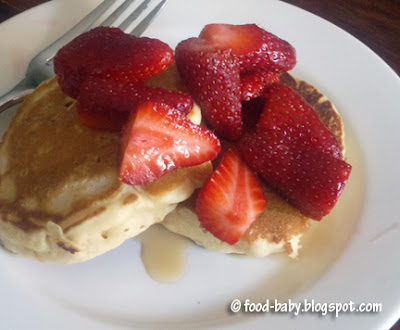
Oats are my breakfast of choice most days so that's what I used here and I was really happy with how these turned out. The batch of 12 disappeared in record time and with the strawberries on top it was the perfect start to our Sunday!
Oaty Pancakes with Strawberries
Makes 12 pancakes, serves 4.
1 1/2 cups self-raising flour
1/2 cup rolled oats
1 tbs sugar
1 ts vanilla extract
2 eggs
1 cup almond milk (or whatever milk you like)
1 punnet of strawberries
1 tbs orange juice
1 tbs maple syrup
Wash, de-stem and halve the strawberries and place them in a bowl. Pour over the orange juice and maple syrup and toss well to combine. Leave to macerate while you make the pancakes.
In a large mixing bowl stir together the flour, oats and sugar. Add the eggs, milk and vanilla and mix until well combined.
Lightly grease a large fry pan with butter and cook pancakes over medium heat 4 at a time (or whatever will fit in your pan). You should get 12 pancakes from this mix. Cook on the first side until you see lots of bubbles start to form then slip over and cook until golden brown. Continue with the remaining batches.
Serve warm with a big spoonful of strawberries and syrup. Yum!
Thursday, September 6, 2012
Peanut Butter Ice Cream
I blogged a few days ago about the amazing Aztec "Hot" Chocolate Ice Cream I made for our Father's Day dinner. Well I also made a more kid-friendly ice cream. Both my boys love peanut butter so when I saw this recipe it was perfect. It's also such an easy recipe with no cooking involved at all that older kids would be able to make it themselves!
If you love peanut butter you will LOVE this ice cream. I served it with hundreds and thousands but I think having it in a sundae with hot chocolate fudge sauce and a scattering of roasted salted peanuts would be divine. Yum!
Peanut Butter Ice Cream
From The Perfect Scoop by David Lebovitz p50
180g smooth peanut butter
180g sugar
330ml full cream milk
330ml pure cream
Pinch of salt
1/2 ts vanilla extract
Puree all ingredients in a food processor until smooth. Chill thoroughly in the fridge then churn in your ice cream machine according to the manufacturer's instructions.
Makes approx 1 litre.
Monday, September 3, 2012
Best Ever Brownies with Aztec "Hot" Chocolate Ice Cream
It was Father's Day here in Australia yesterday, so belated good wishes for all the amazing dads out there!
We didn't really have the best weekend, with 3 out of 4 of us coming down with a bad cold and cough, and poor Charlie had conjunctivitis as well. Needless to say there were no fun father's day activities to be had, unless you count hubby and Oscar going to the library and to Coles to pick up a few essentials. Oh well, there's always next year!
In spite of feeling like crap I still cooked up a storm, doing toasted ham and cheese croissants for breakfast, this creamy prawn curry with naan for dinner and of course a yummy dessert.
You really can't go wrong with chocolate for my husband. He is the ultimate chocoholic! So what better for a decadent Father's Day dessert than these amazing fudgy brownies topped with a spicy chocolate ice cream?
I spotted this ice cream recipe in The Perfect Scoop on my first read flick through. It is a Philadelphia style (no eggs) chocolate ice cream with cinnamon, chili and brandy to give it some kick. I also added the zest of an orange to ramp up the flavour.
The taste test ...
Sensational! Incredibly smooth and luscious but with a bit of a fiery kick at the same time. Hubby said it tasted like Christmas. Adding alcohol to ice cream stops it from setting too hard and I definitely think that's what made the texture so luscious. Served on top of a fudgy chocolate brownie this was a chocoholic's dream. Success.
If there are any chocoholics in your family then you should definitely make these!
Aztec "Hot" Chocolate Ice Cream
Adapted from The Perfect Scoop by David Lebovitz p 29
560ml pure cream
50g cocoa powder
150g sugar
85g dark chocolate, chopped
310ml full cream milk
1 ts vanilla extract
Pinch of salt
1 1/4 ts cinnamon
1/2 ts hot chilli powder
Finely grated zest of 1 orange
2 tbs brandy
In a large saucepan over medium heat, whisk together the cream, sugar, orange zest and cocoa until it comes to a full rolling boil. Remove from the heat and add the chocolate, whisking until it is completely incorporated. Stir in the milk, vanilla, cinnamon, salt, chilli and brandy. Pour the mix into a blender or food processor and blitz for 30 seconds or until completely smooth.
Chill the mixture thoroughly in the fridge and then churn in your ice cream maker according to the manufacturer's instructions.
Makes approx 1 litre.
Rick Katz's Brownies for Julia
Adapted from Dorie Greenspan's Baking from My Home to Yours, p 91
1 cup plain flour
1 tsp salt
250g butter
120g dark chocolate, coarsely chopped
60g milk chocolate, coarsely chopped
1 cup brown sugar
1 cup white sugar
1/2 cup toasted walnuts, roughly chopped
1 tsp pure vanilla extract
4 large eggs
Preheat the oven to 180 degrees celsius (160 degrees fan-forced). Line the base of a 9 inch square baking pan with baking paper and place on a baking sheet.
Whisk together the flour and salt and set aside.
Place a heat proof bowl over a saucepan of gently simmering water, put the butter and chocolate in. Stir frequently until the ingredients are just melted-you don’t want them to get so hot that the butter separates. Add the brown sugar and whisk gently just to incorporate it, then remove the bowl from the pan of water. Stir in the vanilla and transfer to a large bowl.
Put the remaining cup of sugar into the bowl of a stand mixer or a medium bowl and whisk in the eggs. Switch to a rubber spatula and little by little add half of the sugar-egg mixture to the warm chocolate, stirring very gently without stopping-you don’t want the heat of the chocolate to cook the eggs.
With the whisk attachment or with a hand mixer beat the remaining sugar and eggs on medium-high for about 3 minutes, or until they double in volume. Using a spatula and a light touch, fold the whipped eggs into the chocolate, stopping just short of blending them in completely.
Sprinkle the dry ingredients and the nuts over the batter and delicately fold them in, working only until they disappear. Scrape the batter into the pan and smooth the top with the spatula.
Bake for 25-28 minutes, or until the top looks dry. Use a thin knife to check for doneness - the brownies should be only just set and quite gooey. (Mine took about 40 minutes to reach this point so just keep an eye on them and keep checking regularly).
Transfer the pan to a rack and cool to room temperature. Cut into pieces while still in the pan. Makes approx 16.
Sunday, August 26, 2012
No-Bake Lemon Slice
I love a good slice and it's such a shame that they're a bit hard to find. Everyone seems to have jumped on the cupcake, whoopie pie and macaron bandwagon. Not that there's anything wrong with those but they don't have that nostalgia of childhood and simpler times like a slice does. The thought just occurred to me though that maybe my kids will yearn for cupcakes, whoopies and macarons when they're older!
This is now my second no-bake recipe for the month which I think just shows what a busy month it has been. Between the flu, chest infections and my bad back there hasn't been a whole lot of spare time for baking.
So when I needed something to take for a morning tea the next day I immediately thought of this easy lemon slice which I saw on Around Here. Basic pantry ingredients and no need for the oven. Perfect!
Lemon Slice
(Very) Slightly Adapted from Around Here
1/2 cup (162g) condensed skim milk
100g butter
200g Granita biscuits
1 cup dessicated coconut
Grated rind of 1 lemon
2 cups icing sugar
40g melted butter
2 tbs lemon juice
Lightly grease a slice tray (approx 15 x 25cm), line with non-stick paper and set aside.
Place the condensed milk and butter in a saucepan over medium-low heat until the butter is melted.
Crush the biscuits to fine crumbs and add to a large bowl along with the coconut and lemon rind. Pour in the condensed milk and butter and mix until well combined. Press firmly into the prepared tray and refrigerate until firm.
Once the slice is firm, sift the icing sugar into a bowl and add the butter and lemon juice. Mix until smooth and spread onto the chilled slice. Refrigerate again until set. Slice into squares and serve.
This was a real hit with kids and adults alike at our morning tea. Sweet and lemony and very easy to eat!
This post is linked to Crazy Sweet Tuesdays:

Wednesday, August 22, 2012
Chocolate and Zucchini Muffins
I don't really need much of an excuse to bake. And when recipes like this come along you don't need one! Not only will you probably have all the ingredients already, they're healthy! Well healthier anyway.
The recipe seems pretty flexible so you could use whatever type of milk or oil suits you. Some chocolate chips or grated orange zest would be lovely additions!
So how did they taste? These muffins were moist, really chocolatey and slightly fudgy tasting. There was absolutely no detectable zucchini flavour and both the boys loved them and kept asking for 'more cake please.' This is definitely a keeper!
These would be a perfect treat for the lunchbox, just not everyday because they are still pretty sweet.
Chocolate and Zucchini Muffins
Recipe slightly adapted from Vegie Smugglers
1 1/4 cups self-raising flour
3/4 cup traditional rolled oats
1/4 cup raw cacao powder
1/2 cup coconut sugar
1/2 tsp cinnamon
1 egg
3/4 cup non-dairy milk
3/4 cup coconut or macadamia oil
1 tsp vanilla essence
1 small zucchini, finely grated
Preheat the oven to 180 degrees Celsius (160 degrees fan-forced). Grease a 12 cup muffin tray or line with paper liners.
In a large bowl mix together the flour, oats, cocoa, cinnamon and sugar. In a separate bowl mix together the milk, egg, oil, vanilla and grated zucchini.
Pour the liquid ingredients into the dry ones and mix gently until well combined. Divide the mixture evenly between your muffin holes and bake for 25 minutes or so, until they spring back when touched and a skewer comes out clean. Make sure you check a few minutes earlier, mine were one at 22 minutes. Leave to cool in the tin for 5 minutes before turning out onto a wire rack.
Makes 12.
If you haven't been there before make sure you check out Vegie Smugglers for more great kid-friendly meal ideas!
Tuesday, August 21, 2012
Baking with Julia - Popovers
We've had one of those weeks around here. Those weeks where things are a bit crappy and the house is a mess and nothing gets done. I managed to hurt my back last weekend (standing still I might add) and literally couldn't leave the house for the ENTIRE WEEK. Things are finally starting to improve and get back to normal which means I can get back to normal baking and blogging.
Anyway, on this week's Baking with Julia recipe!
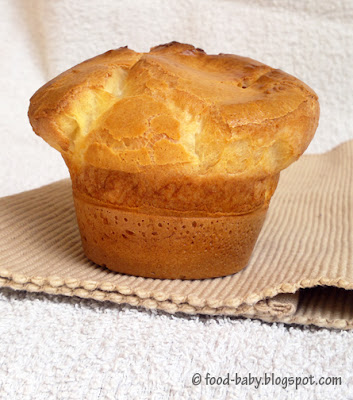
My first thought when I read this week's pick was 'what on earth is a popover?' Some research showed it seems to be a cross between a profiterole and a Yorkshire pudding. Very interesting!
I made these yesterday afternoon and was very happy that worked and puffed up like they were supposed to. Even after reading all the suggestions though I still wasn't really sure how to serve them. Or even what meal they are supposed to be. I ate one warm from the oven and enjoyed it, if only for the novelty of never having eaten one before.
Hubby came home, had one look and promptly declared they needed custard. Guess he thought they were like profiteroles too. So being the awesome man he is, he made his own chocolate custard and had one for dessert!
Sometime soon I'll have to work on a perfect chocolate custard recipe. Will keep you posted!
Our hosts this week are Paula from Vintage Kitchen Notes and Amy of Bake with Amy. They will have the recipe up today so make sure you check it out!
Thursday, August 9, 2012
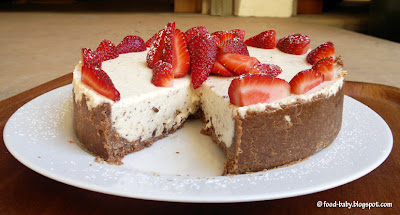
No-Bake Chocolate Chip Cheesecake
I've made a lot of cheesecakes over the years like these here, here and here. But I can't even remember the last time I made a no-bake one! So in honour of my dad coming to dinner I decided to make this no-bake Chocolate Chip Cheesecake.
The taste test ...
Wow, seriously good! The filling is smooth and light and the natural yoghurt gives it a lovely tangy creaminess. I actually chopped the chocolate rather than grated it so I had a few bigger chunks of chocolate that sank to the bottom. Not that there's anything wrong with that! Served with fresh strawberries this was the perfect make-ahead dessert and a great alternative when you don't have time for a baked cheesecake. Two thumbs up!!!
No-Bake Chocolate Chip Cheesecake
Recipe by me
250g chocolate chip biscuits
100g melted butter
250g cream cheese, at room temperature
1 x 400g tin condensed milk
300ml natural yoghurt
1 ts vanilla extract
100g dark chocolate, grated
3 ts gelatine
1/4 cup hot water
Line the base of an 8 inch springform pan with baking paper and set aside. Using a food processor, crush the biscuits into a fine crumb. Add the melted butter and blitz until well combined. Pour the crumbs into the prepare tin and smooth over the base and about halfway up the sides. Place in the fridge to set.
Sprinkle the gelatine over the hot water and set aside for a few minutes then stir to make sure it is completely disolved.
Wipe out the food processor bowl then add the cream cheese and whiz until smooth. Add the condensed milk, yoghurt and vanilla and mix well. Add the cooled gelatine mixture and whiz for 1 minute until thoroughly combined. Tip in the grated chocolate and blitz to mix through.
Pour over the prepared base then refrigerate until set, a few hours at least or overnight. Serve with sliced strawberries and a dusting of icing sugar. Serves 8-10.
Tuesday, August 7, 2012
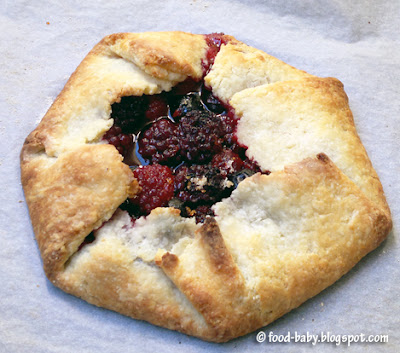
Baking with Julia - Berry Galette
After making a delicious (but boring) apple pie last time, there was no way I was passing on berries again this week! I did have to resort to frozen berries but honestly they worked just fine.
This is one of those cases where the end result is far greater than the sum of it's parts. The galette is a simple, buttery pastry folded around mixed berries. That's it.
I made only slight changes to the recipe, based on what I had in the pantry. That meant using semolina instead of cornmeal in the pastry. After reading the P & Q this week I decided not to add any water at
all to my pastry. I used 3 heaped tablespoons of natural yoghurt
(instead of sour cream) and the dough came together perfectly. I also added the zest of 1/2 an orange in with the berries and sugar which gave a lovely citrus perfume when it came out of the oven.
The resulting galette was insanely good and seemed far more special than just pastry wrapped around frozen berries!
I was surprised by how small the galette was, and I think next time I would use the full batch of pastry with double the fruit.
Our hosts this week are Lisa of Tomato Thymes in the Kitchen and Andrea of The Kitchen Lioness. They will post the recipe under today's date so make sure you check it out. Like Dorie says, this recipe is a keeper!
Saturday, August 4, 2012
Peanut Butter Cookies
In the midst of a flu-ridden and miserable week the urge for peanut butter cookies struck. These went from bowl to belly in 20 minutes flat...
Peanut Butter Cookies
Makes 24
1 cup natural peanut butter
1 cup brown sugar
1/2 cup rolled oats
1/2 cup wholemeal flour
1/2 ts salt
1 ts vanilla extract
1 egg
Preheat oven to 180 degrees celsius (160 degrees fan-forced). Line 2 trays with baking paper and set aside.
Combine dry ingredients in a large bowl then add the egg, vanilla and peanut butter. Mix well. Roll tablespoons of mixture into balls and place on the prepared trays. Flatten each ball slightly then bake for 10-12 minutes, rotating the trays halfway through.
Remove trays from the oven and allow to cool for at least 5 minutes before turning the cookies out onto a wire rack to cool completely. Devour.
Subscribe to:
Posts (Atom)

