Thursday, February 11, 2016

My Frozen Peanut Butter Cream Pie (Dairy Free)


I absolutely love peanut butter. I know lots of people do but unlike most people it's not something I grew up eating. In fact I don't ever remember having it as a kid. I do remember craving it when I was pregnant though and ate stacks of spelt toast with peanut butter and a sprinkle of sea salt all 3 times!

We only buy the good stuff these days, that is freshly ground 100% peanut butter with no oils or salt or anything else added. It's brilliant on crunchy green apple or even just straight from the tub on a spoon.

I was in the mood for something sweet and cool and peanut-buttery and came up with this gorgeous pie for dessert one weekend way back when I should have been packing for our move. I made it again last month and it was equally delicious. A crunchy chocolate base topped with smooth and creamy filling that was almost like ice cream. Yum!

I splurged on medjool dates for this which you can find in the fresh food section of Coles and Woolies near the herbs. You could definitely use regular dried dates instead they may just take a little extra blitzing for the filling to become really smooth.

This sets hard in the freezer so be sure to take it out at least 20 minutes before serving.

Enjoy!

My Frozen Peanut Butter Cream Pie (Dairy Free)

Base:
200g raw almonds
75g medjool dates
20g coconut oil
20g raw cacao
pinch salt

Place all ingredients into the food processor and blitz until the mixture forms sticky crumbs (TMX 30 secs / SP 5). Press the mixture into the base of an 8 inch spring form pan lined with baking paper and place into the freezer while your prepare the filling.

Filling:
200g natural peanut butter
60g medjool dates
270ml coconut cream
30ml milk of choice
20g maple syrup or raw honey

Wipe out the processor (no need to wash it) and add all ingredients. Process until smooth, around 30 seconds to 1 minute depending on your machine (TMX 30 secs / SP 7). Pour over the prepared base and place back into the freezer to set for 4-6 hours or overnight.

Remove from the freezer at least 20 minutes before serving.

Serves 8

Monday, February 8, 2016

Menu Plan Monday (8th February)


How did your meal planning go last week? Did you need to make any changes to your plan? We did!

I hadn't bargained on just how hot it was going to be and with temps in the high 30s for a few days, I had no desire to turn on the oven, or even eat dinner at all those nights to be honest.

Our baked chicken drumsticks became slow cooked teriyaki chicken in lettuce cups, and our chicken and corn risotto became chicken and salad rolls. Much more appropriate!

So even when you've made your menu plan don't be afraid to switch things up a bit if they're not working. Oh and make sure you check the weather forecast too!

What's for dinner this week ...

Monday - Sausages with pumpkin quinoa salad

Tuesday - Zucchini fritters

Wednesday - Veggie-loaded Dairy Free Lasagna

Thursday - Slow cooked Beef Madras with cauliflower rice

Friday - Pumpkin soup with focaccia

Saturday - DIY

Sunday - Roast chicken with roast veggies

Wednesday, February 3, 2016

My Bircher Muesli


Our kids have swimming at 8am every Sunday morning. Yep, we must be crazy! Actually it's not so bad. The classes are a little quieter at that time and let's be honest with young kids it's not like we ever get a sleep in!

Breakfast is important every day but on Sundays it's especially important as it has to be quick, easy and nourishing to give the boys lots of energy for their swim.

One of our favourites is bircher muesli aka overnight oats. Everyone has their own version of bircher muesli and this is mine. Unlike most others it does not include yoghurt or fruit juice, instead it has rice milk with cinnamon, red apple and raw honey for sweetness.

Adding seeds is a great way to increase the nutritional value - the sunflower seeds are a great source of vitamin E, magnesium and selenium, pumpkin seeds are especially high in zinc and chia seeds provide fibre, protein and omega 3s.  Oh and they taste great too!

This is a great alternative to cereal or porridge and the possible variations are endless.

My Bircher Muesli

2 cups rolled oats
4 cups rice milk
1 ts cinnamon
1/4 cup sunflower seeds
1/4 cup pumpkin seeds
1/4 cup chia seeds
1 red apple, grated (per person)
raw honey to serve

Place the oats, milk cinnamon and seeds into a large bowl and stir to combine. Cover and place in the fridge overnight.

In the morning, serve up into bowls and top with grated apple and a drizzle of honey.

Enjoy!

Serves 4-6

Monday, February 1, 2016

Menu Plan Monday and my top tips for meal planning


I'm a huge fan of menu planning and it is one of the key reasons we have been able to stick to our food budget as a family of 5 on a single income. We actually plan and shop fortnightly but we have our weekly menu printed and stuck on the fridge.

Not too many years ago we were regular supermarket shoppers who didn't plan meals and didn't budget for food at all. We ended up at the shops at least three times a week and nearly always got to 5 o'clock without a plan for dinner. Since then we have had 3 children, cleaned up our diet and bought a house, so our shopping habits had to change as well.

It has taken a few years but we now buy our pantry staples like flour, oats, nuts, seeds, oils and dried fruit in bulk through a co-op every quarter, we buy most of our meat in bulk direct from the farm and store it in a chest freezer in the garage, we get our fruit and veg from the markets and just get our basics like dairy, pasta, rice etc from the supermarket.

While we would love to buy only organic it is simply not possible financially but we make the best choices we can. Our meals are all quite simple, made from scratch and family friendly. Now that the kids are back at school I also plan for school lunches and after school snacks and try to spend a few hours on a Sunday baking and prepping for the week to save time. There will nearly always be a broth simmering in the slow cooker, some bread baking in the oven and some treats like biscuits or muffins ready to stash in the freezer.

Our dinners for this week are below but in reality I also plan breakfasts, lunches and snacks as well. I find it is a great way to stay organised but also ensures that you are not eating the same things over and over again.

You can download my FREE blank meal planning template here that you can fill in yourself. If you are new to meal planning it can feel very daunting but having a planner ready to go will help. Before you start planning you can also use the template as a food diary to record what you're eating for a week and then use that information to help you plan. 

My Top Tips for Successful Meal Planning

1. Take your time - set aside an hour to write your meal plan for the first time. Gather up your favourite cookbooks and magazines, set yourself up with a notepad or laptop and make yourself a cup of tea.

2. Personalise - first go through your calendar and mark down any functions you have on that week. It could be working late, after school sport, playdates or anything else that will impact on the time you have available to cook. You probably don't want to plan a roast for those nights if you won't be home until dinner time!

3. Cook once, eat twice - this is a big one! I have learned that buying and cooking in bulk makes a huge difference to how smoothly the week runs. For example, if you want to have spaghetti bolognaise one night always do a double batch and freeze half of the prepared sauce straight after dinner to use another night for spaghetti, lasagna or turn it into savoury mince by adding some extra chopped veg and a teaspoon of curry powder (this is brilliant served on toast for a quick dinner).

4. Sunday afternoon prep - think about what can be prepared ahead of time. I always use Sunday afternoons as prep time for the week. I will get a batch of broth or a stew on to bubble away in the slowcooker, roast a chicken and shred the meat ready for 2 meals like risotto or enchiladas and bake some snacks for school lunches and afternoon teas. You can also chop veggies, marinate meat and make meals specifically for work lunches.

5. Stick with what works - if there are some meals your family is guaranteed to eat make sure you include some of them! Maybe try just 1 new recipe per week and if it's successsful add it into your regular rotation. We often don't plan anything at all for a Friday night and it is marked as DIY on the planner. Everyone chooses their own dinner and it could be leftovers, eggs or something from the freezer.

And one extra tip - don't throw away your completed menu plans! Gather all your completed meal plans in one place to refer to next time you sit down to work out your week's meals. They are great reminders when you are stuck for ideas and if you are really strapped for time you can just repeat the whole week!

Our dinners this week are ... 

Monday - Baked chicken drumsticks with mashed potato and greens

Tuesday - Vegie-loaded Spaghetti Bolognaise

Wednesday - Curried sausages with cauliflower rice

Thursday - Chicken and corn risotto

Friday - Homemade fish and chips with salad

Saturday - BBQ with friends

Sunday - Homemade pizza

Do you meal plan? What's for dinner at your place this week?

Linked up to Menu Plan Monday at orgjunkie.com

http://www.orgjunkie.com


Tuesday, January 26, 2016

Australia Day Slow Cooked Lamb


It just wouldn't be Australia Day without another awesome lamb ad. While it is certainly clever advertising and I imagine lamb sales are through the roof this time of year - the ads are always funny, irreverent and very Aussie. The latest one is online at We Love Our Lamb.

Keeping with tradition we are also having lamb this Australia Day. But rather than a roast or a bbq I decided to use the slow cooker, which makes even more sense given just how hot it has been lately.  Who wants to stand near a hot oven in Summer? Not me!

Having now cooked a lamb roast in the slow cooker I don't think I will do it any other way! Marinating overnight and then slow cooking for 9 hours produced the most juicy, tender and flavourful meat that was falling off the bone. You could literally eat it with a spoon (which my 2 year old did).

I used a 2.5kg leg of lamb which is plenty to feed a crowd but we will stretch it for 3 dinners for the 5 of us with leftovers each time for my husband's lunch. We served it with a Greek style salad today (no feta as most of us are dairy free), will have it in a wrap with coleslaw next time and then with a herbed quinoa salad after that. Yum! Cook once, eat three times. Love it.

Happy Australia Day!

Slow Cooked Greek Lamb
Adapted from Skinnymixers

1 x 2.5kg leg of lamb, bone in
1/4 cup water
1 large onion
5 cloves garlic
1 red chilli
2 tbs sweet paprika
2 heaped ts dried oregano
1 heaped ts dried rosemary
1 heaped ts dried basil
1 heaped ts dried mint
zest of 1 lemon
3 ts pink salt
1/2 cup chicken broth

Place the leg of lamb into the bowl of your slow cooker.

Place all remaining ingredients except the broth into the food processor and blitz for 30 seconds or until smooth (TMX 30 secs / SP 8).

Pour the mixture over the lamb and coat well.

Cover and place in the fridge overnight.

The next day, place the bowl into the slow cooker and add the chicken broth.

Cook on low for 9 hours or until the meat is falling off the bone. Check the gravy for seasoning and add salt and pepper to taste. Pull the meat off the bones into the gravy and slice roughly.

Serve with a fresh salad of tomatoes, cucumber and olives dressed with extra virgin olive oil.

Great for a crowd on Australia Day.

Monday, January 25, 2016

Crispy Southwest Chicken Bites (SRC)

Crispy Southwest Chicken Bites with Dairy Free Ranch Dressing from www.mywholefoodfamily.com

Happy new year everyone! What a long 2 months it's been since our last post for Secret Recipe Club. We had a wonderful Christmas, the kids are all set for school starting this week and it's Australia Day tomorrow. I love this time of year :)

Before I talk about the amazing recipe I chose this month, I need to let you know of some changes I've made around here. As you may have noticed my blog has a new look and a new name! I am now My Wholefood Family, which I think is much more reflective of the way we shop, cook and eat these days. I've also finally ventured onto Facebook a few days ago and I would love you to join me (it's a little quiet there at the moment!).

All done? Now back to the food. This month I was assigned the blog Burnt Apple. Traci is a married mum of 3 who cooks "healthy meals on a tight budget and on a tight schedule." Um yep sounds like I'm in the right place!

I got some great ideas from the roundup of AIP (auto immune protocol) dessert ideas, was intrigued by this non-dairy ice cream made using flax milk (I didn't know that was thing), drooled over these coconut sugar brownies, knew that with 3 boys a recipe for Fart Cookies would be a hit, on a hot summer day who wouldn't want some refreshing Watermelon Lemonade and for the perfect Christmas (or anytime) time snack how about Cinnamon Sugar Almonds?

In the end I settled on Traci's Crispy Southwest Chicken Bites. They were full of flavours I love and let me tell you, these did not disappoint. We loved them. No really, LOVED them! These are one the easiest and best tasting things I've made in ages. We can't buy ranch dressing here in Australia so after a bit of research I decided to make my own version which I adapted from here and here.

Crispy Southwest Chicken Bites filling www.mywholefoodfamily.com

Look at those colours! You just know that is going to taste amazing. I wasn't in my usual supermarket when I shopped for these and I couldn't find wonton wrappers anywhere. I settled for spring roll wrappers and while they were obviously a lot bigger they worked brilliantly.

I was amazed how good they tasted. With a simple brushing of egg white and baked in the oven they were super crispy and almost fried tasting. And dipped into that cool creamy dressing these were magic.


Crispy Southwest Chicken Bites
Recipe from Burnt Apple

2 cooked chicken breasts, shredded (mine was poached with garlic)
2 tbs olive oil
1/2 onion, finely diced
1/2 red capsicum, finely diced
2 cloves garlic, crushed
1/4 cup coriander, chopped
1/4 cup salsa verde
spring roll wrappers
2 egg whites
ranch dressing, to serve

Preheat the oven to 180 degrees Celsius / 350 degrees Fahrenheit. Lightly grease a large baking tray and set aside.

Add the oil to a frypan and sautee the onion and capsicum until tender (about 5 minutes). Add the garlic and cook for another minute or so. Remove from the heat and allow to cool slightly.

In a large bowl place the shredded chicken, coriander, salsa verde and cooled onion mixture and mix well.

Lay a spring roll wrapper on a board with the point facing you. Place a heaped spoon full of filling just below the middle and spread out slightly. Brush the edges with egg white. Fold over the bottom point, then fold in the sides then roll up into a spring roll shape.

Image source
Place onto the baking tray and repeat with remaining ingredients. Brush the rolls with egg white and bake for 15-20 minutes, flipping and brushing the other side with egg white halfway through cooking.

Remove from the oven and allow to cool for a few minutes before serving with ranch dressing.

Makes approximately 20

Thanks for a great month Traci! We loved this recipe and it's become a family favourite.

Thursday, January 21, 2016

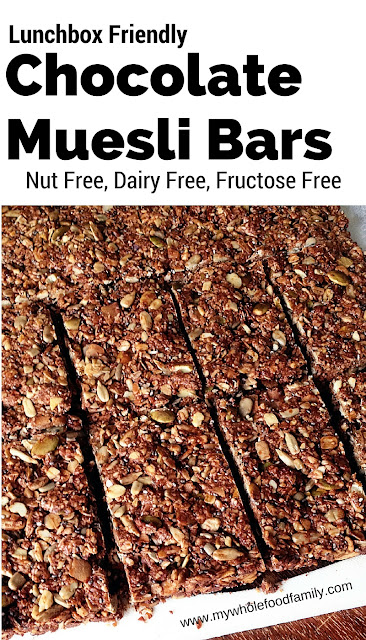
Lunchbox-friendly Chocolate Muesli Bars (Nut, Dairy and Fructose Free)

Lunchbox friendly chocolate muesli bars - nut free dairy free fructose free - from www.mywholefoodfamily.com

I've been making these muesli bars for the kids for years now but with all 3 kids off to school or daycare this year (sob) I can officially call them 'lunchbox friendly.'

If you want to eat fewer processed foods, then making your own snacks like these is a great place to start.

Store bought muesli bars, especially the ones plastered with statements like 'no added sugar', '99% fat free' and 'no artificial colours or flavours' can be full of rubbish ingredients. (I will be doing a post on how to read product labels next month so keep an eye out for that!)

These use a mixture of seeds instead of nuts, coconut oil instead of butter and rice malt syrup instead of sugar. If you have no problems with dairy then use butter by all means and you could also replace the syrup with either honey or maple syrup (although this means they won't be fructose free).

They are absolutely delicious and really filling too so my kids will having one of these and a piece of fruit in their lunchbox for morning tea next week at school. It will keep them going for hours!

Chocolate Muesli Bars

140g rice malt syrup
90g coconut oil
2 1/2 cups rolled oats
1 cup shredded coconut
1 cup pumpkin seeds
1 cup sunflower seeds
1/4 cup chia seeds
1/4 cup sesame seeds
2 tbs raw cacao
3 ts vanilla extract
1/2 ts salt

Preheat oven to 160 degrees C / 140 degrees C fan-forced.

Line a 20 x 30 cm slice pan with baking paper and set aside.

TMX - melt together the syrup, coconut oil and vanilla extract for 2 minutes / 80 degrees / SP 2. Add all remaining ingredients and process for 20 seconds / SP 4.

No TMX? Melt the syrup, coconut oil and vanilla in a small pot over medium heat. Place all remaining ingredients in a large bowl and toss to combine. Pour over the syrup mixture and mix really well.

Tip the mixture into the prepared pan and press down well.

Bake for approximately 25 minutes. Use your nose with this one, the house will smell amazing and it will look evenly browned. Do not overcook!

Remove from the tin by lifting the baking paper on each side and slice into bars while still warm. Leave until completely cooled. Store in an airtight container or freezer.

Makes 16-20 but you can slice them into whatever size bars you need


Monday, January 18, 2016

My Sweet Corn Pancakes

Sweet corn pancakes with bacon © www.mywholefoodfamily.com

One of the very few vegetables my Mr 5 will eat (and I'm not counting chips as a vegetable because he won't touch homemade ones) is corn on the cob. But there is absolutely no way he will eat a muffin, pancake or anything else with pieces of corn in it.

I adore corn fritters with their sweet and savoury flavour and packed with herbs. But I accept that those won't get eaten and sometimes you have to compromise. I came up with these sweet corn pancakes and was delighted to see them gobbled up without a pause.

The secret is processing the corn with the eggs and milk to form a completely smooth puree. The small amount of coconut sugar enhances the sweetness but you could leave that out, add 1/2 ts salt and make them savoury instead. They would be delicious served with avocado and smoked salmon.

Hope your fussy eaters enjoy these as much as mine!

My Sweet Corn Pancakes

1 x 425g tin corn kernels, drained and rinsed
4 eggs
200ml rice milk*
2 cups wholemeal spelt flour
3 ts baking powder
2 ts coconut sugar
pinch salt
oil or ghee for frying

Place the corn kernels into the food processor and blitz until chopped. Add the eggs and milk and process for 30 seconds or so, scraping down the sides if you need to, until the mixture is completely smooth.

Add the dry ingredients and process until just combined. Use a spatula to scrap the sides and mix through an extra flour. * Add an extra tbs or so of milk if you feel the batter is too thick at this stage as all flours differ.

Heat a large frypan over medium heat and add the oil or ghee.

Once hot, place heaped tablespoons of mixture into the pan (I can fit 4 at a time) and cook for approximately 3 minutes each side.

Remove to a plate and keep warm as you repeat with the remaining mixture.

Serve with butter, syrup and crispy bacon.

Makes around 16 pancakes.

Friday, January 15, 2016

Welcome to My Wholefood Family


How exciting that you're here!

This blog has been a labour of love for 7.5 years but it is now time to change course and take things in a new direction. Actually, it's not really so new because if you've been reading along for awhile you will know as a family we have made some big (but simple) changes to the way we eat.

A few months ago I ran a survey asking readers why they are here, what they like and what they want to see more of. Thank you to all those wonderful people who replied, you made my day! The top 3 things you want to see more of are:

- switching the family to whole foods
- healthy food on a budget
- meal planning

I hear you.

Those are exactly my issues on a daily basis and I think together we can take some amazing steps this year!

To make sure you don't miss a recipe please update your RSS feeds!

This will still be predominantly a recipe blog. It's what I love. But I will also be sharing my tips and tricks on switching to, planning and shopping for whole foods.

I also really love making-over recipes. Like finding an amazing looking dessert in a magazine that is full of things we don't eat, and figuring out how to make it in a more whole foods way. So if you have a favourite recipe that you wish was a little (or a lot) healthier, send me an email and I will see if I can make it over for you. Same thing if you find a recipe from my archives that you would like to see made healthier or dairy free or whatever. Let me know.

So to answer your question, no I won't be removing any recipes from my archives. Even the ones full of white flour, white sugar or packaged foods. I love being to look back on what we were doing years ago, get nostalgic over how little and cute the kids were and honestly, get inspiration for dinner sometimes!

So in essence we have a new look and a new direction for the New Year.

I think it's going to be fun!

Monday, January 11, 2016

Pumpkin Boiled Fruit Cake


We're going old school with this one - and it doesn't get much more retro than a boiled fruit cake!

I know not everyone is a fan of fruit cake but we love them. They are very much a treat in this house though as being full of dried fruit they are also packed with sugar. I still had half a bag of mixed dried fruit leftover from making Christmas cakes and a visitor coming for morning tea so it seemed like to the perfect opportunity to make this again.

It is adapted from an old family recipe that I can remember my mum making in the 80s (yep I'm that old!). It is has no sweetener apart from the dried fruit (tick), wholemeal flour (tick) and mashed pumpkin (big tick for hidden veggies).

The pumpkin gives it a lovely warm colour and helps keep it moist, although unlike other fruitcakes this one is best eaten on the day or the day after baking but no longer. Even my pumpkin-hating husband and super fussy Mr 5 loved this and the entire cake was demolished between 6 of us.

I didn't do it this time around but I have been extra sneaky in the past and added a grated zucchini into the fruit mixture and it virtually disappears once boiled. Love those hidden veggies :)


Boiled Pumpkin Fruit Cake

450g organic mixed dried fruit (I used sultanas, raisins and currants)
125g butter
1 cup water
2 ts mixed spice (cinnamon, nutmeg and allspice)
2 cups wholemeal spelt flour
2 ts baking powder
1 cup cold mashed pumpkin
2 large eggs

Place the fruit, butter, water and spice into a large pot and bring to the boil over medium high heat. Let bubble for 5-10 minutes or until most of the liquid is gone and the fruit is plump and sticky. Allow to cool completely.

Preheat the oven to 170 degrees C / 150 degrees fan-forced. Grease and line a deep 8 inch cake pan and set aside.

Add the beaten egg and pumpkin and mix well.

Fold through the flour and baking powder (I never bother sifting but you can whisk them together in a bowl before adding if you like).

Pour the mixture into the prepared tin and bake for approximately 1 1/2 hours. Watch the top and cover with foil if it is getting too dark.

Cool in the tin and serve sliced with butter and a cup of tea.


Wednesday, January 6, 2016

Salsa Verde

Happy New Year everyone! How are you feeling about 2016? Tired and not ready to go back to work, or pumped and positive about what what the new year may bring? As for me, I am really excited about the big things that are happening this year. Oscar is going into grade 2, Charlie is starting prep and Noah is off to daycare for the first time. That will leave me with 3 child-free days (feeling a little sad about that) to really get stuck into my study (feeling great about that!).

In order to make it all run smoothly I will need to be really organised with food and shopping and I'm working on some planning tools to help with that. My health will also have to be a priority this year if I am going to have the energy to do everything I want and need to do.

While I don't set resolutions as such I do set intentions, and as always I intend to eat more vegetables, to really get a rainbow of colours on my plate every day. We tend to get stuck in a veggie rut and let's face it, the same old steamed vegetables served on the side of whatever protein we happen to be having that night can get boring.

For me the secret to eating and really enjoying salads and vegetables is a great sauce. If you can whip up a great homemade mayonnaise and a handful of different salad dressings you can make anything taste amazing.

Salsa verde literally means 'green sauce' and is a packed with the good stuff like fresh herbs, garlic and extra virgin olive oil. It is fantastic tossed through salad leaves and it makes a plate of steamed greens really sing. It is so good that I can (and do) eat spoonfuls of it straight from the bowl.


Salsa Verde
Slightly adapted from Taste

1/2 bunch flat leaf parsley
1/2 bunch basil
1 garlic clove, crushed
2 ts capers
zest of 1 lemon
3 tbs fresh lemon juice
1/2 cup extra virgin oil
salt and pepper to taste

Place the herbs, garlic, capers and lemon zest into the food processor and blitz until finely chopped (TMX 10 secs / SP 8, scraping down the bowl halfway).

Add the lemon juice and then with the motor running drizzle in the oil and process for about 30 seconds. Transfer to a glass bowl and store covered in the fridge for up to 3 days (if it lasts that long!)

This one is husband-approved so give it a go!

Related Posts Plugin for WordPress, Blogger...