Thursday, March 10, 2016

How to: Cook a Perfect Roast Chicken

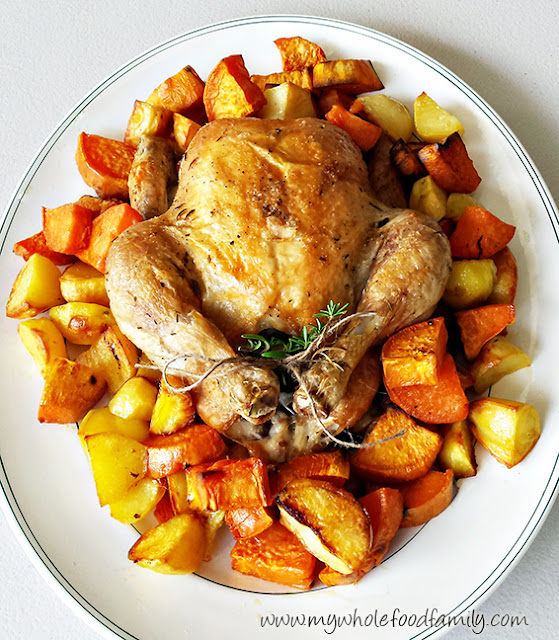
How To Perfect Roast Chicken from www.mywholefoodfamily.com

Whether it's a special occasion or just a Sunday roast, knowing how to cook a roast chicken is practically a life skill. What other food is as comforting and economical as the humble roast chook?

Growing up we regularly had roast chicken but apart from the drumstick it was never my favourite thing. The breast meat was always quite dry and powdery and without smothering it in gravy it didn't really have much flavour. But after learning a few simple tips and tricks I can finally say I have mastered the roast chicken and we have one every fortnight.

Forget buying a ready roasted chicken that is packed with nasty ingredients from the supermarket, my perfect roast chicken will become a staple at your place.

First things first, you need to choose the right chicken. If your budget allows then organic and free range is definitely the best and if you choose a large one it should give you enough meat for 2 dinners and a litre or so of broth from the bones.

To make sure you have enough meat for 2 dinners don't serve the chicken whole at the table. Instead carefully strip the meat off the bones and reserve some immediately. I allow just over half with roast vegetables for the first night then freeze the rest for risotto, stir-fry or just a salad loaded up with green veg, avocado and a great dressing. Don't forget to save all the bones for a broth - you can pop them straight into the slow cooker if you have one with some veggies and a few litres of water (I will be posting the full recipe for my bone broth soon so keep an eye out for that).

My top tips for a perfect roast chicken:

1. Check your timing - a good rule of thumb is to cook your chook at 190 degrees Celsius for 25 minutes per 500g plus an extra 20 minutes.

2. Flavour the chicken from the inside - lemon, onion, garlic and herbs are all brilliant.

3. Turn it upside down to rest - this will guarantee juicy breast meat.

4. Rest the meat for at least 20 minutes or anywhere up to half the cooking time, just cover with a few sheets of alfoil and a folded towel to keep in the heat.

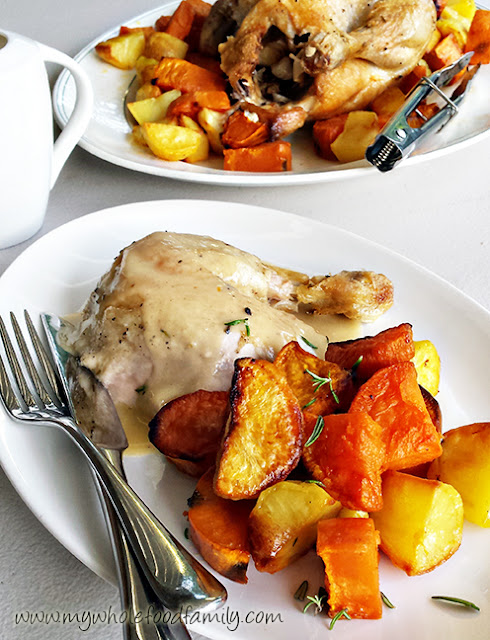
5. Use the pan juices to make amazing gravy - you will see in the recipe below what I do to make an easy chicken gravy.

How To Perfect Roast Chicken from www.mywholefoodfamily.com

My Perfect Roast Chicken

1.7kg chicken
1 onion, peeled and quartered
6 cloves garlic, smashed
1 tbs extra virgin olive oil
1 ts salt
1/2 ts cracked black pepper
1 sprig fresh rosemary or 2 sprigs fresh thyme, finely chopped
1 1/2 cups water

1.2 kg potatoes, sweet potato and pumpkin, cut into 4cm pieces
2 tbs duck fat
salt and pepper to taste

Preheat the oven to 190 degrees celsius. Place the duck fat into a large baking dish and put in the oven to heat up.

Place the chicken into another large baking dish (I use pyrex). Place the garlic and half the onion inside the cavity.

Pour the oil over the top of the chicken, sprinkle on the salt, pepper and rosemary and massage them all in well. Add the onion to the dish and pour in the water around the chicken (this will form the basis of the gravy later).

Carefully remove the hot baking dish from the oven and tip in the chopped vegetables. Use 2 spoons to toss the veggies in the duck fat, sprinkle with salt and pepper.

Place both baking dishes in the oven and roast for 1 hour 40 minutes.

Remove the dishes from the oven. Place the chicken onto a serving plate and using tongs, carefully turn the chicken upside down (breast side down). Cover with foil and leave to rest for at least 20 minutes.

To make an easy chicken gravy:

Pour the pan juices and the onion into the Thermomix bowl along with 25g butter, 25g white spelt flour and 1 ts vegetable or chicken stock paste. Cook for 5 minutes / 90 degrees / SP 3. The puree for 10 secs / SP 9. Check for seasoning.

Linking up with Domesblissity's Thriving on Thursdays.

Monday, March 7, 2016

Meal Plan Monday (7th March)


Oh Monday, you come around so quickly these days!

I'm one of those (seemingly) rare people who doesn't hate Mondays. It always seems like a fresh start to me - lots of things to do and a whole week to do them in. Plus all 3 of my boys happened to be born on a Monday so there's that!

I have decided to post my meal plans every second Monday from now on. We plan and shop fortnightly anyway so it makes more sense. It will also give you more of an idea of how I cook once- eat twice, as very often the meals in the second week are based on leftover bulk ingredients from the first week.

This Monday will be a big prep day as I am picking up our 20kg bulk meat order and packaging it all up for the freezer.  I will also prepare the vegetable base for the bolognaise sauce and mix up the spices for the curried sausages and burrito bowls.

What we are eating this fortnight ...

Monday - Peanut Sesame Noodles

Tuesday - Spaghetti Bolognaise

Wednesday - Curried Sausages

Thursday - Mexican Burrito Bowls

Friday - DIY

Saturday - Veggie Fritters

Sunday - Homemade gnocchi with mushrooms

Monday - Green Quiche

Tuesday - Butter Chicken (leftover from freezer)

Wednesday - Lasagna (bolognaise sauce leftover from freezer)

Thursday - Chicken stir-fry (roast chicken leftover from freezer)

Friday - Grain-free Pancakes with Strawberry Chia Jam

Saturday - DIY

Sunday - Roast Chicken and vegetables

Have a great week!

Thursday, March 3, 2016

My Mango Coconut Custard

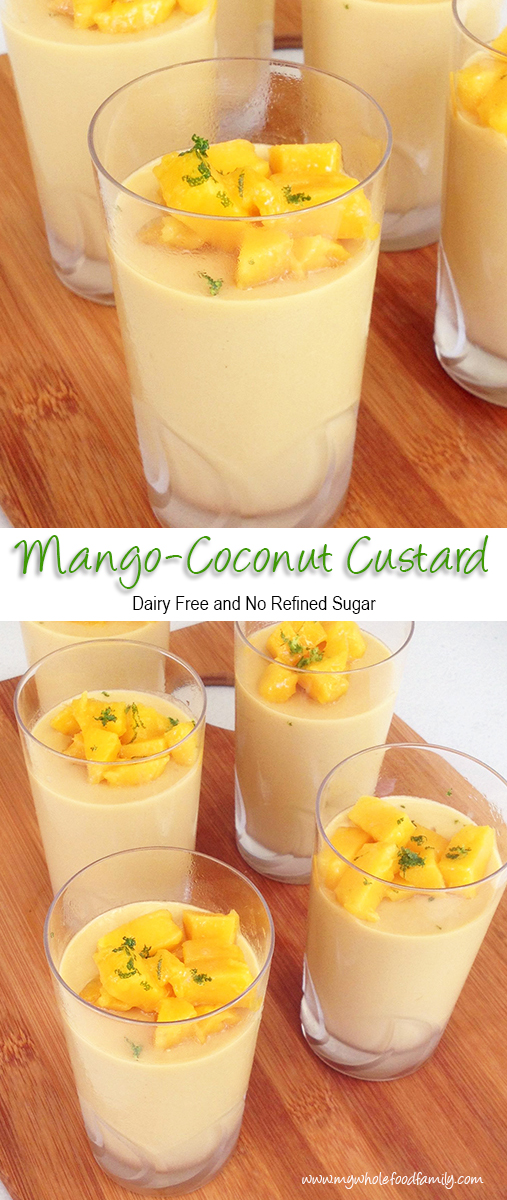
Mango Coconut Custard - dairy free - no refined sugar - from www.mywholefoodfamily.com

We may be officially in Autumn now but it hasn't cooled down one bit and we are still blessed with an abundance of summer fruit.

We've eaten our fair share of mangoes over the past few months - the kids always argue over who gets the seed and there are now lots of t-shirts with faint orange stains down the front. The last few mangoes in the fruit bowl were calling my name this week and I was determined to make something with them rather then just watch them get gobbled up.

Mango and coconut are a match made in heaven. Being dairy-free we use a lot of coconut milk and cream in this house, sometimes as a substitution for dairy but other times like this you really want that creamy lusciousness. My first thought was to make ice cream but our freezer has been a little unreliable lately and I wasn't sure the ice cream bowl would be frozen enough for it to work.


Anyone with a Thermomix will tell you it makes great custard, so that's what I decided to do.  And the result? Well this mango coconut custard went down a treat on a hot Autumn-but-feels-like-Summer afternoon.

My kids had theirs for afternoon tea but it would be the perfect dessert to serve after a Asian or Indian meal. Cool, sweet, fragrant and just delicious.

Enjoy!

My Mango Coconut Custard

2 ripe mangoes
500g coconut milk
3 eggs
40g arrowroot
75g rice malt syrup
20g coconut oil

Reserve half a mango and set aside.

Add the flesh of 1 1/2 mangoes and the coconut milk to the mixing bowl and process for 10 seconds / SP 8 or until completely smooth. Scrape down the sides of the bowl and add all remaining ingredients.

Cook for 8 minutes / 90 degrees / SP 4.

Pour into heatproof glasses and place in the fridge to chill completely

To serve, top with reserved mango (finely diced) and garnish with mint leaves or lime zest (optional).

Serves 5

Tuesday, March 1, 2016

Baked Banana and Blueberry Pancake


So baked pancakes. Did you know that was a thing? We love pancakes and pikelets in this house. I love that you can pack them full of good stuff and the kids still eat them. The kids love them just because they taste good.

Most days though we just don't have time to stand at the stove and cook pancakes 4 at a time in a pan. Enter baked pancakes. You mix up all the same ingredients, pour them into a preheated pan and cook in the oven for 20 minutes or so while you go and do something else. Brilliant!

My version uses lots of eggs, wholemeal spelt flour and the sweetness of banana, blueberries and a small amount of coconut sugar. I took it out of the oven just before I left for school pick up so it was ready to eat as soon as we all got home.

This was a delicious afternoon tea for my boys but it would be a perfect weekend brunch as well.

Happy baking!

Baked Banana and Blueberry Pancake
Adapted from All Recipes

3 eggs
1 large very ripe banana
1 tbs coconut sugar
1 ts vanilla extract
1 cup wholemeal spelt flour
1 ts baking powder
pinch salt
1/2 cup blueberries
4 tbs butter or coconut oil

Preheat the oven to 200 degrees celsius / 180 degrees fan-forced. Add the butter or coconut oil to a 20 x 30cm baking dish and place the baking dish into the oven to preheat as well.

Place the eggs, banana, coconut sugar and vanilla into a food processor or blender and blitz until smooth. Add the remaining ingredients (except the blueberries) and process for a few seconds until well combined, scraping down the sides if you need to.

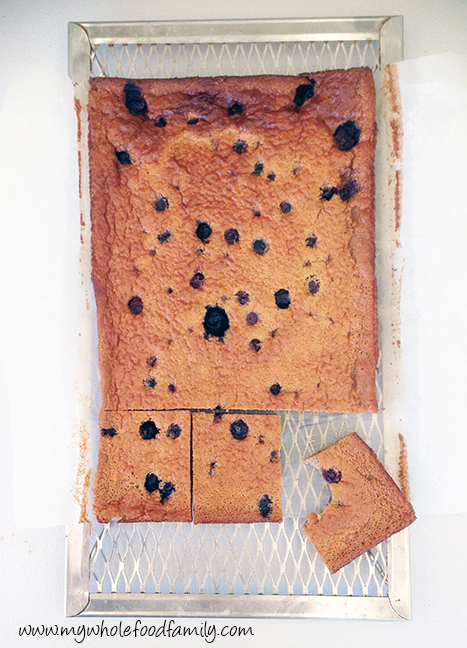
Carefully remove the hot pan from the oven and swirl it to coat the bottom evenly with the melted butter or coconut oil. Pour in the batter, scatter the blueberries over the top and return to the oven to bake for 20-25 minutes. It will be golden brown, puffed up and smell amazing.

Leave to cool in the tin for 10 minutes before slicing or leave to cool completely and serve at room temperature.

melt butter or coconut oil in pan

bake for 20 -25 minutes

Thursday, February 25, 2016

Dairy Free Spelt Chocolate Chip Muffins

Dairy free spelt chocolate chip muffins www.mywholefoodfamily.com

I actually can't remember the last time I baked anything with chocolate chips. Being dairy free my chocolate choices are quite limited and I tend to stick with blocks of 85% cocoa chocolate like Lindt or Green & Blacks which are naturally free of dairy.

But when I spotted these dairy free chocolate chips in the bulk section of the my health food store I had to grab some and make something for the boys. And what else to bake but chocolate chip muffins?!

I got 10 from this recipe but you could easily make 12 instead (I normally would) just by making them slightly smaller.

This is a simple and delicious recipe that is free from wheat, dairy, nuts and refined sugar.  Perfect for the after school munchies!

Spelt Chocolate Chip Muffins (Dairy free)

Wet ingredients:
2 eggs
1/3 cup coconut oil
1/3 cup coconut sugar
2 ts vanilla extract
3/4 cup rice milk

Dry ingredients:
1 2/3 cup wholemeal spelt flour
3 ts baking powder
pinch salt

Filling:
1/2 cup dairy free chocolate chips
2 tbs chocolate chips, extra

Preheat oven to 180 degrees / 160 degrees fan-forced.

Line a muffin tray with paper liners and set aside.

-----------

Thermomix instructions - add the wet ingredients into the bowl and mix for 5 secs / SP 4.

Add the dry ingredients and mix for 5 secs / Sp 4, scraping down the bowl if needed.

Add the 1/2 cup chocolate chips and mix for 4 secs / SP 3 / Reverse.

-----------

No thermomix? Combine the wet ingredients in a small bowl. Combine the dry ingredients in a large bowl. Pour the wet into the dry and mix until just combined.  

-----------

Spoon the mixture into the prepared tray and sprinkle the extra chocolate chips over the top.

Bake for 12-15 minutes or until the top springs back and they are evenly golden brown.

Turn out onto a wire rack to cool.

Makes 10-12 depending on the size of your muffin tray.

Monday, February 22, 2016

Pineapple Mango Salsa (SRC)


BBQ Pork Chops with Pineapple Mango Salsa from www.mywholefoodfamily.com


It's Secret Recipe Club time! I know it can't just be me, but the last Monday of the month seems to come around so quickly! Each month around 120 bloggers are assigned a blog in secret to peruse and choose a recipe to make. Today is Group D's turn to reveal their assigned blog and recipe.

This month I was thrilled to be assigned Fantastical Sharing of Recipes by Sarah who happens to be the fearless leader of the Secret Recipe Club. Sarah is married to Nick and they have 3 beautiful children, 2 cats and a dog. Definitely a full house! She is also a serious recipe hoarder and her blog is packed full of delicious sounding, family-friendly comfort food.

I liked the sound of the Atomic Hashbrowns but the kids aren't keen on spicy food so the Chubby Hubby Potatoes would be more their thing, though I've bookmarked both to try later. I was also really tempted by the 40 Clove Garlic Chicken and Classic Cabbage Rolls. But it is summer here after all and I just couldn't face any hot food so I started looking for something cool.

It has been stinking hot here the past few weeks. We've had a couple of 36 degree days (around 96 F) and it is just miserable being in the kitchen when it's that hot. So many times I've planned my meals for the week and then not made any of it because none of us felt like eating much. BUT not this time.

These barbecued pork chops topped with pineapple mango salsa were calling everyone's name. Is there anything more summery than this? (apologies to anyone knee-deep in snow right now).

Succulent pork was the perfect pairing for this light, fresh salsa. The kids loved having fruit for dinner and miracle of miracles, Mr 5 actually tried some pork! This is the kid that won't touch any meat except salami.

Thank you Sarah for such a simple but delicious recipe. This is one of our new family favourites.

Pineapple Mango Salsa
Recipe from Fantastical Sharing

1 1/2 cups fresh sweet pineapple, diced
1 mango, diced
1/2 red capsicum, finely diced
1/4 cup red onion, finely diced
2 tbs fresh coriander roughly chopped
juice of 1 lime
1 tbs extra virgin olive oil
pinch salt

Place all ingredients into a large glass bowl and toss to combine.

Refrigerate for 30 minutes before serving with grilled meat.

secret-recipe-club.blogspot.com


Menu Plan Monday (22nd February)

Menu Plan Monday www.mywholefoodfamily.com

Can you believe this is the last week of February? At this rate it will be Christmas before we know it!

We have most nights free this week but I also have a lot of work to do while the kids are at school and day care, and definitely don't want to be spending too much time on food preparation.

Are you following me on Facebook yet? I posted a pic of my big bake-off yesterday to get prepared for the week. All that baking means that lunchbox snacks and afternoon teas are already taken care of for the entire week which is awesome. I love feeling organised!

This week we will be eating ...

Monday - Veggie-loaded Spaghetti Bolognaise

Tuesday - Veggie fritters

Wednesday - Chicken stirfry

Thursday - Slow cooked shredded pork

Friday - DIY

Saturday - Brinner (pancakes, eggs, bacon, mushooms)

Sunday -  Homemade pizza

Have a great week!

Thursday, February 18, 2016

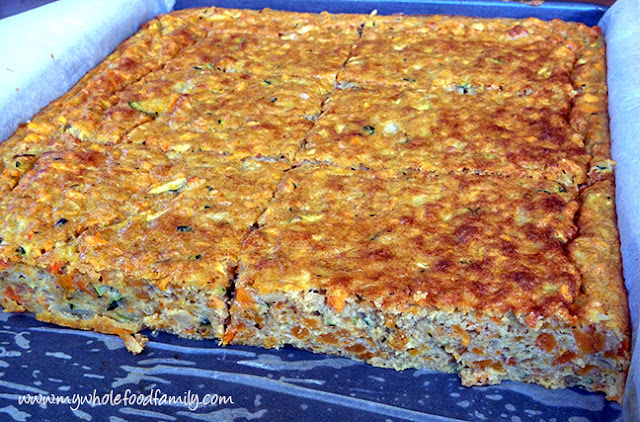
Curried Veggie Slice

Curried vegetable slice www.mywholefoodfamily.com

A few weeks ago we realised our fridge was suddenly not cold anymore so I baked up a storm, trying to use up everything that I could before it went bad. This was one of the results and it was absolutely delicious!

It's basically my take on a classic zucchini slice. Unfortunately not one of my children will eat zucchini slice, something I've found incredibly frustrating as it's such an easy meal and can be served hot for dinner or cold in lunchboxes.

I did have a small win with this recipe though, as after leaving out the bacon, swapping some of the veggies and adding some curry powder I called it a Curried Veggie Slice and my 6 year old loved it! Go figure.

I ate some for lunch straight away and froze the rest in single serves. It's been brilliant for my lunch on study days when I need something quick and filling.

Have you had any luck changing the name of something to get your kids to like it?

Curried Veggie Slice

1 onion, finely chopped
1 clove garlic, crushed
450g grated vegetables (I used sweet potato, carrot and zucchini*)
6 eggs
50g extra virgin olive oil
100g wholemeal spelt flour (or rice flour to be gluten free)
1 ts baking powder
1 tbs veggie stock paste
1 ts curry powder
1 tbs nutritional yeast flakes (or a handful of grated cheese if not dairy free)

Grease and line a 20 x 30cm slice pan with baking paper and set aside.

Preheat oven to 180 degrees C / 160 degrees fan-forced.

In a small bowl beat the eggs, oil, stock paste, curry powder and nutritional yeast until well combined. Place all other ingredients into a large bowl. Pour the egg mixture over the top  and mix well.

Pour the mixture into the prepared pan and bake for approximately 30 minutes or until golden brown and just set.

Leave to cool for at least 15 minutes before serving or refrigerate until needed. Great for lunchboxes.

*make sure you squeeze out the excess liquid from the zucchini before adding it otherwise your mixture will be very wet and the slice won't bake properly.

Monday, February 15, 2016

Menu Plan Monday (15th February)


We have a busy week with a few school functions and doctors appointments so dinners need to be easy and quick. Lots of components are already in the freezer like the meatballs and the chicken for the risotto. We usually do our DIY night on a Saturday but it needs to be on Wednesday this week. Being flexible is key!

Here's what is on the menu for us this week ...

Monday - Pork meatballs with rice noodles and greens

Tuesday - Chicken and corn risotto

Wednesday - DIY

Thursday - Curried sausages with cauliflower rice

Friday - Scrambled eggs, mushrooms and toast

Saturday - Homemade pizza

Sunday - Roast chicken and veg

Have a great week!

Sunday, February 14, 2016

Chocolate Bliss Balls (Nut free, Coconut free)

Chocolate Bliss Ball nut free coconut free www.mywholefoodfamily.com

Well love it or loathe it, today is Valentine's Day!

We don't really celebrate it as such but do tend to have something a bit more special for dinner and I will often bake something chocolate-y for us all to enjoy. This year, being determined to keep some treats in the freezer at all times for school lunches and afternoon tea, I decided to just make a batch of chocolate bliss balls.

Yep another bliss ball recipe. I love them! They really are perfect little morsels of deliciousness.

Our school doesn't have any nut restrictions so I don't really need to make things nut free but I think it's good to mix things up a bit so we're not eating the same things all the time. I tend to avoid dates as they are so high in fructose but as a treat now and then (and especially on Valentine's Day) I'm not going to worry about it, especially as they are also a great source of fibre and oh yeah, they're delicious!

The only reason these are coconut free is that we were almost completely out of coconut! Totally unheard of in this house as there is usually coconut in all forms - coconut milk, coconut cream, coconut oil, coconut water, shredded coconut and desiccated coconut #coconutaddict.

So whether you are celebrating Valentine's Day or not, I hope you had a wonderful day!

My (Nut free, Coconut free) Chocolate Bliss Balls

3/4 cup sunflower seeds
3/4 cup pumpkin seeds
2 tbs chia seeds
2 tbs raw cacao
1 ts vanilla extract
1/4 ts sea salt
1/2 cup dried dates
2 tbs coconut oil

Place all ingredients into a food processor and blend until the mixture is sticky and clumping together (TMX 10 secs / SP 8).  Using wet hands, roll the mixture into balls and store in the fridge or freezer.

Make approximately 16

Thursday, February 11, 2016

My Frozen Peanut Butter Cream Pie (Dairy Free)


I absolutely love peanut butter. I know lots of people do but unlike most people it's not something I grew up eating. In fact I don't ever remember having it as a kid. I do remember craving it when I was pregnant though and ate stacks of spelt toast with peanut butter and a sprinkle of sea salt all 3 times!

We only buy the good stuff these days, that is freshly ground 100% peanut butter with no oils or salt or anything else added. It's brilliant on crunchy green apple or even just straight from the tub on a spoon.

I was in the mood for something sweet and cool and peanut-buttery and came up with this gorgeous pie for dessert one weekend way back when I should have been packing for our move. I made it again last month and it was equally delicious. A crunchy chocolate base topped with smooth and creamy filling that was almost like ice cream. Yum!

I splurged on medjool dates for this which you can find in the fresh food section of Coles and Woolies near the herbs. You could definitely use regular dried dates instead they may just take a little extra blitzing for the filling to become really smooth.

This sets hard in the freezer so be sure to take it out at least 20 minutes before serving.

Enjoy!

My Frozen Peanut Butter Cream Pie (Dairy Free)

Base:
200g raw almonds
75g medjool dates
20g coconut oil
20g raw cacao
pinch salt

Place all ingredients into the food processor and blitz until the mixture forms sticky crumbs (TMX 30 secs / SP 5). Press the mixture into the base of an 8 inch spring form pan lined with baking paper and place into the freezer while your prepare the filling.

Filling:
200g natural peanut butter
60g medjool dates
270ml coconut cream
30ml milk of choice
20g maple syrup or raw honey

Wipe out the processor (no need to wash it) and add all ingredients. Process until smooth, around 30 seconds to 1 minute depending on your machine (TMX 30 secs / SP 7). Pour over the prepared base and place back into the freezer to set for 4-6 hours or overnight.

Remove from the freezer at least 20 minutes before serving.

Serves 8
Related Posts Plugin for WordPress, Blogger...